
Use this comprehensive checklist to plan, install, and verify a safe, efficient dryer vent in Somerville, New Jersey. From materials and routing to weatherproofing and testing, you will find stepwise items you can check off to ensure a robust installation that performs well through humid summers and cold winters. To streamline the process, you can also reference a local pro’s proven workflow for a complete dryer vent installation checklist tailored to homes in and around Somerville.
Pre-Planning and Assessment
- Identify dryer type and outlet location; measure the space behind the dryer to prevent crushing the transition duct.
- Confirm required duct diameter (typically 4 inches) and total allowable length per the dryer manufacturer.
- Choose the shortest, straightest path to an exterior termination. Favor wall exits over roof when possible for easier weatherproofing.
- Inspect walls and framing for obstructions: plumbing, electrical, and structural members.
- Decide on materials: rigid or semi-rigid metal for permanent runs; UL-listed transition duct for the dryer connection.
- Document the planned route with photos or a simple sketch to aid installation and future maintenance.
Materials and Tools Checklist
- Rigid or semi-rigid 4-inch metal duct sections and elbows
- UL-listed transition duct and clamps
- Dryer-rated exterior hood with a backdraft damper (no screen)
- Foil-faced aluminum HVAC tape; metal straps and hangers
- Drill/driver, hole saw or masonry core bit, tin snips
- Stud finder, level, measuring tape, marker
- Weather-resistant sealant and flashing
- Insulation sleeve for unconditioned segments (attic, crawlspace, overhangs)
Routing and Termination
- Keep elbows to a minimum; substitute two 45-degree bends for one 90 if needed.
- Maintain a slight downward slope toward the termination to discourage condensation pooling.
- Ensure the exterior hood opens freely and faces a clear area away from dense shrubs or snow collection zones.
- Avoid terminating under decks or near corners where wind eddies could blow lint back toward the home.
- Do not vent into attics, crawlspaces, garages, or interior spaces.
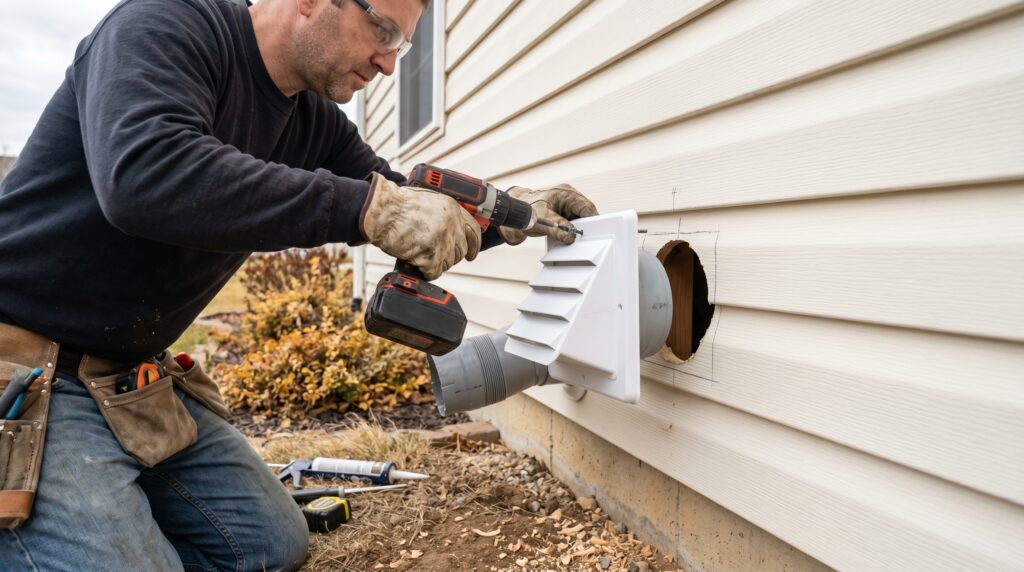
Cutting and Penetrations
- Mark the centerline from indoors; drill a pilot hole to confirm location and exterior clearance.
- Cut the opening carefully, supporting masonry where needed to avoid cracking.
- Dry-fit the termination hood and confirm free damper movement before final fastening.
- Integrate flashing and apply exterior-grade sealant to weatherproof the penetration.
Duct Assembly and Sealing
- Attach a rigid starter collar to the transition duct behind the dryer.
- Orient male-to-female joints in the airflow direction to reduce lint snags.
- Use clamps where appropriate and seal all seams externally with foil-faced aluminum tape—never cloth duct tape.
- Avoid screws through the duct wall that project into the airstream.
- Support long runs with metal straps, keeping the duct straight and elevated off surfaces.
Insulation and Condensation Control
- Add insulation sleeves around duct sections in attics, crawlspaces, or other cold areas.
- Maintain slope to carry any incidental moisture toward the exterior hood.
- Check that the hood design sheds rain and snow and seals well against wind-driven drafts.
Testing and Verification
- Run the dryer on a warm cycle and feel for strong, steady airflow at the exterior termination.
- Observe the damper opening; it should swing fully and close when the cycle ends.
- Inspect for leaks at joints; reseal with foil-faced tape if you feel air escaping.
- Slide the dryer back slowly to avoid crushing the transition duct and recheck airflow afterward.
Performance Optimization
- Shorten the route or reduce elbows if airflow seems weak.
- Replace crushed or damaged duct sections with smooth metal.
- Consider a booster fan only if the manufacturer’s maximum equivalent length is exceeded and the fan is rated for dryer exhaust and remains accessible.
Maintenance Schedule
- Clean the lint screen every load.
- Inspect the exterior hood monthly; clear lint and confirm damper action.
- Brush-clean the duct at least annually and any time you notice extended drying times.
- After renovations or appliance changes, re-verify alignment and seals.
Mid-Project Quality Check
Before you close up walls or reinstall finishes, do a mid-project check against this list: Are all joints tight and taped? Is the route as straight and short as possible? Is access for cleaning preserved? If anything looks questionable, it is wise to book a quick local review focused on dryer vent installation experts who can validate airflow and safety while adjustments are still easy.
Somerville-Specific Tips
- Historic homes may require creative routing to avoid structural members; take photos of the final path for future reference.
- On shaded or windy sides of the house, choose a robust hood and confirm the damper seals tightly.
- Where snow accumulates, position the termination high enough to avoid blockage.
- Insulate cold runs to prevent condensation drips that can stain siding or ceilings.
Frequently Asked Questions
Q: What length is too long? A: Follow your dryer manufacturer’s maximum equivalent length, counting elbows. Shorter and straighter is always better.
Q: Can I share the dryer vent with a bathroom fan? A: No. Each appliance requires its own dedicated vent to the outdoors.
Q: Are plastic ducts acceptable? A: No. Use smooth metal duct for the permanent installation and a short UL-listed transition duct at the dryer.
Q: How do I know if the damper is working? A: During a test cycle, you should see it open fully. When the dryer stops, it should fall closed to block drafts and pests.
Q: Do I need to seal the exterior hood flange? A: Yes. Use exterior-grade sealant and proper flashing to shed water and protect the wall.
Q: What if I smell something burning? A: Stop the dryer, unplug it, and inspect the vent for obstructions. If unsure, seek immediate professional help.
Ready for a Smooth, Code-Conscious Install
Check off each item and your dryer will reward you with faster cycles, safer operation, and lower moisture in the laundry area. If you would like a thorough walkthrough, final verification, and neat finishing touches that hold up through New Jersey weather, reach out to a trusted local team to complete your dryer vent installation with confidence.
PREVIOUS: Dryer Vent Installation Rules For Somerville New Jersey Businesses
NEXT: Homeowner Guide To Dryer Vent Installation In Somerville New Jersey
