
Introduction
A successful duct system does not happen by accident—it is the result of a disciplined, step-by-step process. In Somerville, New Jersey, where homes contend with humid summers and frosty winters, a detailed approach ensures quiet operation, consistent temperatures, and efficient energy use. This guide breaks the project into clear phases so homeowners, remodelers, and property managers can understand what to expect from start to finish. If you want seasoned hands to manage the process and verify every checkpoint, consider professional air duct installation to keep the project on schedule and aligned with local standards.
Phase 1: Assessment and Goal Setting
Every project begins by defining what success looks like. Are you eliminating hot and cold spots? Replacing leaky or noisy ducts? Adding conditioning to a finished attic or basement? Understanding these priorities sets the performance targets for airflow, noise, and air quality.
During assessment, inspect the existing system (if any). Note duct sizes, materials, support methods, and obvious restrictions. Pay attention to return pathways: inadequate returns are a common cause of uneven rooms and blower noise. Photograph problem areas and gather equipment data (blower size, coil type) to inform the design phase.
Phase 2: Design and Sizing
Design translates goals into a routed, sized system. Draw a floor plan that shows trunk lines, branches, supply registers, and returns. Determine target airflow (CFM) for each room based on size and exposure, then select duct sizes and fittings that achieve those flows with acceptable static pressure.
Keep equivalent length calculations in mind—tight elbows and wyes add resistance. Where space is tight, use long-radius fittings and smooth transitions. Balance acoustics by avoiding high-velocity outlets in bedrooms and study areas. Plan for manual balancing dampers near branch takeoffs so you can tune the system after startup.
Phase 3: Permits and Scheduling
Contact your local building department to determine whether permits and inspections are required and to coordinate rough-in and final inspections if necessary. Schedule the work in logical order: demolition and access creation, rough-in ducting, sealing and insulation, equipment set or tie-in, testing and balancing, and finish trim. Communicate with other trades—framers, plumbers, electricians—to prevent conflicts and rework.
Phase 4: Procurement and Staging
Order materials and stage them thoughtfully. Common items include sheet metal trunks, insulated flex for branches, takeoffs, collars, wyes, elbows, boots, dampers, hangers, UL 181 foil tape, and duct mastic. Label boxes by room or zone so installers can move quickly and keep the site organized.
Inspect materials for damage and verify quantities before starting. Confirm that insulation R-values meet local requirements for unconditioned spaces such as attics, garages, or crawlspaces.
Phase 5: Equipment and Plenum Setup
Set the furnace or air handler securely, respecting clearances to combustibles and providing adequate service access. Build or install supply and return plenums sized to keep velocities reasonable and transitions smooth. A quiet, efficient system begins here: a cramped or turbulent plenum can cause noise and elevated static pressure that ripple through the entire installation.
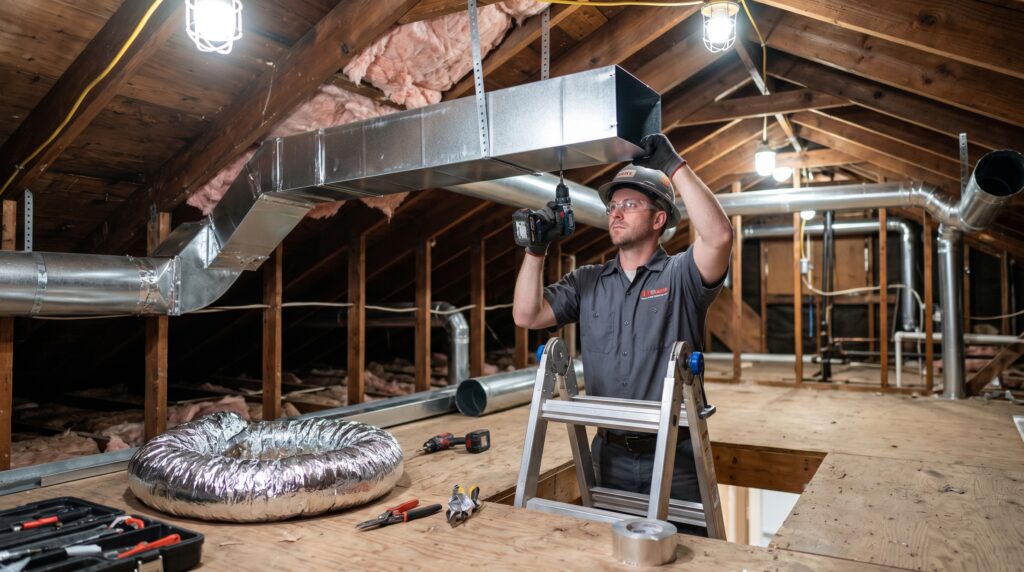
Phase 6: Main Trunk Rough-In
Run the supply and return trunks along the planned routes. Keep them straight, level, and well-supported, using long-radius elbows where possible. Mechanically fasten joints with screws or cleats, then seal all seams and screw penetrations with mastic. Proper sealing during rough-in prevents disappointing leakage results later.
Where ducts pass through fire-rated assemblies, install firestopping and any required dampers or sleeves. Maintain clearances around chimneys and flues, and coordinate with electricians and plumbers to avoid conflicts.
Phase 7: Branch Runs and Boot Installation
Install takeoffs from the trunks to each room. For rigid branches, crimp and bead as needed, then secure and seal. For flex branches, pull the inner liner tight, band it securely to the collar with mastic, and keep the run as straight and short as practical. Support flex with wide hangers to avoid compression and noise.
Place boots at floor, wall, or ceiling locations. Frame and seal openings to prevent air leakage and drafts. Temporarily cap boots to keep debris out during construction.
Phase 8: Sealing and Insulation
Air sealing is mission-critical. Even small leaks compound into lost comfort and higher run times. Brush mastic over seams, fittings, and screw heads, and use UL 181 foil tape where appropriate before mastic overlay. In unconditioned spaces, insulate ducts to required R-values, ensuring vapor barriers are intact to prevent condensation during humid summers.
Phase 9: Supports, Clearances, and Details
Verify that all ducts are supported at code-compliant intervals and that hangers do not compress insulation. Check clearances from appliances, flues, and electrical equipment. Label dampers for future balancing and take photos of concealed junctions. These details support long-term reliability and easier service.
Phase 10: Testing and Balancing
With rough-in complete, start the system and evaluate performance. Measure static pressure at the supply and return plenums. Inspect for audible leaks and use a smoke pencil, if available, to detect small leaks at seams. Measure airflow at registers with an anemometer or balancing hood, then adjust dampers to match room targets.
Document damper positions and note any rooms that need further attention. Balanced airflow today means fewer callbacks and better comfort tomorrow.
Phase 11: Final Inspection and Trim
Coordinate the final inspection with the local authority if applicable. Install register grilles and confirm that filter access is convenient and clearly labeled. Review the system map, damper settings, and maintenance schedule with the homeowner or building manager.
Quality Standards to Aim For
Set benchmarks for leakage, static pressure, and acoustics. While specific targets vary by equipment and layout, the goal is consistent temperatures across rooms, quiet operation at typical blower speeds, and clean seams that show careful workmanship. The right standards ensure satisfaction long after the project wraps up.
Risk Management and Troubleshooting
Even a well-planned project can run into surprises—hidden beams, last-minute layout changes, or a register that ends up behind a built-in. When the unexpected happens, step back and revisit goals: preserve airflow, avoid noise, and maintain access. Sometimes a small reroute, a larger branch, or an added return can solve a stubborn comfort problem.
In tight timelines or complex retrofits, engaging professional air duct installation services for design verification, pressure testing, and balancing can turn a challenging job into a predictable success.
Somerville Considerations: Climate and Construction
Many Somerville homes have basements ideal for mechanical spaces, but some rely on attics or sealed crawlspaces for distribution. Each pathway has unique concerns. In attics, prioritize insulation and vapor barriers to prevent summer condensation. In basements, protect ducts from accidental impacts and check for moisture issues along foundation walls. For crawlspaces, ensure ground moisture control is in place and supports keep ducts above potential standing water.
Seasonal shifts also matter. In winter, tightly closed homes can develop pressure imbalances if returns are scarce. In summer, long runs across hot spaces can under-deliver without adequate insulation. Plan and build with these realities in mind.
Maintenance Handoff
A great installation includes a great handoff. Provide a system map, filter sizes, and suggested maintenance intervals. Show how to adjust dampers seasonally if needed, and review signs that indicate it is time for service—rising energy use, unusual noise, or uneven comfort.
Frequently Asked Questions
Q: How long does a full duct installation take? A: Timelines vary by home size and complexity, but a well-coordinated retrofit often spans several days to a couple of weeks from demolition to balancing and trim.
Q: Which is better—metal or flex? A: Rigid metal offers durability and superior control of static pressure for trunks, while flex is convenient for short branches when installed taut and well-supported. Many top-performing systems combine both.
Q: Do I need permits? A: Many jurisdictions require permits and inspections for ductwork alterations or replacements. Check with your local building department before starting.
Q: Why is return air so important? A: Without adequate return pathways, rooms can become pressurized or starved, leading to noise, uneven temperatures, and reduced equipment efficiency.
Q: How do I prevent condensation on ducts? A: Insulate cold ducts in hot, humid spaces and maintain a continuous vapor barrier. Repair jacket tears promptly and address high humidity in attics or crawlspaces.
Q: What if my static pressure is high? A: Look for undersized branches, tight elbows, dirty filters, or significant leakage. Adding a return or increasing duct size may be necessary to bring static into the recommended range.
Move Forward with Confidence
When each phase is completed with care—assessment, design, rough-in, sealing, insulation, testing, and handoff—the result is a quiet, efficient system that delivers comfort across the seasons. If you want start-to-finish accountability and proven workmanship, schedule expert air duct installation and enjoy the peace of mind that comes with a process-driven approach.
PREVIOUS: Air Duct Installation Guide For Beginners In Somerville New Jersey
