
Installing a dryer vent in a Somerville, New Jersey home requires careful planning, the right materials, and precise execution to ensure safe, efficient airflow. While it might seem like a straightforward project, the details matter: total run length, number of elbows, duct type, termination style, and sealing method all affect performance and safety. If you prefer a professional touch from the start, consider scheduling expert dryer vent installation so your system is routed, sealed, and tested to local best practices.
This detailed walkthrough covers the complete process from assessment to final checks, tailored to common Somerville home layouts. Whether your laundry area is in a basement, on the main level, or tucked inside a closet, use these steps to understand what a quality installation involves and how to prepare.
Step 1: Assess the Space and Constraints
Start by identifying the dryer location, the exterior wall or roof nearest to it, and obstructions that could affect routing. Check framing directions, plumbing runs, electrical lines, and any HVAC ducts that share pathways. The best route is short and straight. In older Somerville homes, anticipate tighter framing, plaster walls, or brick exteriors that require careful drilling and sealing techniques.
Measure the distance to the exterior and note how many direction changes are necessary. Each elbow adds equivalent length and resistance, so the goal is to minimize turns. Consider moving the dryer slightly if it dramatically shortens the path.
Step 2: Choose the Right Materials
Use rigid metal duct for the primary run to the exterior to promote airflow and resist crushing. A short length of listed flexible transition duct may connect the dryer outlet to the wall, but it should be as short and straight as possible. Acquire high-temperature foil tape for sealing joints, appropriate clamps for transition connections, and a quality exterior termination with an integral backdraft damper and no screen.
If the run passes through cold or unconditioned areas, plan for strategies that reduce condensation risk per manufacturer guidance. Consider appropriate supports to maintain slope and prevent sagging, which can trap lint.
Step 3: Map the Route and Confirm Code Considerations
Before cutting openings, map out the duct path on paper and on the walls or framing using painter’s tape. Verify that the total equivalent length will fall within the dryer manufacturer’s limits. Identify framing members you must avoid and plan hole sizes to accommodate duct while maintaining structural integrity.
In multifamily or townhome configurations common in parts of Somerville, fire-resistance-rated assemblies may be present. Penetrations should be made and sealed in accord with local requirements to maintain ratings where applicable. Consult documentation as needed to confirm compliant methods.
Step 4: Prepare the Dryer Area
Shut off the dryer and unplug it. If it is a gas dryer, close the gas valve and observe all safety precautions. Pull the dryer away from the wall carefully without crushing the transition duct. Vacuum lint and dust to create a clean working area and protect nearby surfaces. Remove the old transition and wall connection if replacing an existing vent.
Gather tools: hole saws or masonry bits for exterior penetration, metal snips for cutting duct, a drill/driver, tape measure, level, and safety equipment such as eye and ear protection. Keep the work zone tidy to prevent damage to flooring and finishes.
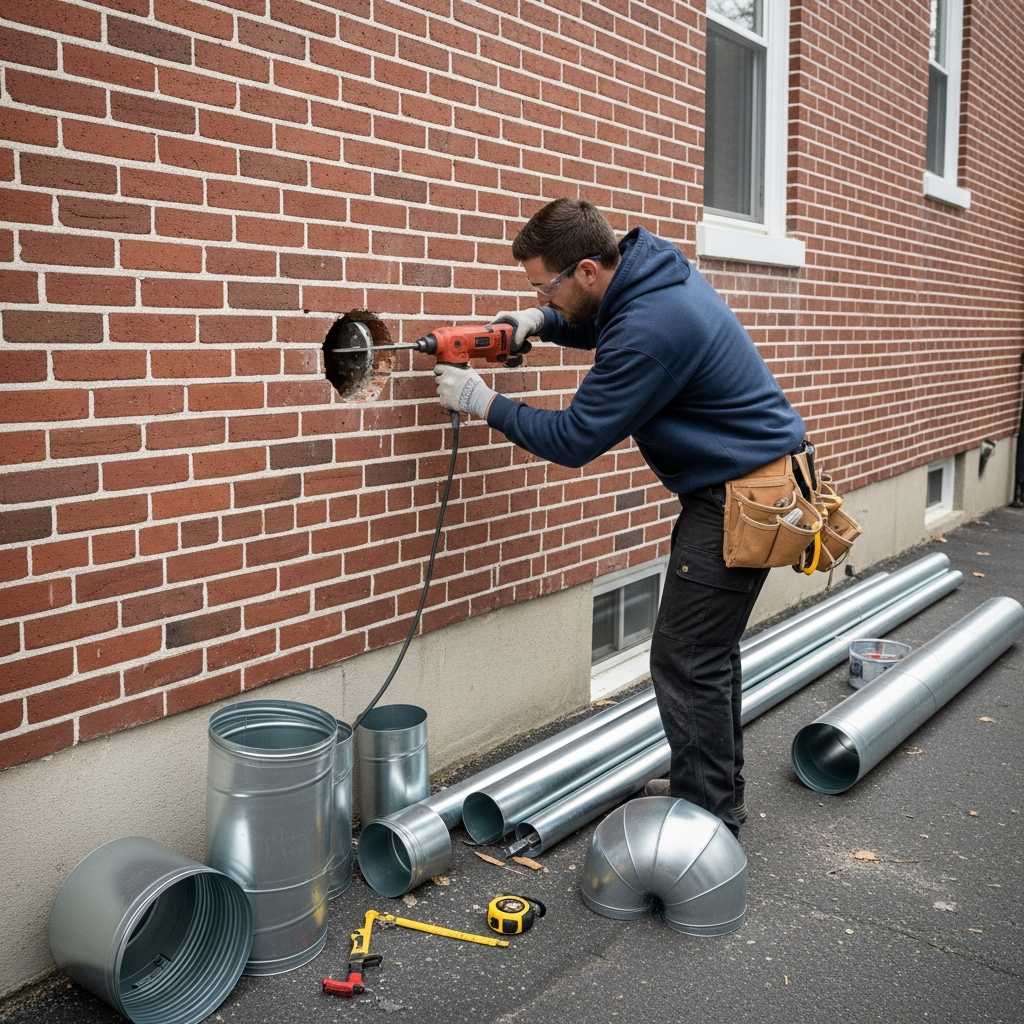
Step 5: Create the Exterior Penetration
Carefully drill a pilot hole from inside to mark the intended termination point. Confirm there are no conflicts with utilities or structural elements before enlarging the hole. For wood siding, a hole saw matched to the duct size creates a clean penetration; for brick or masonry, use appropriate masonry bits and take your time to avoid cracking.
Dry-fit the termination cap to ensure a snug fit, then install it with the integrated damper oriented correctly. Flash and seal the exterior flange per cladding type to prevent water intrusion. The termination should be clear of obstructions, at a suitable height, and positioned so the damper can open freely.
Step 6: Install and Seal the Duct Run
Work from the dryer location toward the exterior, assembling rigid duct sections with smooth, aligned joints. Where elbows are required, use gentle, long-radius fittings and keep turns to a minimum. Support the duct at appropriate intervals to prevent sagging. Avoid using screws that penetrate the airstream; instead, secure joints with listed foil tape that can withstand dryer heat and maintain an airtight seal.
Confirm that the duct slopes slightly toward the termination where recommended to discourage condensation from draining back into the dryer. Keep the run accessible where possible for future cleaning.
Step 7: Connect the Transition Duct
At the dryer outlet and the wall connector, attach a short, straight piece of listed transition duct. Use proper clamps to secure the connections. Avoid kinks, crushing, or sharp bends that will restrict airflow. Push the dryer back into place gradually, watching that the transition remains clear and unobstructed.
Measure the final clearance behind the dryer to confirm it is not overly tight. In tight laundry closets, a recessed dryer vent box can create extra space and protect the transition duct from damage.
Step 8: Test Airflow and Operation
Run the dryer on a timed cycle and check airflow at the exterior termination. The damper or louvers should open briskly during operation. Listen for rattles that indicate loose joints and inspect for air leaks along the run. Verify that the dryer completes a cycle without error codes and that the laundry area does not overheat.
Capture a simple drawing or photo record of the final route for future reference. Good documentation helps with maintenance and troubleshooting down the road.
Step 9: Clean Up and Educate
Vacuum debris, dispose of old materials, and wipe down surfaces. Share or note care instructions: clean the lint trap after each load, inspect the termination seasonally, and plan periodic professional vent cleaning. Explain warning signs such as longer drying times, musty smells, or a damper that barely opens, which suggest the need for service.
Homeowners who understand the system are more likely to keep it running safely and efficiently for years.
Common Mistakes to Avoid
Do not vent into attics, crawlspaces, or garages; always terminate outdoors. Do not use plastic or vinyl ducting, which can sag and trap lint. Avoid excessive elbows and long runs. Do not rely on screws that penetrate the duct interior, and never install a screened termination that can clog with lint. Each of these errors raises fire risk and reduces performance.
If your home layout forces a challenging route, consult a professional who can propose compliant alternatives. Somerville homes often benefit from minor framing adjustments or a different termination location to maintain proper airflow. When in doubt, a local pro can validate your plan and, if needed, provide turnkey dryer vent installation that meets the manufacturer’s specifications.
Maintenance After Installation
Even a perfectly installed vent needs routine care. Clean the lint screen every load, vacuum the dryer cavity and behind the unit periodically, and schedule vent cleaning based on laundry volume and route complexity. Regular checks after storms or freeze-thaw cycles help ensure the termination operates freely and remains sealed against the elements.
Track any changes in drying time or temperature in the laundry area. Small shifts can signal buildup or a developing restriction that deserves attention before it becomes a safety issue.
Frequently Asked Questions
Q: How short should my dryer vent be? A: Keep the run as short and straight as possible while staying within manufacturer limits for equivalent length. The exact maximum varies by model.
Q: What is the best duct material? A: Rigid metal duct for the long run is preferred for airflow and durability, with a short section of listed transition duct between the dryer and wall connection.
Q: Can I vent a dryer through the roof? A: Wall terminations are often preferred to reduce length and ease maintenance, but roof terminations are possible when properly installed. They require secure flashing and regular checks to ensure the damper operates and the cap remains clear.
Q: Do I need to insulate the duct? A: Where the duct crosses cold or unconditioned spaces, consult manufacturer guidance to address condensation risk appropriately. The main goals are maintaining airflow and preventing moisture problems.
Q: How often should I schedule cleaning? A: Many households benefit from annual cleaning, though heavy laundry use or longer runs can require more frequent service. Pay attention to drying times and exterior damper movement.
Q: Is flexible duct okay for the entire run? A: No. Flexible duct is not recommended for the long run because it increases friction and catches lint. Use it only as a short, straight transition where allowed.
Schedule Service with Confidence
If you would rather a seasoned pro handle the details—from planning and drilling to sealing and final testing—choose a local team that understands Somerville homes. With the right tools and techniques, your dryer will run safer and more efficiently. Contact a trusted provider today for reliable dryer vent installation and enjoy peace of mind with every load.
