
Installing a safe, efficient dryer vent in Somerville, New Jersey is a smart upgrade that improves drying performance, reduces energy waste, and lowers fire risk. This comprehensive how-to walks you through planning, materials, routing, and step-by-step installation tailored to homes and small buildings around the borough. If you prefer expert help from the start, consider professional dryer vent installation to ensure strong airflow, weather resilience, and code-conscious results.
Somerville homes range from historic structures to modern townhouses, which means no two vent routes are the same. Older homes may have thick masonry walls and tight crawlspaces; newer homes might offer easier attic or rim-joist runs but stricter energy details to preserve. This guide balances practical instructions with safety practices that work across building styles and seasons in central New Jersey’s humid summers and chilly, windy winters.
Why Proper Dryer Venting Matters
A properly installed dryer vent removes moist, lint-laden air from the dryer to the outdoors, preventing moisture damage, mold, and lint buildup. Good venting helps clothes dry faster, keeps utility bills in check, and reduces wear on the appliance. Poorly installed or long, restrictive ducts create backpressure that increases cycle times and overheating risk. Over time, lint accumulation in hidden areas can become a severe hazard.
In Somerville’s climate, moisture control is especially important. Warm summer air holds more water vapor, so a weak exhaust path can saturate laundry spaces. In winter, cold exterior surfaces encourage condensation inside ducts if the run isn’t properly sloped and insulated where necessary.
Key Principles and Local Considerations
- Use smooth-walled metal ducting: Rigid or semi-rigid metal promotes airflow and resists crushing. Avoid plastic or foil flex duct for permanent runs.
- Shortest, straightest route: Fewer elbows and shorter lengths reduce static pressure, improving dryer efficiency.
- Proper termination: Exhaust to the building exterior with a backdraft damper. Do not discharge into attics, crawlspaces, garages, or interior spaces.
- No screens at the termination: Screens trap lint. Use a damper hood designed for dryer exhaust.
- Sealed joints: Use foil-faced aluminum tape approved for HVAC, not cloth duct tape. Do not use screws that penetrate the airstream and snag lint.
- Accessible for cleaning: Plan cleanout access points or gentle curves you can reach with a brush system.
- Somerville seasons: Wind, rain, and snow mean you should use a durable exterior hood and a snug wall or roof flashing detail.
Tools and Materials Checklist
- Rigid or semi-rigid metal duct sections and elbows
- UL-listed transition duct from dryer to the first hard duct
- Exterior termination hood with backdraft damper, no screen
- Foil-faced aluminum HVAC tape and metal clamps
- Tin snips or aviation snips; sheet metal crimper if needed
- Drill/driver, hole saw or masonry core bit (if venting through brick)
- Stud finder, level, measuring tape, marker
- Firestop or fire-block sealant where required
- Weather-resistant flashing and sealant for exterior penetration
- Insulation sleeve for unconditioned spaces if condensation is a concern
Planning the Route
Start by mapping the straightest line from the dryer to an exterior wall or roof. Horizontal wall terminations are often easier in Somerville’s wood-framed homes; masonry walls require careful drilling and sealing. Roof terminations add complexity and weatherproofing steps. Avoid running the duct through habitable rooms or long paths with multiple elbows. Each 90-degree elbow adds significant resistance; plan to minimize them or substitute two 45-degree bends where space allows.
Check for structural elements, electrical, plumbing, and gas lines before drilling. Maintain clearances from combustibles per product literature. If your dryer is gas-fired, ensure adequate combustion air and that the vent route does not block access to the gas shutoff.
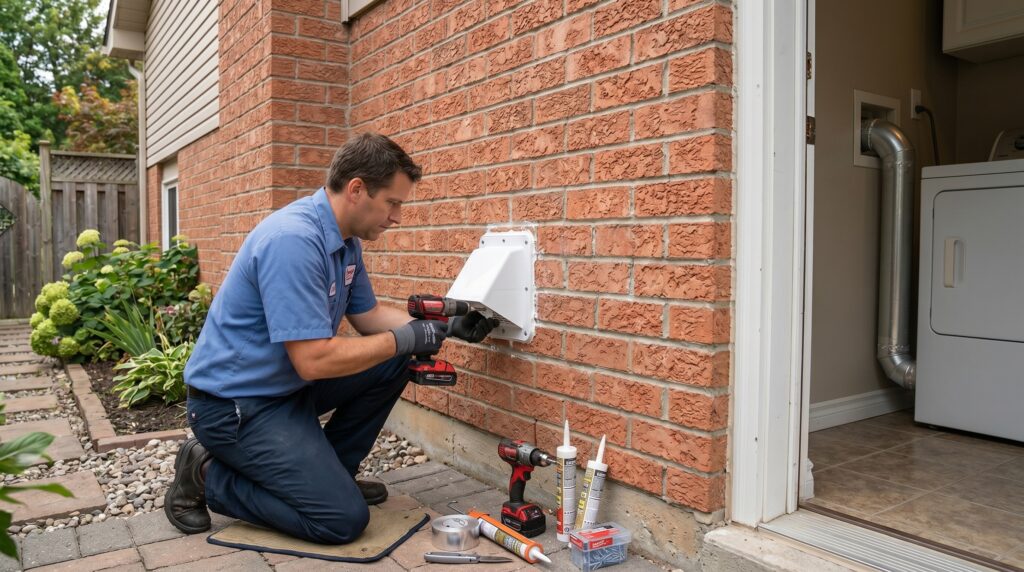
Creating the Wall or Roof Penetration
- Locate the center point from the interior, marking carefully. Drill a pilot hole to the exterior to confirm location and that no obstructions exist.
- Use a hole saw sized for the duct and termination collar. For brick or block, a masonry bit or core drill may be necessary, and patience is key for a clean hole.
- Dry-fit the termination hood. Ensure the damper swings freely and sits with a slight downward pitch to shed water.
- Apply exterior-grade sealant behind the hood’s flange and press firmly into place. Fasten per manufacturer instructions and integrate with flashing as needed.
Assembling the Duct
- From the dryer location, install a short, UL-listed transition duct to a rigid starter collar. Keep this segment as short and straight as possible.
- Dry-fit rigid or semi-rigid sections toward the exit point, observing airflow direction markings if present. Aim for gentle curves over sharp elbows.
- Crimp and slip-fit male-to-female ends in the direction of airflow (male ends facing away from the dryer) to reduce lint catching at seams.
- Secure joints with metal clamps where appropriate and seal seams externally with foil-faced aluminum tape.
- Support long horizontal runs with metal hangers to prevent sagging. Maintain a slight downward slope toward the termination to discourage condensation pooling.
At this stage, many homeowners in central New Jersey opt for a midway consultation to confirm route efficiency, termination choice, and sealing details. If you need a confidence check or prefer a turnkey approach, schedule a local assessment for Somerville dryer vent installation so airflow and safety targets are validated before you close up walls or finish surfaces.
Sealing, Insulation, and Weatherproofing
Where the duct passes through unconditioned areas such as attics, vented crawlspaces, or overhangs, consider an insulation sleeve rated for duct applications. Proper insulation can mitigate condensation during winter. At the exterior, integrate the termination hood with housewrap or existing siding details. Re-caulk and re-paint as necessary for a neat, long-lasting finish.
Testing the System
- Reconnect the dryer and confirm that the drum spins and heats before final positioning.
- Perform a basic airflow test by placing your hand at the termination. You should feel a strong, steady stream of warm air with minimal pulsing.
- Observe the damper for smooth movement; it should open fully under operation and close when the dryer is off.
- Check all joints for escaping air and reseal as necessary. Inspect for kinks behind the dryer when you slide it into place, maintaining adequate clearance.
Common Mistakes to Avoid
- Using long lengths of flexible foil duct in finished runs.
- Allowing screws to protrude inside the duct, catching lint and reducing flow.
- Terminating into attics, crawlspaces, or garages.
- Installing screens over the exterior hood, leading to clogs.
- Neglecting slope on horizontal runs, allowing condensation to pool.
- Forgetting access for cleaning and annual maintenance.
Maintenance and Cleaning
Even a well-installed vent requires periodic cleaning. In homes with frequent laundry or pet hair, plan inspections and light cleanouts multiple times per year. Clean the lint filter every load. Look for signs of poor airflow—longer dry times, a hot dryer cabinet, or a musty laundry room. Use a brush kit to remove lint from accessible sections and inspect the exterior hood for free damper movement.
Safety and Performance Tips
- Maintain adequate clearance behind the dryer to prevent crushing the transition duct.
- Label the vent path or take photos before closing walls to make future service easier.
- If a booster fan is required due to an unusually long route, select a model rated for dryer exhaust and install access for service. Confirm compatibility with the dryer manufacturer.
- Where local conditions bring high snowfall, keep the termination above anticipated drift levels and clear of landscaping.
- In homes with tight envelopes, crack a nearby window during first tests to rule out make-up air issues.
Troubleshooting After Installation
- Weak airflow at the exterior: Re-check for kinks, crushed ducts, or an elbow that shifted while pushing the dryer back.
- Damper sticks: Confirm the hood is installed plumb and clear of caulk or paint that binds the flap.
- Condensation dripping: Improve slope, add insulation where runs pass through cold spaces, and ensure the termination is not shaded in a way that fosters ice buildup.
- Persistent lint shedding outside: Inspect for a torn transition duct or loose joint near the dryer.
Frequently Asked Questions
Q: Can I reuse an existing vent path when replacing a dryer? A: Yes, if it is metal, smooth-walled, properly sized, and free of damage. Always clean it thoroughly and verify that the total length and elbow count still meet your dryer’s recommendations.
Q: Is foil or plastic flex duct acceptable for long runs? A: No. Use rigid or semi-rigid metal for permanent sections. Reserve short UL-listed transition duct for the connection right behind the dryer.
Q: How often should I clean the vent? A: Inspect visually every few months and plan a thorough cleaning at least annually, more often for large households or pets.
Q: Can the vent terminate under a deck? A: Avoid discharging where airflow is restricted or where lint could accumulate near combustibles. Choose an open, accessible exterior wall.
Q: Do I need a special roof cap for dryer exhaust? A: Yes, use a cap or hood specifically designed for dryer use with a backdraft damper and no screen. General-purpose roof vents are not suitable.
Q: What signs indicate a problem? A: Longer dry times, laundry room humidity, a hot dryer top, or a burning smell point to airflow restriction. Address immediately and consider a professional inspection.
Take the Next Step in Somerville
Whether you are replacing a faulty vent or installing one for a new laundry layout, a safe, efficient system pays you back with faster cycles and peace of mind. If you would like expert design, code-conscious routing, and a clean exterior finish that stands up to New Jersey weather, contact a trusted local team to schedule your dryer vent installation today. Get the airflow right once and your dryer will reward you with years of reliable service.
PREVIOUS: Dryer Vent Installation Troubleshooting In Somerville New Jersey
NEXT: Dryer Vent Installation Rules For Somerville New Jersey Businesses
