
Introduction: Expert Strategies to Protect Your Somerville Home
Dryer efficiency and safety depend on one crucial factor: unimpeded airflow from the appliance to the outdoors. Even diligent homeowners who empty the lint screen after every load may overlook the gradual buildup inside ducting, elbows, and termination hoods. That accumulation is more than a nuisance—it forces the dryer to work harder, wastes energy, and can lead to overheating. The expert tips below combine field-tested techniques with practical insights tailored to Somerville, New Jersey homes. Whether you tackle maintenance yourself or supplement with periodic professional dryer vent cleaning, these strategies will help you maintain strong airflow, consistent drying times, and a lower risk profile year-round.
Somerville’s climate puts unique pressures on vent systems. Summer humidity can make lint sticky, clinging to duct walls. Winter cold can stiffen exterior dampers and, in some cases, encourage frost around the cap that catches lint. Neighborhood features—trees shedding seeds, wildlife seeking warm nooks—add more variables. By applying the expert principles in this guide, you’ll know not only how to clean the vent, but also how to configure, monitor, and upgrade your system so problems become rare and easy to spot.
Tip 1: Map the Entire Airflow Path Before You Clean
Professionals start every job by identifying the complete route from dryer to outside. Sketch your layout: the dryer’s exhaust collar, the transition duct, the duct run through walls or ceilings, each elbow or offset, and the final termination at a wall hood or roof cap. Note the estimated length and the number of turns. Complex routes are common in older or remodeled Somerville homes, where laundry spaces were adapted rather than designed from scratch. Knowing the path helps you plan tool access, anticipate debris catch points at elbows, and decide whether you need inside and outside help for a push-pull cleaning method.
As you map, look for telltale issues: crushed transition ducts, long horizontal runs with sags, or elbows immediately behind the dryer that invite lint buildup. If the run is near your dryer manufacturer’s maximum equivalent length, plan to clean more frequently and prioritize low-resistance upgrades to reduce friction.
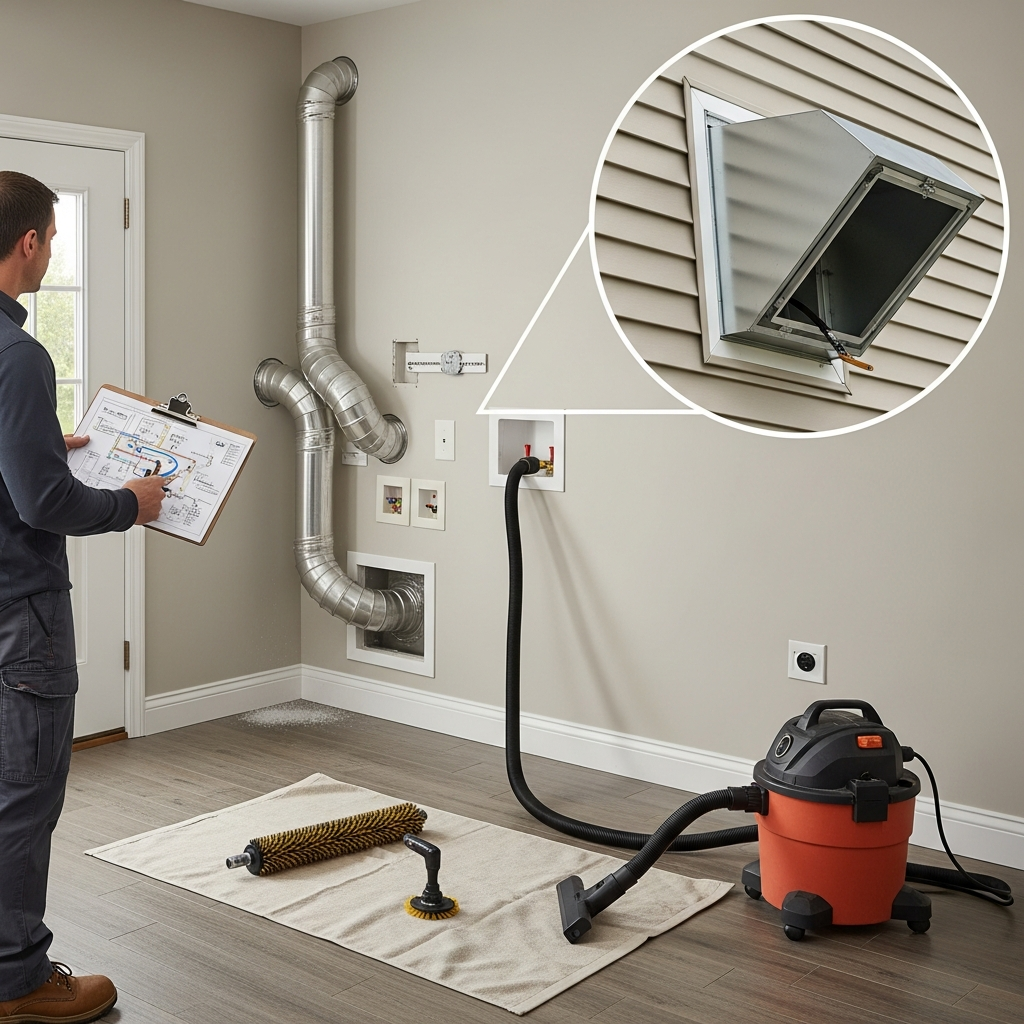
Tip 2: Choose the Right Tools and Use Them Gently
Experts prefer flexible and rotary brush kits designed for dryer ducts, paired with a shop vacuum. Semi-rigid brush heads offer good scrubbing action without gouging the metal. When using a drill, keep speed low to avoid whipping that can detach brush heads or separate weak joints. Extension rods should be fed carefully through elbows; forceful driving risks compacting lint into hard plugs. Keep a flashlight, replacement clamps, and a microfiber cloth nearby. After each pass, vacuum the brush bristles so you are pulling lint out, not pushing it deeper.
Choose a short, rigid or semi-rigid transition duct that will not crush when the dryer is moved back into place. Avoid screws that penetrate the duct interior. Instead, use quality worm-gear clamps and ensure clean, snug connections. These small details prevent future snags and make your next cleaning more effective.
Tip 3: Start with the Dryer and Lint Housing
Airflow restrictions inside the appliance can mimic a clogged vent. Before brushing the duct, remove the lint screen and vacuum the lint housing and surrounding areas. If your dryer manual permits, access the blower wheel inlet to clear any matted debris. This step prevents loose lint from being blown into the freshly cleaned duct. Wipe the exhaust collar and any nearby surfaces where fibers cling. Establishing a clean starting point ensures your duct cleaning yields accurate airflow improvements and reliable drying time results.
Once the dryer interior is tidy, disconnect the transition duct and move the appliance forward carefully. Label clamp positions or take photos to ensure proper reassembly. Many expert visits are spent correcting poor connections that form small leaks—these draw in dust, deposit lint outside the intended path, and lower system efficiency.
Tip 4: Clean from Both Ends When Possible
The most thorough results come from alternating interior and exterior access. Have a helper vacuum at the hood while you feed the brush from the laundry side, then switch roles. This two-sided approach breaks up compacted lint at elbows and ensures material exits the run rather than bunching mid-duct. Inspect the exterior hood for cracked plastic, sticky residue at the hinge, or pest evidence. If a screen is present, remove it—screens trap lint and are not recommended for dryer exhausts. Verify that the damper opens fully with the dryer running and closes when off.
For roof terminations, prioritize safety. If access is risky, do not climb. Instead, maximize what you can accomplish from inside and schedule roof service with a qualified pro. Many Somerville homes have rooflines that make DIY roof work impractical.
Tip 5: Verify Results with Simple Field Checks
After reassembling the transition duct with proper clamps, run the dryer on air fluff. Outside, you should feel a strong, consistent exhaust stream and see the damper propped wide open. Inside, listen for rattles that might indicate a loose joint or kinked duct. Track drying performance over the next few loads and note any changes. Experts often record cycle times and fabrics to build a personal baseline; you can do the same so deviations are obvious.
If airflow remains weak, consider hidden issues: an elbow packed just beyond your brush reach, a roof cap with a sticking backdraft damper, or a run with significant effective length. In those cases, a professional with specialized equipment can reach farther or temporarily open sections for direct access.
Tip 6: Adopt a Maintenance Rhythm Aligned with Use
Set a default schedule of six to twelve months, then refine it based on your household. High-volume laundry, pet hair, and plush textiles all increase lint production. If you notice airflow declines or drying time creeps upward between scheduled cleanings, shorten the interval. Tie reminders to other home routines in Somerville, like HVAC filter changes or seasonal yard work. A quick monthly glance at the exterior hood is a powerful habit—if the damper is stuck or lint stains appear on siding, take action immediately.
After large home projects—painting, drywall work, insulation upgrades—perform an extra cleaning. Construction dust migrates into vents and binds lint, accelerating clogs. Proactive attention after renovations preserves your baseline efficiency.
Tip 7: Optimize Hardware for Long-Term Reliability
Upgrade to semi-rigid aluminum for the transition duct and minimize bends. Choose a low-restriction exterior hood with smooth interiors and a freely swinging damper. Where the duct crosses attics or crawlspaces, add insulation to limit condensation. Consider a recessed dryer box to keep the transition path short and free from kinks while allowing the dryer to sit closer to the wall. During remodels, look for opportunities to reduce elbows or reroute excessively long paths.
Some systems in Somerville include booster fans for long runs. Ensure any fan is rated for dryer use, has accessible service points, and is kept clean. Incorrect fans or clogged blades become airflow bottlenecks rather than solutions. If a fan is necessary, include its cleaning in your maintenance plan.
Tip 8: Learn to Read Early Warning Signs
Professionals pay attention to subtle cues: a damper that opens less than before, lint streaks on siding, a slightly hotter dryer top, or a faint odor during cycles. If clothes require a second run or delicate items overdry, suspect an airflow change. Investigate promptly to avoid stressing heating elements and bearings. The goal is to intervene early, when a light brushing restores performance, rather than waiting until a hard plug forms deep in the duct.
Another expert cue is the sound of airflow. A healthy exhaust produces a steady whoosh at the hood. Whistling or fluttering may indicate a partial blockage or a damper hinge starting to gum up. Familiarize yourself with the normal sound so anomalies stand out during your monthly checks.
Tip 9: Troubleshoot Difficult Configurations
Older or compact Somerville homes sometimes route dryers to roof caps with multiple elbows. If your brush repeatedly stops at the same distance, mark it and translate that measurement to your floor plan. You might identify an elbow inside a closet or ceiling cavity that is accessible through a small cutout. If access is limited or structural, avoid invasive work without a plan—professionals can often reach from alternate angles using specialized rods and retrieval tools.
Water in the duct, evidenced by musty lint or rust, points to condensation or an improper slope. Add insulation in accessible areas, confirm the run pitches slightly toward the exterior, and replace any sections with corrosion. Persistent moisture problems merit a more comprehensive look at the vent route and termination.
Tip 10: Document Your Work and Results
Keep simple records: date, tools used, where resistance was felt, condition of the exterior hood, and post-cleaning airflow observations. Over time, your notes will reveal patterns—perhaps a specific elbow that accumulates lint faster, or seasonal factors that slow airflow. Documentation helps you anticipate the next cleaning and provides valuable context if you later bring in a specialist.
Photos are also helpful. Quick snapshots of clamp positions, duct conditions, and hood interiors guide accurate reassembly and future spot checks. Attach a small tag near the dryer with the last cleaning date to keep everyone in the household informed.
Frequently Asked Questions
Q: How often should I schedule professional service if I clean myself? A: Many homeowners alternate: a DIY cleaning at six months and a professional visit annually. The pro can reach farther, inspect for hidden issues, and validate your process.
Q: Can I use a leaf blower to clear the vent? A: High-pressure air can compact lint, separate joints, or blow debris into the dryer cabinet. Purpose-built brushes and controlled vacuuming offer better control and safer results.
Q: Are screens acceptable on dryer hoods to block pests? A: No. Screens trap lint and cause rapid blockages. Use a hood with a free-swinging damper and inspect it regularly.
Q: What if my vent exits through the roof? A: Prioritize safety. If roof access is risky, limit DIY to interior cleaning and schedule roof-cap service with a qualified technician who has fall protection and the correct tools.
Q: My dryer still takes too long after cleaning. What else could be wrong? A: Check for kinks in the transition duct, verify damper movement, and inspect inside the dryer’s blower path. If the vent run is near maximum length, small restrictions cause big performance drops—consider routing improvements.
Keep Dryer Performance High in Somerville
Strong airflow is the foundation of safe, efficient drying. By mapping your system, using the right tools gently, cleaning from both ends when possible, and adopting an evidence-based maintenance rhythm, you can keep performance high in your Somerville, New Jersey home. For complex runs, roof terminations, or stubborn obstructions, a specialist brings equipment and experience that save time and reduce risk. When you are ready to secure top-tier airflow and reliability, arrange expert dryer vent cleaning and enjoy faster cycles, lower energy use, and greater peace of mind.
