
Introduction: A Homeowner’s Roadmap to Safer Drying in Somerville, New Jersey
For many Somerville homeowners, laundry day follows a comfortable rhythm—sort, wash, dry, fold. But there is a critical step hiding behind the dryer that deserves equal attention: maintaining a clear, efficient vent. Lint and moisture move through the vent on every cycle, and without routine maintenance they accumulate, choke airflow, and create a potential ignition source. A systematic plan for dryer vent cleaning protects your investment, lowers energy use, and helps your dryer deliver consistent results. This guide walks you through understanding your system, planning a schedule, performing the cleaning, and solving common challenges that are specific to homes in and around Somerville, New Jersey.
Local climate and home design affect vent performance. Humid summer air can cling to duct interiors and make lint sticky, while winter cold can stiffen exterior dampers and trap residue along the rim. Older homes may feature longer or more convoluted runs as laundry rooms were retrofitted into available spaces. Townhomes or condos sometimes route vents to roof caps that are harder to service. The following sections give you a homeowner’s perspective—clear steps, thoughtful safety notes, and practical troubleshooting—so you can clean confidently and know when to call in additional help.
Understanding the Anatomy of Your Dryer Vent
The vent pathway begins at the dryer exhaust collar, continues through a short transition duct, then heads through a rigid or semi-rigid duct behind walls or ceilings until it exits at a hood or roof cap outside. Smooth, rigid metal ducting is best for minimizing friction and lint catch points. Transition ducts should be short and crush-resistant. The exterior termination must open fully during operation and close when idle to deter pests and moisture. Every bend or unnecessary length adds resistance and raises the importance of regular cleaning, especially in Somerville homes where remodels might have added extra elbows to accommodate structural features.
Some systems include booster fans to help with long runs. If you have one, ensure it is designed for dryer use and cleaned per the manufacturer’s instructions. Incorrect fans or clogged fan blades can become new bottlenecks. Pay attention to the total effective length: manufacturers list a maximum run that considers elbow penalties. If your run is near that maximum, schedule cleanings more frequently to keep airflow in the safe zone.
Safety and Prep: What to Do Before You Start
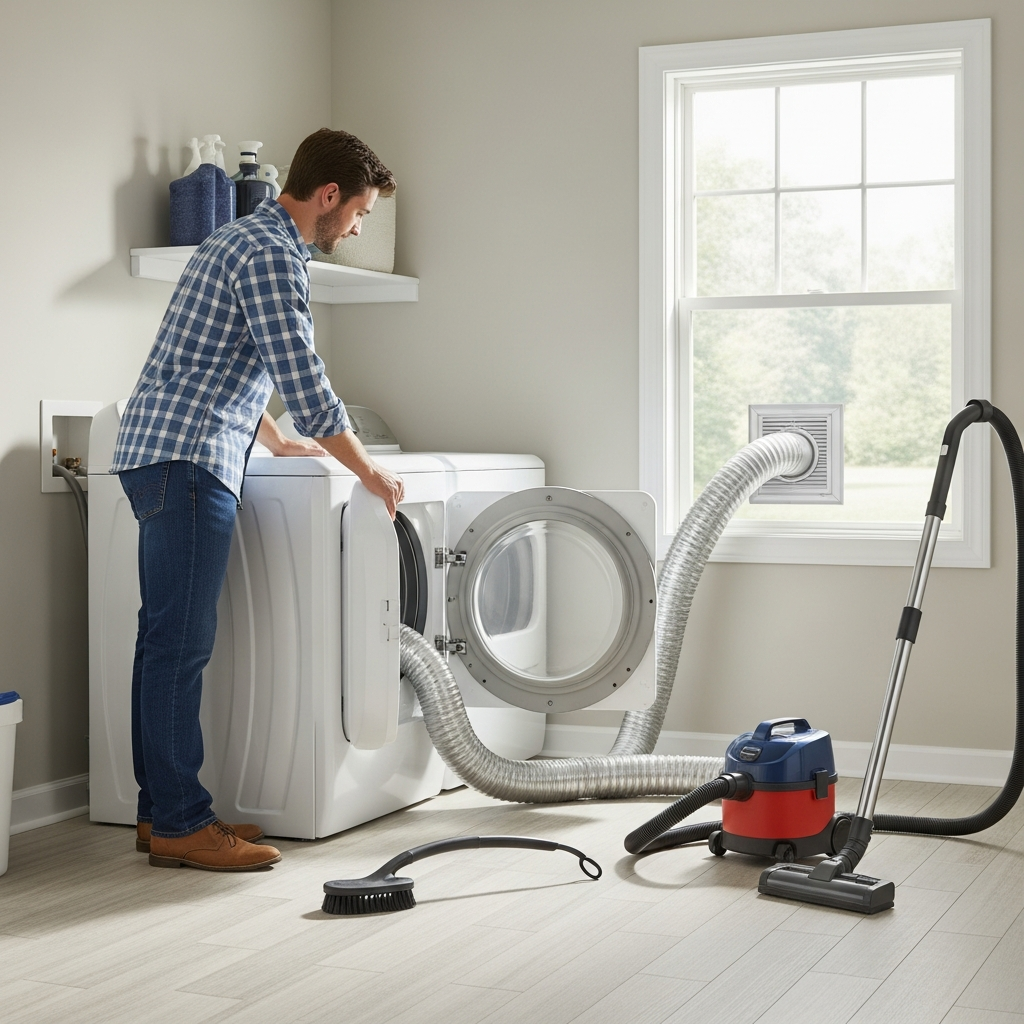
Begin by disconnecting power at the plug or breaker. For gas dryers, close the gas supply valve and avoid stressing the connector. Clear a workspace behind and beside the dryer. Put on eye protection and a dust mask to guard against fine lint. Keep a fire extinguisher accessible. Have a vacuum with a crevice tool and brush attachment on hand, plus a flexible or rotary brush kit, screwdriver, nut driver, flashlight, and replacement clamps. If your laundry closet is narrow, measure the reach you will need so you can move the dryer a little at a time without pinching the transition duct or cable.
Protect flooring with a drop cloth and stage a trash bag for collected lint. If your vent terminates on a deck or near shrubbery, consider a tarp to catch debris during exterior cleaning. Always proceed slowly when loosening clamps and removing ducts to avoid tearing thin materials or cutting yourself on sharp edges.
Performing the Cleaning: Interior Access
Unplug or de-energize the dryer and gently pull it forward. Loosen the clamp at the dryer’s exhaust collar and the clamp at the wall or ceiling stub-out, then remove the transition duct. Inspect it: if crushed, foil-type, or embedded with lint you cannot remove, plan to replace it with semi-rigid aluminum. Vacuum around the dryer cabinet rear, the floor, and the lint trap housing. These areas collect stray fibers that can recirculate and cause rapid buildup after you finish the main vent.
Insert a flexible brush into the duct opening leading toward the exterior. Twist and advance the brush slowly, withdrawing periodically to vacuum off dislodged lint. If using a drill to drive a rotary brush, set a low speed and maintain gentle pressure. Do not force the tool past sharp turns; if resistance persists at a specific point, mark the depth and plan to assess from the opposite end or consider a professional evaluation for that section.
Performing the Cleaning: Exterior Access
Move outside to the termination hood. Open the damper and inspect for lint cakes, nesting material, or flapper hinges gummed by residue. Clean these areas with a vacuum and brush. If the hood is cracked, weather-beaten, or includes a screen across the outlet, consider replacement with a dryer-compatible hood that has a free-swinging damper instead of a lint-trapping screen. For roof terminations that are tough to reach safely, limit work to a visual check and plan for specialized help if needed.
With a helper inside, coordinate alternating passes: one person pushes the brush from indoors while the other vacuums exterior debris and confirms a clear path. Repeat until little material emerges. Finish by verifying the damper opens fully when the dryer runs and closes snugly when off.
Reassembly and Verification
Reattach or replace the transition duct. Keep the path as straight and short as possible. Use worm-gear clamps and avoid screws penetrating the duct, which can snag lint. Carefully slide the dryer back while watching for kinks. Restore power and, for gas units, reopen the valve. Run the dryer on a no-heat setting for a few minutes and check outside for a strong, steady exhaust stream. Inside, listen for unusual rattles and confirm no hot or musty odors are present. Efficient airflow and normal sounds signal a successful cleaning.
If airflow is weak despite your work, you may have a hidden obstruction, a collapsed section, or a roof cap with a stuck damper. In that case, stop and reassess. For complex runs—common in multi-story Somerville homes—consider scheduling a professional who can reach from multiple access points or temporarily remove sections to clear tight elbows fully.
Maintenance Cadence for Somerville Homes
A practical schedule for many households is every six to twelve months, adjusted by usage. Families with multiple laundry loads per day, pet owners, or those drying heavy shedding fabrics will benefit from more frequent intervals. Add inspections around seasonal transitions. Summer humidity can make lint clingy; winter ice or snow can obstruct exterior outlets. After big home projects like drywall sanding or insulation work, do an extra cleaning because airborne dust accelerates buildup within the vent.
Between full cleanings, empty the lint screen each load and vacuum around the lint trap opening periodically. Check outside airflow monthly by placing your hand near the hood when the dryer runs. If the stream weakens noticeably or the hood flap barely opens, move up your cleaning date. In the middle of the year, many homeowners in Somerville find it helpful to book a mid-cycle professional visit for dryer vent cleaning so small obstructions never have a chance to grow.
Recognizing Warning Signs
Watch for extended drying times, clothes that feel unusually hot, a burning or musty smell during cycles, or lint accumulating around the door gasket. A dryer top that grows hotter than normal or moisture condensing on nearby windows can indicate restricted exhaust. Outside, lint streaks on siding, a stuck or partly opening damper, or minimal airflow are also warnings. Do not ignore these signs; prompt action reduces the likelihood of overheating and saves energy.
Auto-dry sensors can misread moisture levels when airflow is poor, causing cycles to run too long or stop too soon. If your machine’s behavior changes suddenly, consider vent restriction before assuming a control board or heating element problem.
Upgrades and Best Practices
Replace fragile foil transition ducts with semi-rigid aluminum to resist crushing. Keep the run as short as possible and minimize elbows. Where ducts pass through unconditioned spaces, add insulation to reduce condensation. Consider a recessed dryer box to help the appliance sit closer to the wall without kinking the transition duct. Choose a low-resistance exterior hood that opens fully and has smooth interior surfaces. During remodels, reroute long runs or reduce elbows when feasible to improve baseline airflow and make maintenance easier.
Establish a reminder system aligned with household routines: mark calendar dates, pair cleanings with HVAC filter changes, or set alerts on your phone. Some smart dryers can detect airflow issues and prompt service. Even with reminders, a quick glance at the exterior hood each month is an easy habit that catches many problems early.
Troubleshooting Common Problems
If the brush snags, you might be hitting a screw protruding into the duct, a sharp elbow stuffed with lint, or a joint that has separated. Avoid forcing the brush; pulling too hard can detach brush heads. Instead, mark the depth, measure where that point is along the path, and check for access from the other side. If you discover water stains or musty lint, improve insulation and confirm the duct has a slight slope toward the exterior. If a booster fan is installed, verify it is rated for dryers and clean its blades as part of your routine.
Persistent weak airflow after cleaning can also stem from internal dryer blockages. Consult your appliance manual for steps to vacuum the blower wheel area and the lint housing. If you are not comfortable opening the dryer cabinet, contact an appliance technician after confirming the vent is clear.
Frequently Asked Questions
Q: How do I know if my vent run is too long? A: Check your dryer’s manual for maximum equivalent length and count each elbow as additional length. If your route approaches the limit, plan more frequent cleanings and consider rerouting during a future renovation.
Q: Are plastic ducts acceptable? A: No. Plastic and thin foil ducts crush and can melt. Use rigid or semi-rigid metal for safety and durability.
Q: Can I rely on the lint screen alone? A: The lint screen captures a portion of fibers, but fine particles pass through and collect in the vent. Regular vent cleaning remains essential.
Q: What should I do about birds or rodents? A: Use a proper dryer hood without a screen, ensure the damper closes, and inspect regularly. If nesting has occurred, remove it carefully and consider a hood design that deters entry without creating lint traps.
Q: My roof cap is hard to reach. Is it okay to clean just from inside? A: You can improve conditions from inside, but the best results come from accessing both ends. If roof access is unsafe, hire a specialist who has the equipment and safety training to service roof terminations.
Make Laundry Safer and Easier in Somerville
A clear dryer vent shortens cycles, reduces wear on clothing, and cuts the risk of overheating or ignition. By following this guide, scheduling regular inspections, and addressing small issues before they grow, you can keep your Somerville, New Jersey laundry routine reliable and safe. If your vent is long, complex, or roof-terminated—or if you prefer the assurance of a comprehensive service—book professional dryer vent cleaning and enjoy better airflow, faster drying, and peace of mind.
