
Installing a new air duct system is one of the most influential upgrades you can make for comfort, air quality, and energy performance in a Somerville, New Jersey home. Whether you are renovating an older house or finishing a new addition, this practical, step-by-step how-to will walk you through the planning, materials, safety, and detailed techniques that produce a tight, quiet, and balanced duct network. Before you pick up a tool, remember that the basics matter most: a right-sized system, a clean layout with gentle airflow, and meticulous sealing and insulation. If you prefer to collaborate with a professional, consider exploring trusted local air duct installation resources early in the process so design and execution stay aligned with building codes and your comfort goals.
Know the System You Are Building
Your duct system’s job is simple in theory and intricate in practice: quietly deliver conditioned air to each room and bring return air back to your equipment so the cycle continues efficiently. Every supply run, trunk, and return needs correct size, length, and fittings to move air without unnecessary resistance. Pressure imbalances lead to hot and cold spots, noise, and wasted energy. Designing for smooth turns, adequate return pathways, and balanced airflow provides comfort that you can feel and lower utility bills you cannot see. It also sets the foundation for future maintenance, upgrades, filtration improvements, and zoning options.
Somerville, NJ Considerations: Climate and Code Mindset
Somerville experiences humid summers and crisp winters, so your duct layout must minimize leakage and provide robust insulation to reduce condensation risk and heat loss or gain. Place supply diffusers to counter seasonal loads, such as near exterior walls and large windows. Keep returns accessible and distributed to promote even air mixing. Local permitting requirements typically expect safe clearances from combustibles, proper support spacing, mechanical fastening where required, and documented duct sealing. Always verify specifications with your building department or inspector, and follow manufacturer guidelines for appliances, air handlers, and accessories used with the ducts.
Tools and Materials Checklist
- Measuring tape, laser measure, and level
- Duct sizing calculator or software with Manual D concepts
- Sheet metal snips, aviation snips, and a folding tool
- Crimpers, drive cleats, S-cleats, and sheet metal screws as required
- Metal duct sections, takeoffs, wyes, and elbows with long-radius options
- Flex duct (if applicable) with inner liner, wire helix, and protective vapor barrier
- Duct board or rigid foam insulation sleeves for metal sections where needed
- Mastic, UL 181-rated foil tape, and mesh scrim for sealing
- Hangers and strapping, vibration isolation pads, and supports
- Fire-blocking material where codes require air seal between building cavities
- Boots, registers, diffusers, and return grilles sized for the calculated airflow
- Drill/driver, hole saws, and a hand seamer
- Personal protective equipment: gloves, safety glasses, respirator, and knee pads
Having all items on site prevents mid-project delays and encourages consistent workmanship. If you are integrating with existing ductwork, inspect what you plan to keep and replace damaged or undersized runs instead of trying to patch around problems.
Design First: Sizing and Layout
The best installations start on paper. Confirm your HVAC load calculation, then match duct sizes to required CFM for each room. Favor a main trunk with short, gently curving branches rather than long, twisted runs. Avoid excessive use of flex; when you use it, pull the inner liner tight, support it frequently, and keep bends smooth. Plan returns generously because undersized returns starve the system, raise static pressure, and trigger noise. Sketch the full route including equipment connections, takeoffs, and register locations, and include measurements for each segment to pre-cut and assemble efficiently.
- Identify equipment location, orientation, and service clearances.
- Map the trunk path along joists or within chases that preserve headroom.
- Choose long-radius elbows and wyes for low-resistance airflow.
- Size branches using friction rate design and match to room CFMs.
- Place supplies near heat loads and keep registers accessible for future service.
- Provide one large central return or multiple returns for even pressure distribution.
- Plan for balancing dampers on branches to fine-tune comfort.
- Detail insulation thickness for unconditioned spaces to limit condensation and losses.
Preparation and Safety
Turn off and lock out equipment before working, and verify electrical safety. Clear pathways, cover finished surfaces, and stage materials near the work zones. Pre-assemble subcomponents such as elbows and transitions on a bench where you can maintain square, tight seams. Wear PPE and keep a shop vacuum at hand to reduce dust. Mark joists and studs to prevent accidental fastener placement into wiring or plumbing, and review fire-blocking requirements if penetrating framing or using building cavities for returns.
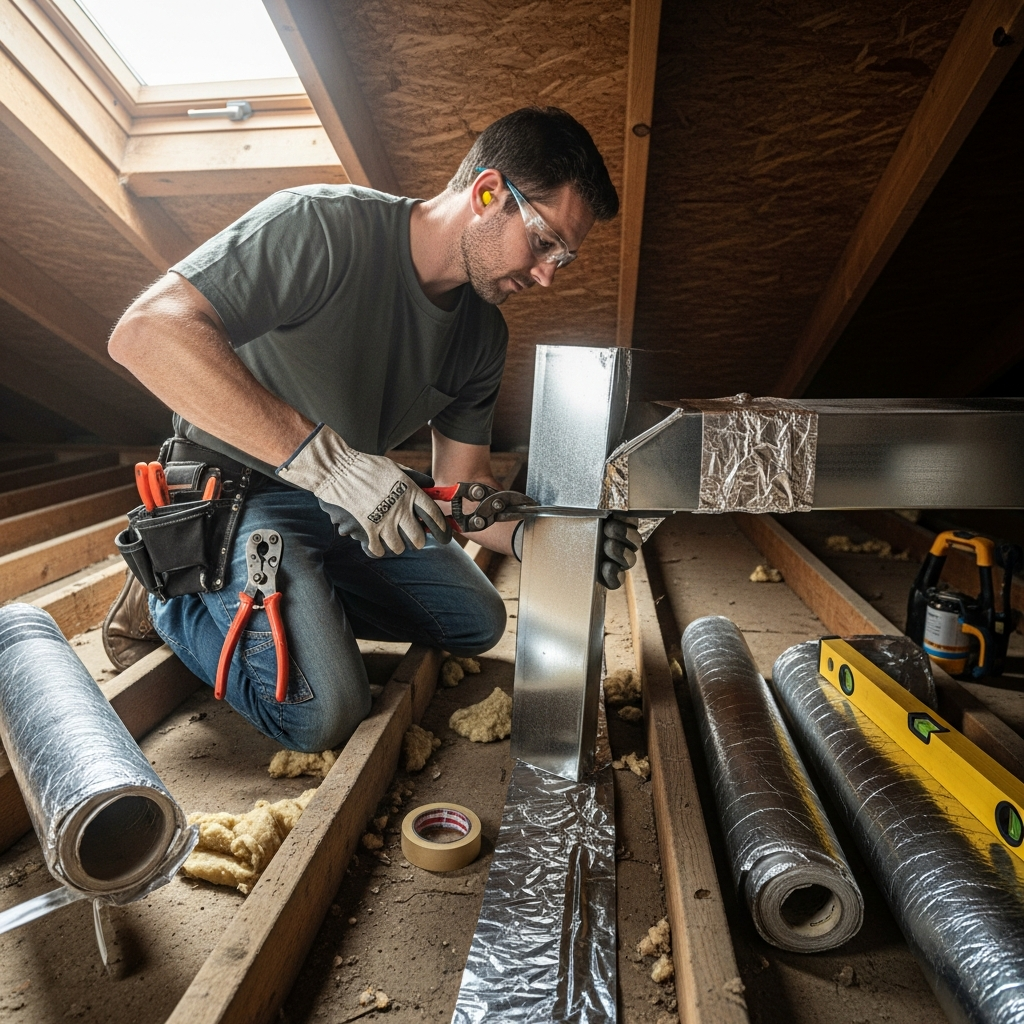
Step-by-Step Installation
- Set the trunk line. Start at the air handler or furnace plenum, confirm alignment, and secure with mechanical fasteners and approved sealant.
- Install takeoffs. Use starting collars or saddle takeoffs that include a tight, sealed transition from trunk to branch.
- Assemble elbows and wyes. Opt for long-radius fittings and eliminate unnecessary transitions.
- Run branch ducts. Keep runs as short and straight as possible with gentle sweeps instead of sharp turns.
- Support ductwork. Follow spacing guidelines; metal ducts often need supports every 8 to 10 feet, and flex more frequently.
- Set boots and registers. Position flush with finishes and secure firmly to framing, leaving space for finishing materials.
- Seal every seam. Brush mastic into joints, tape as required with UL 181-rated foil tape, and mesh-reinforce large gaps.
- Insulate in unconditioned areas. Fully wrap or sleeve ducts; seal vapor barriers to prevent condensation.
- Install balancing dampers. Place them on accessible branch sections for future tuning.
- Provide returns. Frame return cavities or run dedicated return ducts; ensure quiet, low-velocity design.
- Isolate vibration. Use flexible connectors at equipment and isolation pads at supports where appropriate.
- Penetrations and fire-blocking. Seal around penetrations and restore fire-blocking per code.
- Label runs. Mark branches with room names and CFMs to speed balancing and service.
- Clean the interior. Vacuum debris so airflow starts in a clean system.
Sealing, Leakage Control, and Insulation
Air leakage squanders energy and invites moisture problems. Treat every seam, joint, collar, and boot with mastic, then reinforce with foil tape as specified. Sealing the return side is as critical as sealing supplies; unsealed returns can draw dusty, humid, or attic air into the home. In basements, crawlspaces, and attics, insulate ducts to the appropriate R-value and maintain continuous vapor barriers. Pay extra attention at boots and transitions where multiple materials meet.
Quiet Operation and Indoor Air Quality
Keep airflow velocities in a comfortable range and avoid abrupt direction changes. Select diffusers matched to the room’s throw distance. For indoor air quality, specify effective filtration at the equipment and maintain clean returns. Consider a dedicated return in larger bedrooms or ensure an adequate undercut or transfer grille to minimize door-closure pressure spikes. Noise often comes from high static pressure, loose components, or poorly located grilles; your design and fastening choices can prevent those issues before they start.
Mid-Project Quality Check
Before closing walls or insulating attics, do a full review. Confirm branch lengths and sizes match the plan, verify all seams are sealed, and adjust supports so ducts do not sag. Use a manometer or pressure gauge if available to compare planned versus actual static pressure. If you decide at this stage that you want a second opinion or hands-on help, local experts who focus on duct installation services in Somerville can validate your design, perform airflow testing, or finish specific sections while you manage the rest.
Commissioning and Balancing
Once the system is assembled and sealed, power the equipment and test in heating and cooling modes. Verify there are no rattles, whistles, or vibration noises. Use a flow hood or anemometer to measure supply and return airflow, and adjust balancing dampers to match calculated CFMs for each room. Confirm temperature splits across the coil or heat exchanger, check filter fitment, and inspect for condensation where cold air meets humid air. Finalize register positions for comfort, label dampers for seasonal tweaks, and document your readings for future reference.
Maintenance and Future Upgrades
A well-installed duct system should remain quiet and efficient for years, but it relies on consistent care. Replace filters on schedule, keep returns clear of obstructions, and vacuum registers during seasonal cleanups. If you renovate, revisit duct sizing for new room loads. Consider adding zoning, improved filtration, or energy recovery ventilation if your lifestyle or building envelope changes. A documented baseline of airflow and static pressure gives you a reference to catch subtle performance changes early.
Frequently Asked Questions
Q: Can I use flexible duct for all branches? A: Flex is acceptable on many branches when pulled tight, supported frequently, and routed with gentle bends, but avoid long runs and sharp turns. For highest performance and durability, prioritize smooth metal for main trunks and long or high-flow sections.
Q: How do I prevent condensation on metal ducts in summer? A: Insulate ducts in unconditioned areas to the recommended R-value, seal all seams, and maintain a continuous vapor barrier. Keep supply air temperatures within normal operating ranges and address high indoor humidity with proper ventilation and dehumidification.
Q: Do I need multiple returns? A: Many homes benefit from a central return plus additional returns in larger or far rooms. If you prefer door undercuts or transfer grilles, verify they provide enough free area to keep pressure differences very low when doors are closed.
Q: What is the best way to size branches? A: Use an industry-accepted method that connects room-by-room loads to duct sizes and total external static pressure limits. Keep friction rates realistic and balance dampers accessible for fine-tuning after startup.
Q: How tight should supports be? A: Supports should hold ducts without crushing or deforming them. Space supports according to material type, and add extra supports at transitions, takeoffs, and registers to prevent sagging over time.
Q: Why does my system sound loud at certain registers? A: High velocity, undersized branches, or restrictive grilles cause noise. Revisit sizing, add a longer radius elbow, or use a grille with more free area to reduce sound while maintaining flow.
Q: Is it okay to use building cavities for returns? A: Only where permitted, and the cavities must be properly sealed, smooth, and fire-blocked. Dedicated return ducts often deliver cleaner, quieter results.
Q: What are the signs of poor duct sealing? A: Hot or cold spots, dusty returns, and high energy bills are common indicators. A quick inspection with a smoke pencil near seams can reveal leaks that need mastic and tape.
Bring Your Plan to Life
If you follow a design-first approach, build carefully with tight, well-supported ducts, and verify airflow during commissioning, you will achieve consistent comfort through every season in Somerville. When you want expert collaboration, inspections, or a turnkey install, connect with a local team for professional air duct installation to move from a paper layout to a quiet, efficient, long-lasting system.
