
Persistent hot and cold spots, dusty rooms, and odd HVAC noises often trace back to the same source: leaky or damaged ductwork. In Somerville, New Jersey, where summers are humid and winters drop below freezing, poorly sealed or insulated ducts can magnify comfort issues and stress your equipment. Troubleshooting is the art of narrowing causes logically, testing hypotheses, and fixing problems in a prioritized, safe sequence. This guide walks you through a field-proven troubleshooting workflow you can use in basements, attics, crawlspaces, and mechanical rooms—whether you are a skilled DIYer or coordinating with a professional.
Effective troubleshooting starts with a baseline. Document the symptoms, gather simple measurements, and create a map of your duct system. This approach transforms guesswork into an orderly process that leads to durable fixes. If you uncover extensive damage, complex return pathways, or persistent pressure anomalies, partner with a Somerville specialist who performs air duct repair and verification testing regularly.
Remember the three pillars: safety, airflow, and cleanliness. Power down equipment when opening access panels; protect yourself from sharp metal and dusty spaces; and avoid spreading contaminants by keeping work areas clean and contained. With that mindset, you can diagnose most duct issues efficiently.
Step 1: Define Symptoms and Prioritize
Begin by listing each symptom with locations and times. Is the second-floor bedroom hot in the afternoon but comfortable at night? Does a first-floor office feel drafty only when the system first starts? Are returns noisier than supplies? Rank the issues by impact on comfort and indoor air quality so you can address the most urgent ones first.
Interview household members or employees. Different people use rooms at different times and notice different patterns. Their observations can point to a stuck damper, a collapsed section of flexible duct, or a return pulling air from a dusty storage area.
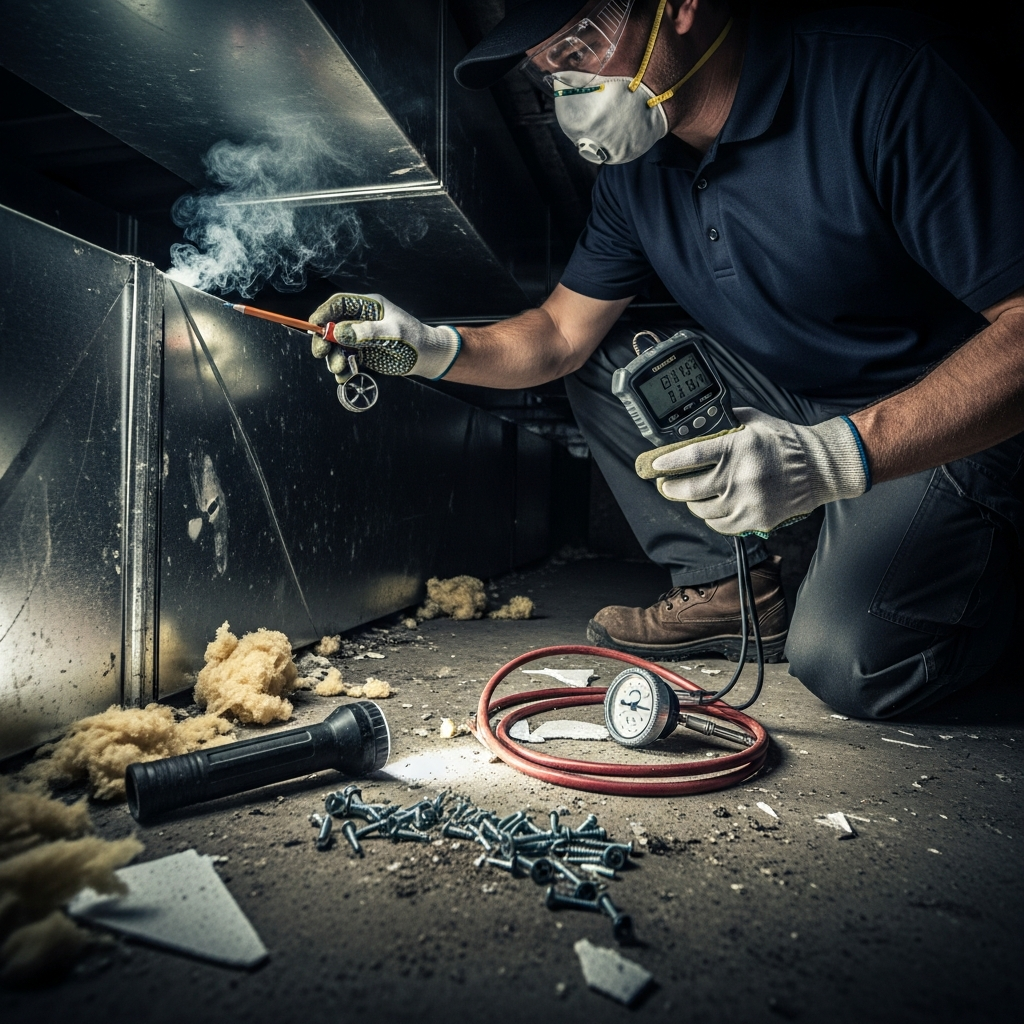
Step 2: Visual Inspection and Air Movement Cues
With the system off, inspect accessible trunks and branches from the air handler outward. Look for missing screws, loose takeoffs, wrinkled or failing tape, torn insulation, rust, and crushed flex. Mark suspicious areas with painter’s tape for follow-up.
Restore power and run the blower. Use a smoke pencil or incense stick near seams, boots, and return drops. Outward smoke movement at supply seams and inward movement at return seams reveal leaks. A thin strip of tissue can also show air movement when smoke is impractical.
Step 3: Pressure and Airflow Measurements
If available, measure static pressure upstream and downstream of the blower and across the filter. Excessive pressure suggests blockages, undersized ducts, or closed dampers. Low pressure with poor airflow might indicate severe leakage or a failing blower.
At diffusers, use an anemometer to compare airflow between rooms. Large discrepancies often point to crushed or disconnected branches or severe leakage upstream of the affected room. Record these readings for comparison after repairs.
Step 4: Targeted Repairs
- Secure and Seal: Re-seat loose joints and secure with sheet metal screws. Apply water-based mastic over seams and screw heads, or use UL 181 foil tape on straight seams where mastic is impractical.
- Fix Flex Duct: Cut out damaged sections, reattach to collars with metal bands, seal with mastic, and restore insulation and vapor barrier.
- Boot and Grille Gaps: Seal boot-to-drywall or ceiling tile gaps with mastic or low-expansion foam to prevent leakage and dust streaks.
- Insulation Upgrades: Wrap exposed supply runs in unconditioned areas with foil-faced insulation and re-tape jacket seams.
- Return Pathways: Line any panned joist returns with sheet metal or duct board before sealing to prevent drawing air through wood cavities.
- Damper Corrections: Free stuck dampers, label their positions, and rebalance as you go to stabilize airflow across rooms.
Step 5: Mid-Process Validation
After completing one or two high-priority zones, retest with smoke and repeat airflow measurements at affected rooms. You should see reduced leakage and improved, more uniform readings. Listen for changes in noise—rattles or whistles that persist could signal an unsecured access panel or a new leak created when a joint shifted during sealing.
Re-check static pressure. If sealing significantly tightened the system, you might notice a slight rise. Ensure it remains within the blower’s recommended operating range. If pressure rises too much, verify filter condition, inspect the coil for dirt, and open dampers slightly to redistribute flow. Should problems persist beyond DIY scope, engage a local expert in air duct repair who can balance the system with professional instruments and methods.
Step 6: Root Causes and Environmental Factors
Somerville’s climate plays a role in recurring duct issues. In humid summers, condensation forms on cold supply ducts routed through warm spaces, particularly where insulation is thin or disrupted. Over time, moisture can degrade adhesives and corrode fasteners. In winter, negative pressure on the return side can pull cold air from basements and crawlspaces through unsealed gaps, increasing dust and creating drafts.
Building age and renovations also matter. Older houses and storefronts may have had ducts added in stages, resulting in dead-end branches, mismatched sizes, and tight bends. Offices with drop ceilings can hide long, meandering runs to reach new cubicle layouts. Identifying and correcting these root causes prevents the same symptoms from returning after short-term fixes.
Step 7: Final Testing and Documentation
When repairs are complete, repeat airflow measurements and compare them to your baseline. Balance dampers to fine-tune comfort from room to room. Inspect filter racks for bypass, seal as needed, and replace filters to start fresh.
Document your work with photos, notes, and a simple map indicating repaired joints, replaced flex sections, and final damper positions. This documentation saves time the next time you or a contractor services the system and helps track performance over time.
Preventive Practices to Avoid Future Problems
- Inspect accessible ducts at least twice per year, before the most extreme seasons.
- Keep storage clear of duct runs to prevent crushing and accidental tears.
- Maintain condensate drains and drip pans to reduce moisture exposure near ducts.
- Use only UL 181-listed materials for seals and insulation repairs.
- Train household members or staff to leave supply registers open and unobstructed.
- Address pest entry points in attics and basements promptly.
- Re-label dampers if handles loosen or shift over time.
Frequently Asked Questions
Q: Why do I still hear whistling after sealing some joints? A: The sound can come from a nearby, still-leaking seam, a partially closed register, or a loose panel. Use a smoke pencil and tighten fasteners to pinpoint the source.
Q: Can duct leaks make rooms dusty? A: Yes. Return leaks especially can draw dusty air from wall cavities or basements, distributing it through the system. Sealing returns and boot gaps often reduces dust significantly.
Q: How do I know if a flex duct is too long or kinked? A: If airflow is weak at the diffuser and the run contains sharp bends or long unsupported spans that sag, it is likely overly restrictive. Shorten, straighten, and support the run for improvement.
Q: Should I insulate return ducts? A: Returns in unconditioned areas can benefit from insulation to prevent condensation and temperature swings, though supplies are usually the higher priority.
Q: Does sealing increase system pressure dangerously? A: Sealing typically brings pressure toward design values. Monitor with a manometer if available; address filter, coil cleanliness, or damper adjustments if pressure rises too much.
Q: Is it safe to use standard duct tape? A: Avoid cloth-backed duct tape. Use UL 181-rated foil tape or water-based mastic for durable, temperature-resistant seals.
Restore Quiet, Consistent Comfort
With a structured troubleshooting process—observe, measure, repair, and verify—you can resolve most duct-related comfort and air quality problems while protecting your HVAC equipment. Each improvement, from securing a loose return to re-insulating attic supplies, builds toward a quieter, more consistent indoor environment.
If you want a second set of eyes, comprehensive testing, or help with complex returns and balancing, partner with a local team experienced in air duct repair. Expert guidance will turn your troubleshooting into lasting results that carry your home or workplace comfortably through every Somerville season.
