
Homeowners in Somerville, New Jersey often notice their heating and cooling equipment working harder than expected, rooms that never feel quite comfortable, and dust that returns too quickly after cleaning. Frequently, the culprit is an aging or leaky duct system. This guide demystifies air duct repair for homeowners, providing step-by-step instructions, decision-making tips, and safety practices suitable for single-family homes, townhouses, and older properties common in the area. You will learn how to identify air leaks, reconnect flexible ducts, seal joints professionally, and verify improvements with simple tools you can use confidently.
Whether you plan to complete minor fixes or simply want to be an informed customer, understanding the fundamentals of duct sealing, insulation, and airflow will pay dividends in cleaner indoor air and consistent comfort. When projects exceed your comfort level or involve hidden returns, extensive re-routing, or balancing across multiple floors, consult a reputable provider with deep experience in air duct repair. Knowing what to expect will help you make smart, safe choices for your home.
Somerville experiences humid summers and chilly winters, which makes duct condition especially important. Uninsulated or leaky supply runs through attics and basements can pick up unwanted heat or cold, undermining your system’s design. Meanwhile, return leaks can pull dusty or damp air from crawlspaces and garages, adding unnecessary strain to filters and indoor air quality. A well-executed repair reduces these problems and allows your equipment to run at intended performance.
How to Recognize Air Duct Problems at Home
Start with comfort and cleanliness clues. Bedrooms on the top floor that feel stuffy in summer or cold in winter hint at heat gain or loss along attic duct runs. A first-floor family room with weak airflow might have a kinked or crushed branch behind a wall cavity. Dust streaks around supply registers and return grilles indicate past leaks at boots or drywall gaps. Whistling or rattling from the basement or attic suggests loose joints or panels that vibrate as air rushes past.
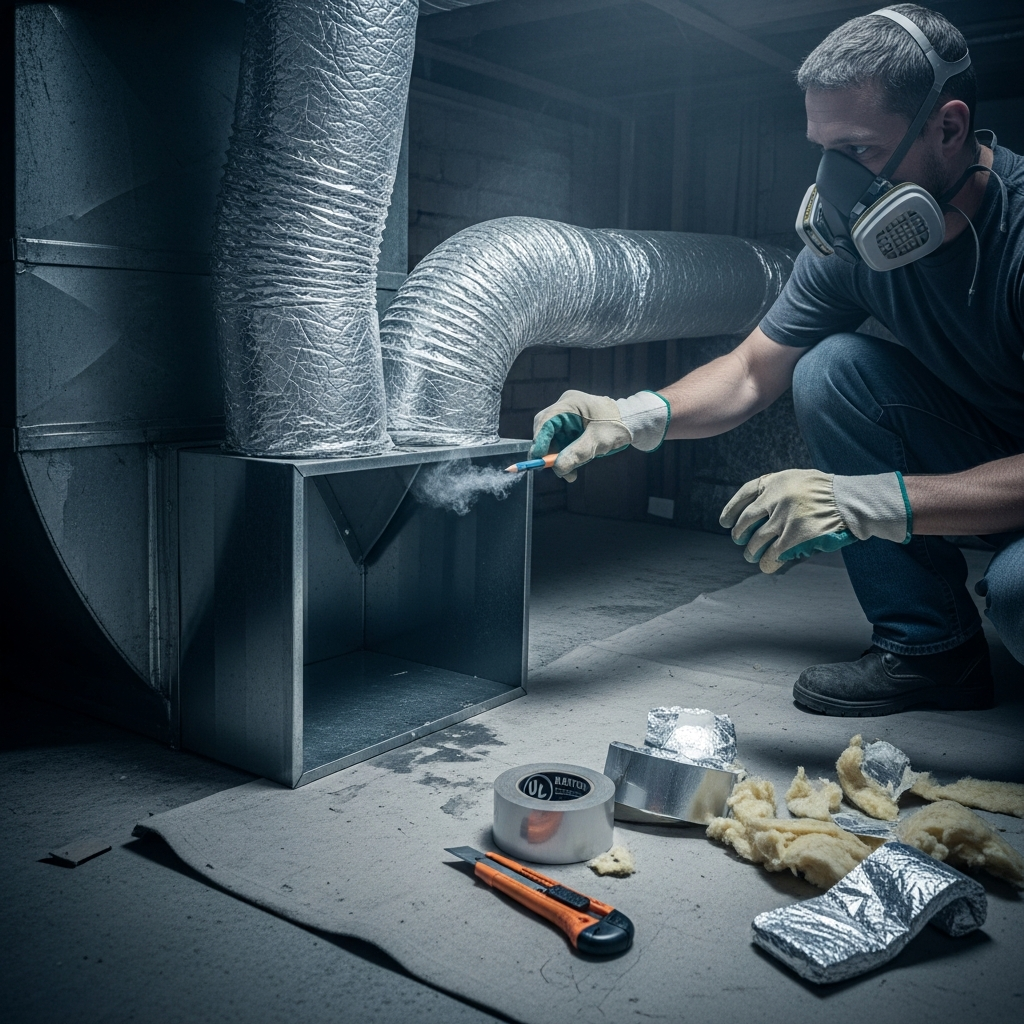
Perform a quick walk-through with the system running. Hold a tissue or smoke pencil near accessible seams. If the tissue flutters inward at a return seam or outward at a supply seam, you have leakage to address. Note each location on a sketch of your floor plan or in the notes app on your phone. Collecting evidence first will save time and materials later.
Essential Tools and Materials for Homeowners
- UL 181-rated foil tape for straight seams on metal ducts and certain flex connections.
- Water-based mastic for long-lasting sealing of elbows, takeoffs, and irregular joints.
- Sheet metal screws to secure refitted connections on rigid ducts.
- Insulation wraps or preformed sleeves for exposed supplies in attics and basements.
- Metal bands or heavy-duty zip ties for clamping flex duct inner liners to collars.
- Utility knife and aviation snips to cut flex duct, insulation, and metal neatly.
- Dust mask or respirator, gloves, and safety glasses for safe handling.
- Smoke pencil or incense stick to visualize leaks during testing.
- Low-expansion foam or gasketing to seal boot-to-drywall gaps and filter rack leaks.
- Marker and labels for documenting damper positions and repaired sections.
Step-by-Step Home Repair Process
- Shut Down the System: Turn the thermostat to off and cut power at the breaker if you will open access panels. This prevents the blower from running while you work.
- Evaluate Returns First: Returns often leak the most and can draw in dirt and moisture. Inspect the return plenum and any panned joist returns. Seal gaps and line wood cavities with sheet metal or duct board before applying mastic.
- Secure and Seal Rigid Joints: Push misaligned sections back together, fastening with three evenly spaced sheet metal screws. Brush mastic over seams, elbows, and screw heads to create a flexible, continuous seal.
- Repair Flexible Duct Connections: Cut away damaged flex to clean material. Slide the inner liner over the collar, secure with a band or two tight zip ties, then mastic the joint and restore insulation and outer jacket.
- Fix Kinks and Sags: Support long flex runs every 4 to 6 feet with wide straps to prevent sags. Re-route tight bends to wider radii to reduce resistance and noise.
- Insulate Supply Runs in Unconditioned Spaces: Wrap exposed supplies with foil-faced insulation and seal seams with UL 181 foil tape. Do not compress insulation; preserve its thickness for full R-value.
- Seal Boots and Grille Openings: Remove registers and fill the gap between the boot and drywall with mastic or low-expansion foam. Reinstall registers after the seal cures.
- Check Dampers and Balance Airflow: Identify manual damper handles and mark their positions. Adjust to reduce hot and cold spots, then recheck room temperatures after a full system cycle.
- Test with Smoke: Restore power and let the blower run. Use a smoke pencil to find remaining leaks. Reapply mastic or tape where needed.
- Document Work: Note what you sealed, materials used, and damper settings. This record helps during seasonal adjustments or when working with a contractor.
Room-by-Room Tips for Somerville Homes
Second-floor bedrooms often depend on long, attic-based supply runs. After sealing joints and repairing insulation, verify that diffuser sizes match room loads. A small bedroom might not need a large register, while a larger room with multiple windows benefits from balanced flows and good return pathways under doors.
Basement family rooms can feel cool or musty if returns leak near the floor. Seal those returns diligently and consider adding a small, sealed return closer to the occupied zone if the design allows. This encourages better circulation and reduces stratification.
For older homes with narrow chases, duct diameters may be smaller than ideal. While you cannot easily enlarge those chases without renovation, you can minimize leakage, smooth bends, and verify that all branches are fully open and unobstructed.
Mid-Project Checkpoint: Are You on Track?
At the halfway point, pause and reassess. You should see reduced smoke movement at previously leaky seams, quieter operation, and steadier airflow. If the blower seems noisier or rooms feel unchanged, re-check for overlooked returns or a crushed flex behind an access hatch. Use your notes to methodically address each identified leak.
It is also worth reviewing the filter rack and door. If air bypasses around the filter frame, dust will accumulate quickly in your newly sealed ducts. Add gasket material and ensure the filter fits tight without gaps. If you remain unsure about persistent leaks or airflow imbalances, do not hesitate to book a consultation with a local specialist in air duct repair who can test and fine-tune your system with professional instruments.
Homeowner Do’s and Don’ts
- Do clean surfaces before applying tape or mastic for maximum adhesion.
- Do support long runs of flex duct to prevent sags and noise.
- Do label dampers and note positions for future seasonal tweaks.
- Don’t use standard cloth duct tape; it will fail in heated and cooled environments.
- Don’t compress insulation while wrapping ducts; thickness equals performance.
- Don’t ignore return leaks; they often cause the worst dust and air quality issues.
- Don’t cover up moisture or microbial growth; correct the source first and remediate properly.
Testing, Balancing, and Living with the Results
After completing repairs, run the system through both heating and cooling if possible. Feel for even temperatures across rooms and check humidity with a simple hygrometer. Balanced systems will cycle less frequently and maintain comfort without dramatic swings. If a room remains stubbornly uncomfortable, a small damper adjustment or diffuser change may solve it. Keep children’s rooms and home offices in mind—steady airflow is essential for sleep and productivity.
Track changes over a week. Are allergies calmer? Is dust building up more slowly? Do doors close more gently when the blower starts, indicating reduced pressure swings? Small observations like these confirm that your sealing and balancing made a real difference.
Maintenance Habits That Extend Duct Life
- Inspect accessible seams at the start of summer and winter for tape lifting or mastic cracks.
- Change or clean filters on schedule and verify a tight fit to prevent bypass.
- Keep storage off attic or basement ductwork to avoid crushing and tears.
- Reinforce insulation seams as needed with UL 181 foil tape.
- Check drain pans and condensate lines seasonally to prevent moisture around ducts.
- Open supply registers fully; partially closed registers can increase noise and back-pressure.
- Watch for pest entry points and address them promptly.
- Update your maintenance log with observations and small adjustments.
Frequently Asked Questions
Q: Can sealing ducts reduce dust in my home? A: Yes. By closing return leaks and boot gaps, you prevent dusty air from crawlspaces and wall cavities from entering the system, which reduces dust circulation in living areas.
Q: What materials are safe for DIY sealing? A: Use UL 181-rated foil tape and water-based mastic. Avoid cloth duct tape and any unlisted adhesives that can emit odors or fail under HVAC temperatures.
Q: How do I know if insulation is sufficient? A: In unconditioned spaces, supply ducts should be fully wrapped with intact, foil-faced insulation. If you see exposed metal or compressed insulation, upgrade it to maintain system efficiency and temperature control.
Q: Do I need special tools to balance airflow? A: No. While pros use anemometers and pressure gauges, homeowners can make meaningful adjustments by observing comfort, listening for noise, and adjusting dampers in small increments.
Q: Should I seal ducts in the winter or summer? A: Any time works, but spring and fall are convenient shoulder seasons with milder temperatures and less system demand, giving mastic more predictable cure times.
Q: What if my home still has comfort issues after sealing? A: Revisit return pathways, verify door undercuts allow air to flow back to returns, and consider diffuser changes. Persistent problems may indicate sizing or design issues that a professional can evaluate.
Make Your Somerville Home More Comfortable Today
With careful inspection, proper sealing, and a few balancing tweaks, most homeowners can dramatically improve comfort and air quality in their Somerville homes. You do not need specialized equipment to make meaningful progress—just patience, the right materials, and a methodical approach.
If you want expert guidance, verification testing, or help with hidden returns and complex branching, connect with a trusted local team experienced in air duct repair. The sooner your ducts are tightened and insulated, the sooner your family will enjoy cleaner air and steadier comfort in every season.
