
Efficiency is not just a number on your HVAC nameplate; it is the sum of good design, tight ductwork, balanced airflow, and steady maintenance. In Somerville, New Jersey, where summers can be sticky and winters brisk, the duct system is the quiet partner that either carries comfort to every corner or lets it leak into attics and basements. With the right strategy, focused sealing, and smart balancing, you can reclaim lost performance and make your furnace or heat pump work less and last longer. Use the following tips to improve your system step by step, beginning with a quick overview of why strategic air duct repair is one of the most impactful upgrades you can make.
Tip 1: Prioritize the Return Side
Many homeowners fix supply leaks while overlooking returns. A leaky return can pull dusty, unconditioned air from attics, basements, or wall cavities straight into your blower and coil. Seal return plenums, filter cabinets, and boot-to-drywall gaps with mastic and UL 181 foil tape. The payoff is cleaner indoor air and a blower that does not waste power moving extra, unwanted air.
Tip 2: Target High-Value Leaks First
Chase the biggest holes and separations before fine-tuning pinholes. Loose takeoffs, open seams on trunks, and failed collars at flexible duct connections cause major losses. Re-seat joints, add sheet metal screws, and apply mastic. Follow with foil tape to reinforce. This one-two punch locks in your gains for years.
Tip 3: Straighten and Support Flexible Ducts
Every kink or sag is a speed bump in your airflow. Support flex runs every few feet with wide straps and keep bends smooth and broad. Shorten overly long runs to reduce friction, and ensure the inner liner is properly clamped and sealed to the collar before pulling the insulation jacket back in place.
Tip 4: Seal the Boots to the Building
The small gap where the metal boot meets drywall or flooring can act like a vacuum, stealing air meant for the room and pulling in dust. After removing the register cover, apply a suitable seal around the boot perimeter from below or above as access allows. It is a modest task with an outsized impact on comfort and cleanliness.
Tip 5: Insulate Smartly for Our Climate
In Somerville, ducts in attics and unconditioned basements benefit enormously from insulation. After sealing, restore or upgrade insulation to reduce heat gain or loss and to prevent condensation. Pay close attention to seams and penetrations where jacket continuity is crucial for vapor control.
Tip 6: Balance Airflow Room by Room
Once leaks are sealed, balancing helps distribute comfort evenly. If your system has dampers, start with everything open, measure room conditions over a day or two, then nudge dampers to favor weak rooms. Re-check after filter changes and seasonal shifts. If balancing never seems to stick, explore whether duct sizing or layout is holding you back.
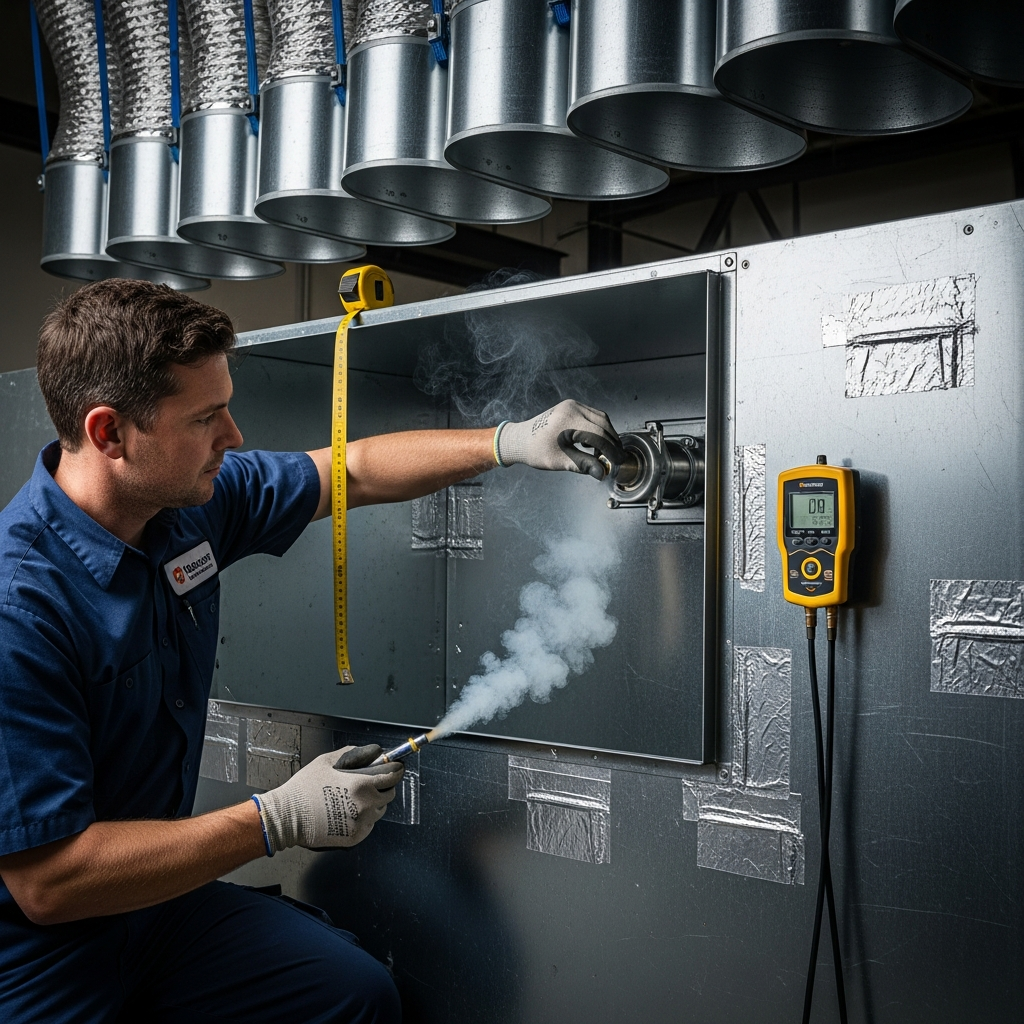
Tip 7: Verify Your Work as You Go
After each repair segment, run the blower and feel for leaks. Use a smoke pencil to visualize. Listen for whistling as a clue to small gaps. Keep notes and photos so you can track progress and avoid re-opening finished sections. If you encounter persistent issues such as severe static pressure or inaccessible chases, this may be the moment to bring in professional air duct repair services with the tools to measure, diagnose, and solve.
Tip 8: Protect the Filter Cabinet and Coil
Leaky filter cabinets allow bypass around the filter, leading to a dirty coil and reduced efficiency. Seal cabinet seams and ensure the filter door closes tightly. A clean, tight cabinet improves air quality and keeps the coil efficient.
Tip 9: Shorten Oversized Runs and Reduce Friction
If a flexible run loops excessively, cut it to an efficient length and reconnect with a proper coupler. Keep transitions gentle. On metal trunks, avoid sudden size reductions without engineered transitions that smooth airflow and reduce turbulence.
Tip 10: Pay Attention to Noise
Noise is a message. Rattling suggests loose supports or panels. Whistling hints at leaks. A low rushing sound can be normal, but sharp tones usually indicate restrictions or gaps. Tackling noise early prevents wear and keeps the system operating in its sweet spot.
Seasonal Strategy for Somerville Homes
In spring, check for moisture stains, slipped insulation, and pest damage. During summer, confirm attic ducts are fully insulated and that radiant heat is not cooking your supply runs. In fall, tighten supports and inspect returns as heating season begins. Winter’s dry air can loosen tapes—plan a quick mid-season walkthrough to catch early failures.
Signs It’s Time to Revisit Your Repairs
- Rooms that drift out of balance after filter changes.
- Dust accumulation recurs near returns and registers.
- New noises appear after renovations or equipment service.
- Condensation or rust appears on metal ducts.
Advanced Checks for Enthusiasts
If you are comfortable with light instrumentation, measure static pressure before and after a repair cycle. Improvements here often translate to better comfort and lower energy use. Consider airflow hoods or temperature probes at registers to compare room-to-room delivery after balancing.
Common Mistakes That Kill Efficiency
- Using cloth “duct” tape that fails quickly.
- Over-tightening straps that pinch flexible ducts.
- Skipping boot-to-drywall sealing.
- Ignoring return leaks that pull in dust and unconditioned air.
- Leaving long, looping runs that add friction.
FAQ
Q: How much efficiency can duct repairs recover? A: While every home is different, sealing major leaks, insulating exposed runs, and balancing airflow can substantially improve comfort and reduce wasted energy.
Q: Is mastic messy? A: It can be, but a small brush and careful application make for clean, durable seals. Allow it to cure fully before closing access.
Q: Do I need to replace old ducts to gain efficiency? A: Not always. Many systems respond very well to targeted sealing, support, and insulation. Replacement is best when ducts are undersized, severely damaged, or inaccessible for repair.
Q: Will balancing make my blower work harder? A: Proper balancing works with your system, not against it. The goal is to reduce restriction and leaks so the blower operates in a healthier range.
Q: How often should I check ducts? A: Do a quick visual twice a year and a deeper inspection annually, especially after major weather events or renovations.
Q: Can I seal ducts in winter? A: Yes, but ensure work areas are dry and materials are within their recommended temperature range for curing.
Make Your Efficiency Gains Stick
Improved comfort and smoother operation come from a simple formula: seal the big leaks, support and straighten runs, insulate where needed, and verify with testing. Keep a brief maintenance log so seasonal changes do not undo your progress. When you want an expert eye to validate results or handle tight spaces safely, trust local pros who specialize in dependable air duct repair and system tuning for year-round comfort.
