
Finding Trusted Dryer Vent Installation Near You in Somerville, New Jersey
Searching for reliable dryer vent installation near you in Somerville, New Jersey can feel overwhelming when every home, building layout, and dryer model is just a little bit different. The right installer does more than connect a hose; they design a safe, efficient airflow path that fits the unique character of your property and meets code. If you are comparing options or just starting to learn, this guide explains what to look for, how the process works, and why proper ventilation matters for performance and safety. To get oriented quickly, many homeowners begin by exploring a local dryer vent installation resource to understand best practices and scheduling considerations.
Somerville’s housing mix—from historic homes with thick masonry walls to newer townhomes and multifamily buildings—creates distinct challenges for routing, vent termination placement, condensation control, and backdraft prevention. A thoughtful approach to dryer vent installation maximizes airflow, reduces lint accumulation, prevents moisture issues, and supports the longevity of both your dryer and your building envelope.
Why Proper Dryer Vent Installation Matters
Efficient drying relies on a clear, direct path for moist air and lint to escape. When vents are too long, crushed, or made of the wrong materials, dryers work harder, cycles take longer, and energy use increases. More importantly, poor venting elevates fire risk and encourages hidden moisture that can exacerbate mold, mildew, and wood rot. In Somerville’s variable climate—humid summers, chilly winters—vent design also has to contend with temperature swings that influence condensation and airflow.
Correct installation decreases drying times, reduces wear on belts and bearings, and helps avoid nuisance error codes triggered by restricted airflow. It can also lower maintenance needs by minimizing the places lint can collect. When connected with smooth, rigid ducting, sealed joints, and a code-compliant exterior cap, the vent becomes a stable, safe part of the home rather than a source of headaches.
“Near Me” Really Means Local Knowledge
Local installers understand the building styles, code expectations, and seasonal conditions that shape good venting choices in Somerville, New Jersey. For example, older homes may demand creative routing to avoid excessive elbows. Row houses and townhomes might have limited exterior wall options or shared chases that affect termination. Basements and utility closets change how far the duct must run and how easily it can be cleaned later.
Working with a nearby specialist also streamlines scheduling, follow-up visits, and long-term maintenance recommendations. You want a partner who can return for inspections, cleaning, or minor upgrades as your household changes—adding a larger-capacity dryer, finishing a basement, or sealing and insulating previously unconditioned spaces, for example.
Materials That Make a Difference
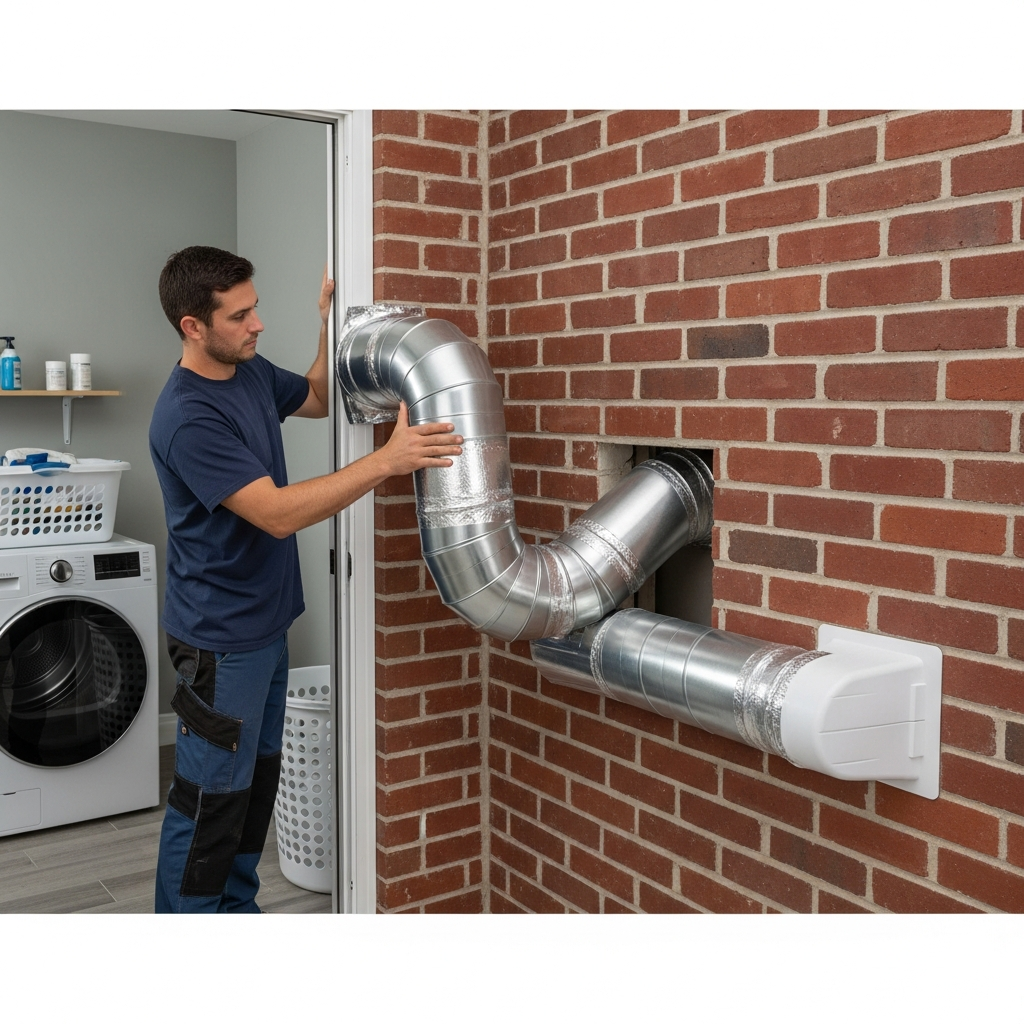
Not all dryer ducts are created equal. Smooth, rigid metal duct is the standard recommendation for long-term performance. Its smooth interior promotes consistent airflow and minimizes lint buildup. Semi-rigid aluminum may be used for short connections behind the dryer when space is tight, but it is not a substitute for a full run of rigid duct. Foil or plastic flex is generally discouraged for primary venting because it collapses easily, restricts flow, and traps lint.
Joints should be joined with appropriate metal foil tape (not cloth duct tape) and mechanically fastened where required without penetrating the duct interior with screws that could snag lint. Proper elbows with wide sweeps reduce turbulence. A high-quality exterior termination cap with a backdraft damper keeps pests and weather out while allowing air to escape freely during cycles.
Code and Safety Considerations in New Jersey
New Jersey follows widely recognized building and mechanical codes that influence dryer vent installation. While local enforcement varies and you should always verify the applicable standards, general requirements typically include venting to the outdoors (not into an attic, crawlspace, garage, or interior room), limiting duct length and the number of elbows, and using appropriate materials. The exterior termination should be properly located and sealed to the building envelope to avoid water intrusion and drafts.
Clearances around the dryer, accessibility for service, and labeling of equivalent lengths may also be required or recommended. Condensing dryers and ductless systems are a different category; for standard vented dryers, a correctly routed duct is essential. Safety isn’t just about avoiding lint fires—although that is critical—it is also about protecting indoor air quality and the durability of the structure.
Assessing Your Home for the Best Route
Installation begins with a route assessment: where is the dryer relative to the nearest acceptable exterior wall, how many turns are required, and what existing building features must be protected? For first-floor dryers on exterior walls, a short, direct path may be possible. For interior laundry rooms or basement units, a longer run with careful planning might be needed to achieve a code-compliant equivalent length and reliable airflow.
Somerville’s older homes often include structural framing that demands precision drilling to avoid joists, beams, and utilities. Masonry walls call for specialized coring and sealing. Proper slope to the exterior helps reduce moisture accumulation within the duct. If the vent path passes through unconditioned spaces, insulation or alternative routing can mitigate condensation risk in winter.
How Professional Installers Work
A professional installation usually follows a predictable sequence: evaluate the site and dryer model, design a route within equivalent length guidelines, gather materials, cut and seal wall or masonry openings, assemble and secure duct sections, seal joints, install the exterior cap, and test airflow. After installation, technicians verify that the appliance operates within expected dry times and that dampers open freely under exhaust pressure. They may also provide maintenance tips and recommended service intervals based on the route complexity and your household’s laundry volume.
Experienced installers use tools like anemometers or pressure measurements to quantify airflow rather than relying solely on subjective assessments. This testing mindset prevents minor restrictions from becoming major frustrations later. In the middle of your research or planning, consider reviewing a local overview of professional dryer vent installation to compare route examples, materials, and post-install testing practices.
Common Mistakes to Avoid
Several recurring issues reduce performance and increase risk. Long runs filled with sharp elbows create excessive equivalent length. Flexible foil or plastic duct used for the main run can sag and trap lint. Screws that penetrate the duct interior catch fibers. Terminating into soffits or attic spaces invites moisture damage. Using cheap exterior caps with small openings or stuck flappers strangles airflow. Skipping sealant or flashing around exterior penetrations welcomes water into the wall assembly. Each of these pitfalls is preventable when the design and workmanship are deliberate.
Another frequent oversight is crowding the dryer against the wall, crushing even a semi-rigid connector. Providing adequate clearance preserves the connection and maintains consistent flow. Lastly, failing to plan for future cleaning access turns routine maintenance into a chore. Thoughtful access points and straight runs make it easy to keep the system clear.
Maintenance After Installation
A high-quality installation sets you up for success, but it doesn’t eliminate maintenance. Lint will always be present in exhaust air. Plan for periodic cleaning of the entire vent run and the exterior termination, especially in households that do multiple loads daily or launder high-lint fabrics like towels and fleeces. Monitor dry times and check for heat or humidity buildup in the laundry area, which may signal a developing restriction.
Seasonal checks are valuable in Somerville, where freezing weather can affect damper movement and warm seasons can invite pests. Quick inspections after storms are prudent to ensure the cap remains secure and free of debris.
Selecting a Local Specialist
When comparing providers, look for evidence of building code familiarity, clear explanations of route design, material choices, and testing methods. Ask how they determine equivalent length, whether they use rigid duct for the main run, and how they will seal the exterior penetration. Transparent communication is a strong indicator of workmanship. Consider how the company supports long-term service—cleaning, minor rerouting for renovations, or troubleshooting performance issues.
References, photos of past work, and a straightforward scope of work can help you compare options confidently. A dependable local partner also understands Somerville’s permitting environment and neighborhood expectations around exterior changes, such as visible vent caps on front or side elevations.
What to Expect on Installation Day
Prepare by clearing access paths and moving laundry items away from the area. The installer may shut off the dryer’s power and gas (if applicable), verify vent locations inside and outside, protect nearby surfaces, and mark drilling points. Expect some noise during coring or cutting. After assembly and sealing, the technician will run a test cycle to assess airflow and confirm damper operation. Before they leave, you should receive guidance on cleaning intervals, safe operation, and how to spot early signs of restriction.
Many homeowners appreciate a brief tutorial on disconnecting the short connector behind the dryer for periodic cleaning without disturbing the main run. Keeping that connector untwisted and gently curved preserves performance.
Answering Somerville-Specific Questions
Neighborhoods with tight lot lines and shared driveways sometimes place the ideal termination on a side wall that faces a pathway. A knowledgeable installer will help position the cap to avoid blowing lint onto walkways and landscaping. In condos or multifamily properties, building management rules may govern vent locations and exterior appearances. Local expertise reduces surprises and ensures a smoother approval process.
Where basements are common, installers may route ducts through rim joists. Proper sealing and flashing are essential to maintain energy efficiency and prevent moisture intrusion. In brick or stone exteriors, the finished opening should look clean and intentional, not improvised.
Frequently Asked Questions
Q: How long should a dryer vent be? A: The allowable length depends on the code, the dryer manufacturer’s specifications, and the number of elbows. Shorter and straighter is better. Professional installers calculate equivalent length to stay within safe limits and maintain strong airflow.
Q: Can I vent a dryer into the attic or garage? A: No. Vents must discharge outdoors to avoid moisture damage, mold growth, and air quality issues. A properly installed exterior termination with a backdraft damper is the accepted solution.
Q: Is rigid metal duct always required? A: Rigid metal is typically recommended for the main run because of its smooth interior and durability. Semi-rigid aluminum may connect the dryer to the wall in tight spaces, but it should not replace rigid duct for long distances.
Q: How often should I clean the vent? A: Many households benefit from annual cleaning, but high-use homes or long vent runs may need more frequent service. Monitoring dry times and heat levels provides practical cues between cleanings.
Q: What are signs my vent is restricted? A: Longer cycles, hotter laundry rooms, burning smells, and a damper that barely opens are common indicators. Lint debris on the exterior cap or around the termination also suggests blockage.
Q: Do I need a permit? A: Requirements vary by municipality and property type. A local installer can advise whether a permit or association notification is necessary in your specific situation.
Q: Will the installation damage my walls? A: Professional coring and sealing minimize disruption. Any penetrations are cut to size, flashed or sealed, and finished to blend with the existing surfaces as closely as possible.
Q: Can I share a duct with another appliance? A: No. Dryer vents must be dedicated to the dryer only. Shared ducts introduce safety and performance problems.
Moving Forward with Confidence
Proper dryer vent installation delivers quieter operation, shorter drying times, safer airflow, and greater peace of mind. Whether you are replacing a makeshift setup or renovating a laundry area, planning the route, materials, and termination carefully will pay dividends for years. A trusted partner will help you navigate code, protect your home’s envelope, and create an installation that is efficient and easy to maintain.
If you are ready to improve airflow and safety in your Somerville home, schedule a visit with a local team that installs with precision, tests performance, and stands behind the work. Reach out today to discuss your layout, timeline, and questions, and book expert dryer vent installation services that fit your home and routine.
