
How to Clean a Dryer Vent Safely in Somerville, New Jersey
Dryer vent cleaning is one of the most impactful maintenance tasks a homeowner can complete for safety and performance. In Somerville, seasonal shifts and busy household routines make it especially important to keep the vent pathway clear. This guide explains safe methods, key precautions, and when to involve a professional. It covers preparation, step-by-step actions, aftercare, and common mistakes to avoid, all with a focus on protecting your home and equipment. If at any point a step feels beyond your comfort level—or if your vent run is long, has multiple turns, or terminates on a roof—consider scheduling professional dryer vent cleaning to ensure a complete and verified result.
The principles outlined here apply to most residential dryers. However, every home is different. Access constraints, materials, and vent routing can vary widely. Approach the task patiently, prioritize safety, and do not hesitate to call in a trained technician when needed.
Know Your Dryer Vent System
Before you begin, understand the path air takes from your dryer to the exterior. Your lint screen catches a significant amount of debris, but fine particles travel through the transition connector into the main duct, then to the outside termination hood. Lint collects especially at bends and where condensation may occur in colder months. Mapping this path—knowing whether your vent exits through a wall or roof—helps you plan safe access and choose tools that won’t damage the duct.
Rigid metal ducting is generally preferred for safety and durability. Older flexible ducts can trap lint in their ridges and are easier to crush or puncture. If you discover fragile or outdated materials, it is wise to consult a pro about replacement options while you are planning a cleaning.
Preparation and Safety First
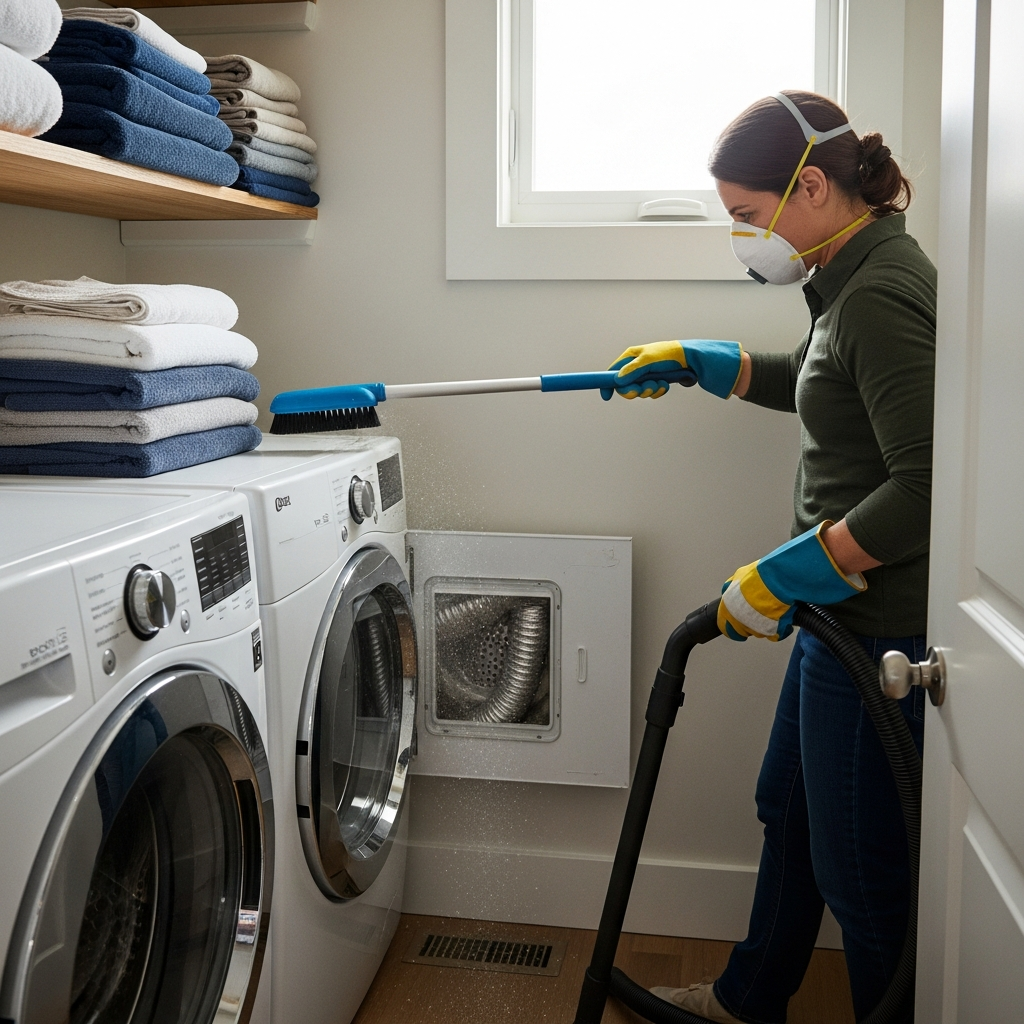
Start by clearing space around the dryer so you can move safely. Remove items from the top of the dryer and nearby shelves, and ensure pets are secured in another room. If you will be disconnecting the dryer, unplug the power cord. For gas dryers, close the gas valve gently before moving anything and avoid straining the gas line. If gas connections or shutoff locations are unclear, stop and call a professional.
Have the right equipment ready. A vacuum with a long hose, a gentle brush designed for vents, and a flashlight are basic essentials. Avoid improvised tools that can puncture the duct, dislodge joints, or leave objects stuck inside. Wear a dust mask and eye protection. If your vent exits to a roof, do not attempt roof work unless you have the proper safety gear and experience; call a trained technician instead.
Step-by-Step: Safe Interior Access
Carefully pull the dryer away from the wall, taking care not to crush or overstretch the transition connector. If your connector is already crumpled or kinked, note that it should be replaced later with a safer, properly sized option. Disconnect the power and, if applicable, the gas supply as described earlier. Gently detach the transition connector from the dryer and the wall or floor duct port.
Use a vent-safe brush and vacuum to collect lint from the transition connector. If the connector is damaged, set it aside for replacement rather than reuse. Next, insert the brush carefully into the wall or floor duct opening and rotate it to loosen lint. Work slowly to avoid compressing debris further down the line. Use the vacuum to capture dislodged lint near the opening.
If you have a short, straight run that terminates on an exterior wall, you may be able to clean the majority of buildup from this point. However, for longer or more complex paths, interior-only methods rarely reach all debris. That is when exterior access and specialized tools become essential.
Step-by-Step: Safe Exterior Access
Locate the exterior termination hood. Clear any leaves or obstructions by hand. If the hood has a damper, check that it moves freely without sticking. Some older hoods have screens that trap lint; these are not ideal for dryer exhaust. If you find a screen clogged with debris, remove the lint carefully and plan to replace the hood with a safer, screen-free model designed for dryers.
Open the damper gently and use a vent-safe brush to loosen lint near the termination. Capture debris with a vacuum as it appears. Do not force tools deep into the duct from the exterior; excessive pressure can lodge lint clumps further in or damage joints. If the vent run is long or includes several bends, exterior brushing may not reach the interior sections effectively.
When to Call a Professional
There are clear moments when a trained technician is the best choice. If your vent route includes multiple turns, if you cannot locate the full path, if the termination is on a roof, or if you suspect damaged or outdated materials, a professional visit is recommended. Likewise, if you notice persistent warning signs—long drying times, a hot laundry room, or a musty odor—after your DIY effort, it is time to schedule dryer vent cleaning with a local specialist who can verify airflow and document results.
Professionals use rotary brushes, air tools, and inspection methods that reach the entire duct safely. They can also address minor issues on the spot, such as a sticking damper or a crushed connector, which improves long-term performance.
Aftercare and Reassembly
Once debris is cleared, reconnect the transition using a secure, properly sized connector that resists crushing. Avoid overly long connectors that create sags or sharp bends. Slide the dryer back carefully, maintaining a smooth path with no kinks. Plug in the power, open the gas valve if applicable, and run a timed cycle while observing the exterior hood. The damper should open freely and close when the cycle ends.
Clean the lint screen after every load. Make a note of how many cycles your typical load now needs; an improvement indicates better airflow. Keep the area around the dryer free of clutter to help dissipate heat and allow easy access for future maintenance.
Common Mistakes to Avoid
Avoid pushing improvised rods or sharp objects into the duct. These can puncture thin wall sections, leading to lint escaping into cavities. Do not use flammable cleaning agents or excessive moisture inside the duct. Do not ignore a crushed or damaged transition connector; replacing it is a safety upgrade, not a cosmetic change. Finally, do not attempt roof work without proper equipment and training.
Seasonal Considerations in Somerville
In winter, condensation can bond lint to cold metal surfaces, making deposits stubborn. Schedule maintenance during milder weather if possible. After heavy spring pollen or leaf fall in autumn, check that your exterior hood is clear. If your household sees increased laundry—guests, sports seasons, or home projects—plan an earlier check-in to maintain airflow.
Frequently Asked Questions
Q: How often should I clean my dryer vent? A: Many households benefit from annual professional service, with interim DIY checks on the exterior hood and transition connector.
Q: My dryer still takes too long after I cleaned the lint screen. What now? A: The lint screen captures only a portion of debris. The main duct often holds compacted lint that requires deeper cleaning.
Q: Are flexible ducts okay to keep? A: Older, flexible ducts can trap lint and crush easily. Consult a professional about upgrading to a safer, more durable option.
Q: Is a musty smell a warning sign? A: Yes. Odors can indicate moisture retention and restricted airflow. Investigate promptly.
Q: Can I prevent birds or pests without a screen? A: Use a hood designed for dryer exhaust with a proper damper. Avoid fine screens that collect lint.
Q: Do I need special tools? A: Use brushes designed for dryer vents and a good vacuum. Avoid makeshift tools that can damage the duct.
Q: What about multi-unit buildings? A: Coordinate with building management. Shared or complex routing calls for professional service and documentation.
Putting Safety and Performance First
Dryer vent cleaning is as much about smart decisions as it is about tools. Know your limits, protect your home, and do not ignore signs of restricted airflow. For peace of mind and verifiable results, consider scheduling professional dryer vent service when your setup is complex or your time is limited. With the right approach, you will enjoy faster drying, a cooler laundry area, and a safer home.
