
When it comes to protecting your home and optimizing your appliances, few upgrades deliver as much value as a professionally installed dryer vent. In Somerville, New Jersey—where homes range from historic properties with thick masonry walls to modern townhomes with compact laundry closets—professional expertise ensures your duct path, materials, and exterior termination work together for safe, efficient airflow. A trained installer evaluates structure, measures effective length, plans for maintenance access, and confirms performance under real operating conditions. If you are comparing DIY to expert support, consider the risks associated with poor routing, flimsy materials, or improper terminations. Early consultation for dryer vent installation can prevent costly mistakes and deliver proven results from the start.
Professional installation is not just about connecting components—it is a process rooted in building science and manufacturer specifications. Proper duct size, minimal elbows, smooth interiors, and a dampered, screen-free termination are all non-negotiable elements. Experienced installers anticipate constraints in framing, plan for code compliance, and avoid hidden traps like condensation in unconditioned spaces or crushed transitions behind tight-fitting appliances.
What a professional evaluation includes
A comprehensive evaluation begins with a site walk-through. The installer locates the dryer, studies the surrounding walls, floors, and ceilings, and identifies the shortest safe route to an exterior termination. They assess whether wall, soffit, or roof exit points are practical and confirm clearance from windows, decks, and mechanical intakes. If an existing vent is present, they examine joints, elbows, and supports and check the termination for screens or broken dampers. They also measure equivalent length and note how many elbows currently burden the system.
Professionals consider future maintenance and access. They plan for cleanouts, ensure joints are sealed with UL- or HVAC-rated foil tape, and verify that any transition connector will be a listed, semi-rigid piece kept as short and straight as possible. Where the duct passes through unconditioned space, they may recommend insulation to reduce winter condensation.
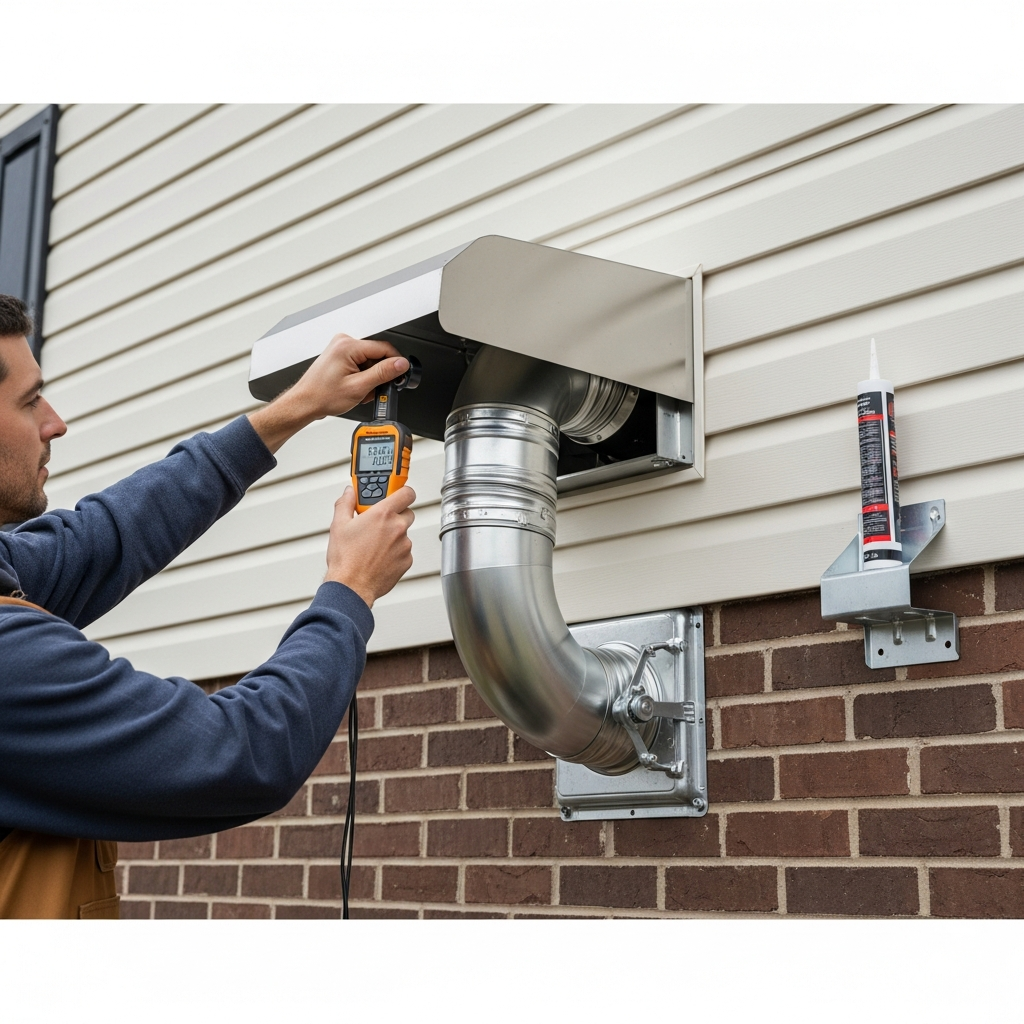
Materials and methods matter
Reputable installers rely on smooth rigid metal duct for main runs. This material resists crushing, minimizes lint adhesion, and delivers superior airflow. Elbows are selected to provide the required direction changes with the least turbulence and are oriented carefully to maintain smooth flow. Joints are fully seated and sealed with appropriate foil tape, not with screws that project into the airstream. Exterior hoods include backdraft dampers to keep pests and cold air out while letting exhaust escape freely.
Where the dryer meets the wall, a listed semi-rigid transition connector provides the necessary flexibility. Professionals often install recessed dryer vent boxes to prevent crushing of the connector and to save space, allowing the appliance to sit closer to the wall without compromising airflow.
Performance testing and documentation
At the end of the installation, a professional verifies performance. That can include measuring back pressure or airflow and confirming that the exterior damper opens fully under load. They may document equivalent length and fittings, providing a record that homeowners can reference for future maintenance or when selling the home. Clear documentation demonstrates that the system was designed and installed with manufacturer guidance in mind.
Testing also helps detect small leaks that could spill lint into wall cavities or reduce exhaust efficiency. Sealing these issues at turnover prevents early lint buildup, a common source of declining performance. Customers often notice immediate improvements: shorter dry times, cooler laundry rooms, and quieter operation.
Somerville-specific insights
Somerville’s climate and housing mix shape dryer vent strategy. Basement laundries benefit from supported horizontal runs secured high and out of walkways, with insulation for any sections in unconditioned areas. Upper-floor laundries that require vertical risers demand special attention to penetrations and roof terminations, which must be designed for dryers and flashed correctly. Brick exteriors require appropriate anchors and carefully sealed penetrations; vinyl siding often calls for a mounting block to ensure a flat, weather-tight surface for the termination hood.
In denser neighborhoods, installers also consider the aesthetic and practical impact of lint discharge. They select termination locations that minimize lint streaking on siding and keep exhaust away from patios, walkways, and planting beds. Where setbacks are tight, they verify clearances from windows and neighboring structures to avoid recirculating moisture-laden air.
When to upgrade an existing system
Tell-tale signs indicate it is time for a professional upgrade: extended drying times, heat buildup in the laundry area, visible lint around the hood, or frequent dryer error codes signaling restricted airflow. Some homes still use plastic or foil accordion-style ducting, which is not recommended for main runs. Others have excessively long routes with multiple sharp elbows, or a termination with a screen that traps lint. A professional will map out an improved path, replace unsuitable materials, and deliver a clean, efficient run tailored to the home’s layout.
If you are renovating or relocating a laundry, upgrading now avoids tearing into finished spaces later. Tight remodeling schedules also benefit from a pro who can coordinate with other trades and sequence work so that walls close only after the vent is tested and verified.
Mid-project coordination
In the middle of a project, small decisions can have outsized effects. Swapping a tight 90-degree elbow for two gentler 45s may significantly improve flow. Adjusting the termination location by a few inches might yield better damper operation and easier maintenance. Re-routing around a joist can avoid an extra turn entirely. If you want assurance that these mid-course tweaks are truly improvements, bring in a Somerville specialist experienced in dryer vent installation to validate airflow targets before walls are closed or caps are set permanently.
Safety and compliance
Professionals follow manufacturer instructions and applicable codes that govern materials, routing, and terminations. They avoid fasteners that penetrate the duct interior, ensure the duct size matches the appliance outlet, and confirm that the total equivalent length does not exceed the limit stated for your dryer model. They also ensure that the exterior hood features a backdraft damper without a screen. Where a permit is required, they provide documentation and coordinate inspections as necessary.
Gas dryers introduce additional safety considerations, particularly with respect to clearances, shutoff valve access, and combustion air for the appliance. While the vent itself handles exhaust air from wet clothing, a well-planned laundry area ensures safe gas and electrical connections alongside proper venting.
Cost of ownership and long-term performance
While prices vary and should be discussed directly with providers, the real value of professional work shows up in day-to-day operation. Better airflow shortens drying cycles and can extend the life of your dryer. Clean joints and smooth interiors help keep lint in check, lowering the risk of lint-related hazards. Well-documented installations also provide confidence to future buyers, who increasingly ask about mechanical systems and maintenance records.
With routine cleaning—often annually or biannually depending on use—your professionally installed vent will continue to perform. Scheduling service is easiest when lint levels are low, damper motion is smooth, and you are not contending with seasonal extremes like winter snow or summer humidity.
Frequently asked questions
Q: What materials do pros use for main runs? A: Smooth rigid metal duct, sealed with HVAC-rated foil tape, supported at regular intervals, and paired with a listed semi-rigid transition at the appliance.
Q: Can you use an existing hole through the wall? A: Often yes, provided the path is sound, the diameter matches requirements, and the termination can be updated to a dampered, screen-free model.
Q: How do I know if the run is too long? A: Installers calculate equivalent length based on straight sections and elbows, then compare it to your dryer manufacturer’s specified limit.
Q: Is roof venting acceptable? A: It can be, with a dryer-rated roof cap and correct flashing. Access for future cleaning must be considered.
Q: How soon will I notice improvements? A: Many homeowners see shorter dry times and smoother damper operation on the very first load after installation.
Q: How often should cleaning occur? A: Usage varies, but annual or biannual cleanings are common. Long runs or heavy laundry loads may require more frequent service.
Move forward with confidence
A professional approach takes the guesswork out of vent design and installation, delivering consistent, verifiable performance with clean finishes inside and out. If you are ready to upgrade or correct an existing system, schedule expert dryer vent installation and enjoy safer operation, better efficiency, and a laundry space that simply works every time you press start.
