
Introduction
Installing a safe, efficient dryer vent is one of those home projects that pays you back with faster drying times, lower energy use, and peace of mind. For homeowners in Somerville, New Jersey, the task comes with some local realities: varied housing ages, mixed construction types, and seasonal weather that swings from humid summers to chilly winters. A thoughtful approach helps you protect your home against excess moisture, lint buildup, and potential fire risk while keeping your laundry routine running smoothly. If you want guidance or plan to have a professional handle the work, consider a trusted local resource for dryer vent installation so you can start with a clear plan and the right materials.
This guide walks you through how to plan, route, and complete a dryer vent installation that meets best practices. You will learn how to evaluate your dryer’s location, choose code-compliant materials, minimize total run length, and seal every joint for safe airflow. You will also find tips to navigate Somerville’s architectural quirks, from older masonry walls to newer townhomes with tight mechanical spaces. Whether you are upgrading from an old, flexible plastic vent or moving a laundry area, the steps below outline a practical, homeowner-friendly path to a successful installation.
Planning the Project and Understanding Local Considerations
Good installations begin with planning. Start by confirming where your dryer currently sits, where it could be moved, and which exterior wall or roof face offers the most direct path outdoors. Short, straight runs are ideal. In older Somerville homes, laundry areas are often in basements with long horizontal runs that snake around beams or joists. Redesigning the route to reduce length and elbows can dramatically improve performance. In newer construction, the laundry may be on an upper floor; roof terminations are sometimes used, but a well-placed wall termination is often simpler to maintain, if allowed by the building’s design.
Next, verify you can meet common code and safety expectations. While local code enforcement may vary, fundamentals are consistent: use smooth-walled metal duct (usually rigid aluminum or galvanized steel), avoid screws penetrating the duct’s interior, do not use plastic or thin vinyl flex, and limit the total effective length and number of elbows to preserve airflow. Keep the vent independent—never share or tie it into another exhaust system. The discharge point must be outside, not in an attic, crawlspace, or garage, and it should include a backdraft damper that opens freely. Aim to place the exterior hood away from tight corners, decks, or areas where lint could collect and moisture could harm trim.
Materials and Tools You Will Need
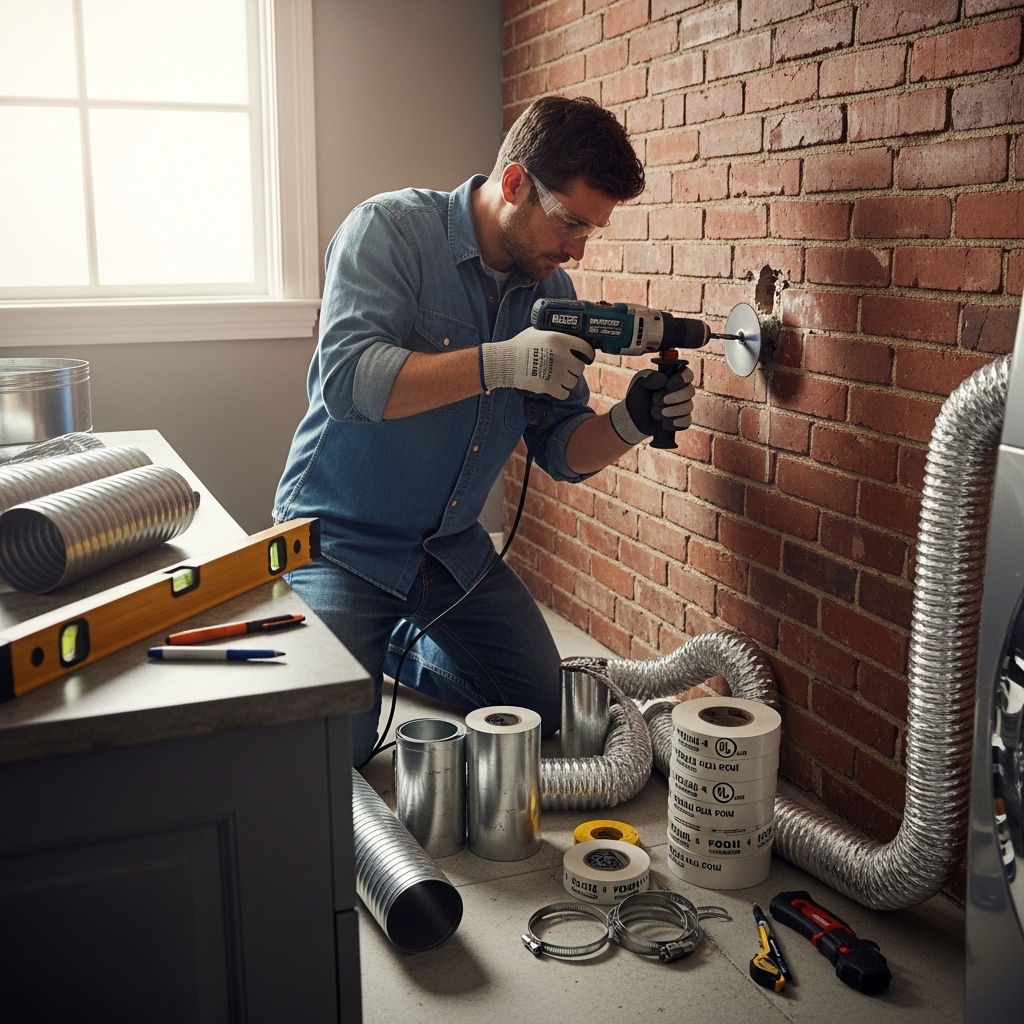
For a safe, durable installation, gather quality materials before you start. Choose rigid metal duct in the correct diameter specified by your dryer—most residential dryers use a 4-inch duct. You will need UL-listed foil tape for sealing seams, metal band clamps for connections that require periodic disassembly, and a high-quality exterior hood with a smooth, low-resistance damper. Have a hole saw or masonry tools depending on your wall type, a drill/driver, a level, and a stud finder. If you are penetrating siding, prepare for proper flashing; if you are penetrating brick, plan for a clean core hole and a neat, weatherproofed termination. Wear protective equipment such as gloves, eye protection, and a dust mask. Lint is surprisingly abrasive and can irritate eyes and skin, especially when disturbed in confined spaces.
Mapping Your Vent Route
Measure twice, cut once applies perfectly here. Sketch the shortest, straightest route from the dryer outlet to the exterior. Each elbow adds effective length and resistance, so use as few as possible and select long-radius elbows when you need to turn. If the laundry is in a basement, consider rising vertically a short distance to pass above obstacles before exiting. For above-grade laundry rooms, check for joist direction and plumbing or electrical runs that could obstruct your path. Verify you can maintain slight downward pitch toward the exterior termination if running horizontally; this discourages condensation from draining back toward the dryer.
In Somerville’s mix of home styles, walls may vary: framed with siding, brick masonry, stucco, or composite cladding. Understand the wall assembly so you can plan a correct penetration that doesn’t invite water intrusion. If you have an older brick facade, you may need a core drill to create a neat circular opening and a sleeve to protect the duct where it passes through the wall. In framed walls, be mindful of insulation and vapor barriers; cut a clean opening, keep clearances tight, and seal around the duct to prevent air leaks.
Preparing the Dryer and Space
Pull the dryer away from the wall so you can work comfortably. Sweep or vacuum lint and dust behind and beneath the appliance. Confirm the dryer’s outlet collar is undamaged and correctly sized. If the laundry area doubles as storage, clear shelves and floor space to reduce tripping hazards and keep materials clean. If you plan to install a short offset box or recessed dryer vent box to allow the dryer to sit closer to the wall without crushing the duct, now is the time to cut that opening and secure the box according to the manufacturer’s instructions, ensuring the duct path is aligned with the dryer outlet.
Creating the Exterior Penetration
Once you are confident in your route, locate the intended termination point from the inside and transfer measurements to the exterior. Drill a small pilot hole to confirm location and to check for utilities or obstructions. Then cut the full-sized opening. For framed walls, use a hole saw sized to the duct and hood collar, and for masonry, use appropriate core drilling techniques. Dry-fit the hood and verify the damper swings freely and is protected from wind-driven rain. Avoid terminations that rely on screens; they trap lint and create a blockage risk. Many hoods include removable dampers for easy cleaning—select one that you can access seasonally without ladders if possible.
Assembling the Ductwork
With the path open, begin assembling your rigid duct sections from the dryer outward. Fit each joint so the male end faces the airflow direction, which helps reduce lint catching. Tape every seam with UL-listed foil tape; avoid cloth-backed duct tape, as it will dry out and fail. Where the duct must be disassembled for cleaning—often right behind the dryer—use a high-quality clamp or a removable connector instead of permanent tape. Use long-radius elbows to shape the route and keep turns gentle. Support the duct at regular intervals with metal straps or hangers, ensuring it does not sag. Sags increase lint accumulation and decrease performance, especially in long horizontal runs.
Connecting to the Exterior Hood
Slide the duct through the wall and mate it to the hood collar, or seat the hood’s collar into the wall sleeve and connect from inside. Seal the joint with foil tape and, if the hood manufacturer specifies, a band clamp for mechanical strength. On the exterior, integrate the hood with the siding or masonry using appropriate sealants and flashings. A neat, well-sealed termination matters: it prevents water ingress, improves insulation performance, and keeps pests from entering. Confirm the damper is not obstructed by trim, shutters, or landscaping and that it opens fully under airflow.
Testing Airflow and Making Adjustments
Before pushing the dryer back into place, perform a test. Temporarily connect the dryer and run it on an air-only or timed cycle. Go outside to confirm that the damper opens and that you feel a strong, steady exhaust stream. Listen for rattles that could indicate a loose joint. If the damper flutters weakly or fails to open fully, look for crushed sections or sharp elbows too close to the dryer. Adjust supports, reorient elbows, or shorten the run if possible to boost performance. If the mid-run is especially complex, consider a booster fan only when absolutely necessary and when allowed; note that many manufacturers require accessible service points and lint filters when booster fans are used.
Mid-Project Troubleshooting and Alternatives
Sometimes, the path you planned isn’t feasible. You may discover a hidden beam, a plumbing stack, or a concrete foundation wall where you expected to exit. In those cases, reroute to a different exterior wall or, if appropriate, a roof termination using components designed for low-resistance dryer exhaust. If you pivot mid-project and need a second opinion or help with specialized tools, it may be more efficient to bring in local specialists familiar with Somerville’s housing stock and code expectations. When in doubt, consult a professional team that regularly handles dryer vent installation and can guide you to a safe, efficient solution without guesswork.
Common Mistakes to Avoid
Avoid flexible plastic or thin, vinyl-like ducts. They crush easily, trap lint, and present a higher fire risk. Do not use screws that penetrate into the airflow; they become lint hooks. Never vent into an attic, crawlspace, or garage—moisture and lint will create mold and safety problems. Do not rely on screens at the termination; they clog. Keep bends gentle and minimize the number of elbows. Do not assemble joints without sealing them; leaks reduce performance and can blow lint into concealed spaces. Do not push the dryer so close to the wall that it kinks the duct. And avoid mixing different duct diameters; abrupt transitions increase resistance and collect lint at the step.
Seasonal and Local Factors in Somerville
Somerville’s seasonal humidity and winter temperatures make vent quality more important. In summer, high moisture content in the air amplifies condensation risks in long, cool basements and crawlspaces. In winter, temperature differences can create condensation inside ducts if the run passes through unconditioned areas. A slightly pitched run toward the outside helps any incidental moisture drain away from the appliance. Periodic checks at the exterior hood during leaf fall and pollen season are smart; both can stick to damp lint near the flap and restrict movement. If your home sits near a busy street or in a sheltered alley, wind patterns may affect the damper’s behavior—choose a hood designed for stable operation in variable conditions.
Maintenance After Installation
A well-built vent is only as safe as its maintenance routine. Plan to clean the duct at least annually, and more often if you dry heavy loads of towels, pet bedding, or lint-prone fabrics. Check the exterior hood every few months to verify the damper swings freely and that no lint mats have formed. Vacuum behind and beneath the dryer to prevent dust from entering the duct during disconnections. Keep detailed notes of the vent route, materials used, and any special fittings so that future cleaning or repairs are straightforward. If you notice longer drying times, unusual warmth around the dryer, or hot, humid laundry spaces, investigate promptly.
When to Call a Professional
Some installations are straightforward for an experienced DIYer, but others warrant expert help. Call a pro if the path requires multiple tight turns through finished ceilings, if you must core-drill through brick or concrete, if you suspect asbestos-containing materials in older walls, or if the vent will be routed a long distance in an older, irregular basement. Professionals bring specialized tools for precise cuts, sealed connections, and verifiable airflow tests. They can also recommend upgrades like a recessed dryer box, smoother long-radius elbows, or improved terminations that reduce future maintenance.
Safety Checks You Should Not Skip
After installation, verify that the dryer’s exhaust temperature remains normal during a timed cycle—excess heat suggests restriction. Check that the laundry room does not become excessively humid. Monitor the first week of operation closely for signs of leaks, rattles, or odors. If you have a gas dryer, ensure the room is well-ventilated and that the appliance is operating safely according to the manufacturer’s instructions. Confirm there are no combustible materials stored right behind the dryer. Lastly, document the vent’s route and take photos of key connections so you can easily disassemble and reassemble for cleaning.
Frequently Asked Questions
Question: Can I use semi-rigid aluminum instead of rigid metal? Answer: Semi-rigid can be acceptable for the short connection between the dryer and the wall where movement is needed for service, but the main run should be rigid metal to reduce lint accumulation and improve airflow.
Question: How long can my dryer vent be? Answer: The maximum effective length depends on the dryer manufacturer’s specifications and the number of elbows. Shorter is always better. Each elbow adds resistance, so plan the straightest route possible and verify against your dryer’s manual.
Question: Do I need a roof vent if my laundry is upstairs? Answer: Not necessarily. A properly planned wall termination can work well if the route is short and unrestricted. Roof terminations can be used when a wall route is impractical, but they must be designed for dryer exhaust and remain accessible for maintenance.
Question: What sealant should I use on duct joints? Answer: Use UL-listed foil tape for seams. Avoid cloth duct tape. Mastic is generally avoided inside dryer ducts due to potential flaking; stick with foil tape rated for high temperatures and metal ductwork.
Question: How often should I clean my dryer vent? Answer: At least annually for most households. If you have pets, launder heavy loads frequently, or notice longer drying times, consider cleaning more often. Regular inspection of the exterior hood is also important to ensure the damper operates freely.
Question: Is a booster fan a good idea? Answer: Only when necessary and when permitted by the dryer manufacturer and local code. Booster fans add complexity and maintenance. Most homes can avoid them by planning a shorter route with smooth, rigid duct and minimal elbows.
Question: Can I vent into a crawlspace with a screen? Answer: No. Dryer exhaust must terminate outside. Venting into enclosed spaces creates moisture and lint accumulation that can damage building materials and pose a safety risk.
Get Reliable Help in Somerville
If your project feels more complex than you expected, or you simply want the assurance that everything will be routed, sealed, and tested correctly, set up a visit with specialists who routinely handle dryer vent installation in Somerville. You will gain a safer laundry space, a smoothly operating dryer, and the confidence that your home’s ventilation is built to last, season after season.
