
Introduction
Even a new dryer vent can underperform if a few small details are off. In Somerville, New Jersey, seasonal temperature shifts, older framing, and pest activity can expose weaknesses that were not obvious on installation day. This troubleshooting guide helps you diagnose and correct the most common dryer vent issues—long dry times, odors, moisture, cold drafts, noisy operation, and recurring lint at the exterior hood. If you would prefer an expert to evaluate, redesign, or replace your setup, local professionals offer reliable dryer vent installation and performance testing to get your system back on track.
Slow Drying and High Heat
Symptom: Loads take progressively longer to dry, or the dryer exterior feels unusually hot. Cause: Airflow restriction due to lint buildup, crushed duct behind the appliance, excessive equivalent length, or a stuck termination damper. Fix: Start with the simple checks—clean the lint screen, pull the dryer forward, inspect and straighten the transition hose, and verify the hood damper opens fully during operation. If performance improves with the dryer pulled out, suspect a crush or kink at the transition or an elbow too close to the appliance.
Examine the main run for unsupported spans that sag and trap lint. Replace tight elbows with long-sweep versions, and reseal joints that may have separated. Confirm that the crimped duct ends face the airflow direction. If your total length is near the manufacturer limit, reducing one elbow can make a dramatic improvement.
Condensation and Water Stains
Symptom: Drips at a low point in the duct, water stains near penetrations, or visible moisture on nearby walls. Cause: Warm, moist exhaust cooling rapidly in uninsulated or unconditioned runs. Fix: Improve slope toward the exterior so incidental condensation drains outward. Insulate duct sections in attics or crawlspaces, and ensure the termination damper closes tightly to reduce cold-air intrusion in winter. If the route is long through a cold zone, rerouting through conditioned space can be the best long-term solution.
Musty Odors or Lint in the Laundry Area
Symptom: A damp, musty smell around the dryer or visible lint dust on surfaces. Cause: Leaky joints, separated connections, or an interior termination by mistake. Fix: With the dryer running, feel around joints for warm air leaks. Reseal with listed foil tape or appropriate mastic. Verify the system terminates outdoors, not into an attic or garage. If a joint has pulled apart repeatedly, add support straps to remove stress and consider replacing damaged sections.
Backdrafts and Cold Spots
Symptom: Cold air drafts near the laundry area or a chilly floor in winter. Cause: A damaged or poor-quality termination that fails to close, or wind-driven backflow. Fix: Inspect the hood, clean lint from the hinge, and replace with a dryer-rated model if necessary. Consider a termination with a better-sealing damper designed for windy conditions. Confirm clearances around the hood so landscaping or snow does not prevent full closure.
Noise, Rattles, and Vibration
Symptom: Buzzing, rattling, or thumping when the dryer runs. Cause: Loose supports, out-of-round elbows, or a transition duct that contacts the appliance or wall. Fix: Add or tighten straps at regular intervals, re-round any deformed elbows, and shorten or reroute the transition to avoid contact points. Listen systematically along the run to identify the loudest section; minor adjustments in alignment often eliminate the problem.
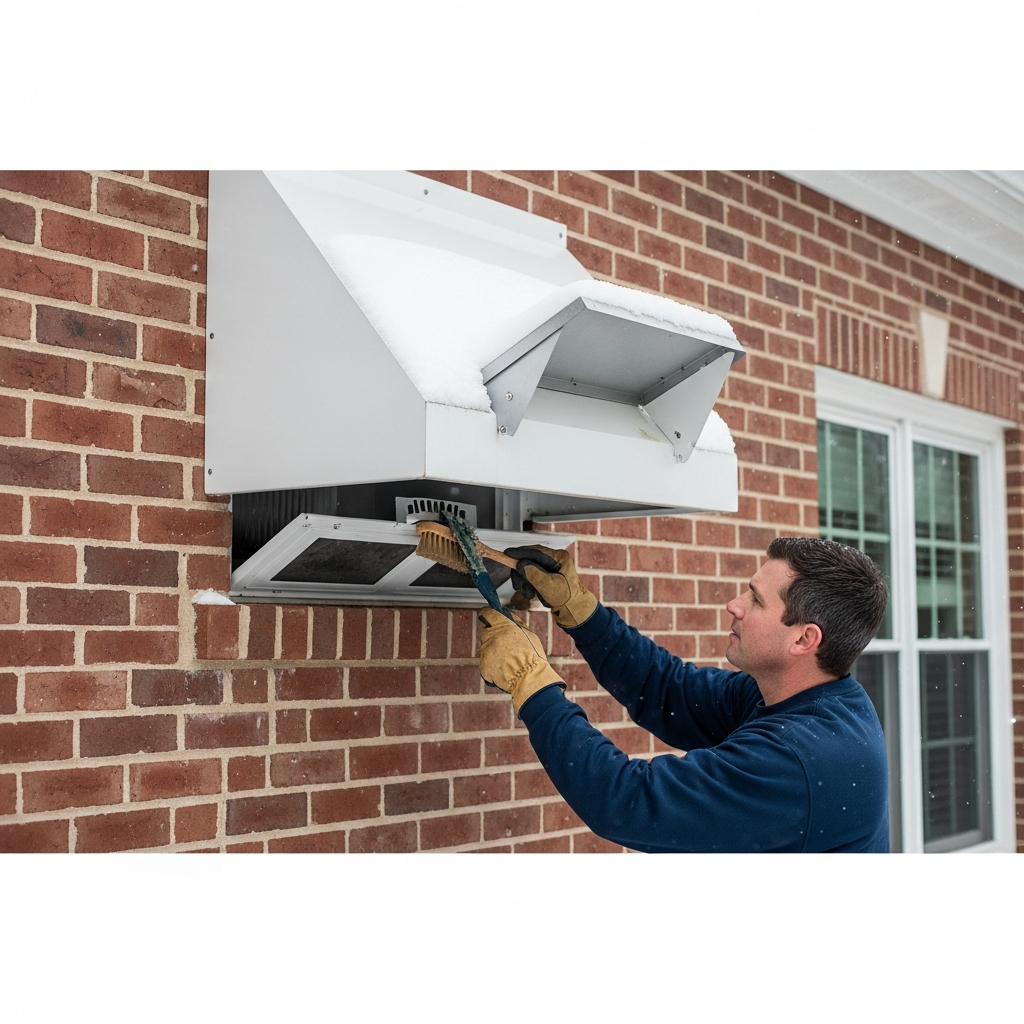
Damper Stuck or Not Opening Fully
Symptom: The exterior damper barely opens, flutters, or stays shut. Cause: Lint buildup, corrosion, paint overspray, or an undersized hood. Fix: Clean the hood thoroughly and test by running the dryer; the flap should open wide and close smoothly after the cycle. If corrosion or damage is present, replace the hood. Ensure the duct diameter matches the hood size, and avoid fine-mesh screens that trap lint and reduce movement.
Birds, Rodents, and Insects
Symptom: Nesting material at the hood, noises in the duct, or a damper that cannot close. Cause: A missing or ineffective pest guard. Fix: Install a dryer-rated termination with an integrated guard that does not impede airflow or trap lint. Avoid aftermarket screens that create obstructions. Clean the area and confirm the damper now closes fully.
Code and Compliance Corrections
Symptom: Home inspection reports or appliance manuals flag issues with the current vent. Cause: Legacy materials or routing that no longer meet standards. Fix: Replace plastic or vinyl flex with smooth metal duct, remove screws protruding into the airstream, and reroute to reduce excessive length and elbows. Confirm that the termination is outdoors and that a backdraft damper is present.
Hidden Restrictions and Equivalent Length
Even when everything looks right, hidden resistance can lurk. Measure every elbow and straight run. Compare your total equivalent length against the dryer’s manual. Many homes unknowingly exceed limits due to tight-radius elbows or extra fittings at the wall box and termination. Upgrading to long-sweep elbows and a low-resistance hood can reclaim significant airflow. If reducing length is impossible, consult the manufacturer about listed booster fans, installed for accessibility and service.
Transition Hose Troubles
Short, accessible, and smooth describes a good transition. If it is long and serpentine, every ripple saps performance. Replace with a UL 2158A–listed product cut to the minimum length needed. Consider a recessed dryer box to protect the hose when you push the appliance back into place. Secure with listed clamps and leave enough room for periodic cleaning.
Attic and Crawlspace Runs
Ducts crossing unconditioned spaces demand extra care. Insulate to reduce condensation, support at close intervals, and maintain continuous slope to the exterior. Periodically check for loose hangers, rodent activity, or crushed sections from storage or foot traffic. In Somerville’s winters, cold-soaked metal can condense moisture quickly; insulation and shorter routes are the antidote.
When to Start Over
Some systems have so many compromises—too long, too many elbows, poor termination—that retrofitting becomes a patchwork of small gains. Rerouting to a new exterior location, replacing elbows with long-sweep fittings, and installing a modern, dryer-rated hood often deliver a step-change in performance and reliability. While it takes planning, the payoff is safer operation and consistently shorter cycles.
Frequently Asked Questions
Q: My dryer is new but still dries slowly. What now? A: Verify the vent first. New dryers cannot overcome poor venting. Check the hood, transition hose, and total equivalent length before calling for appliance service.
Q: Is it okay to add a screen to keep birds out? A: Use a termination specifically designed for dryers with an integrated guard, not a fine-mesh screen that can clog with lint.
Q: Can I reduce the duct size to fit an existing hole? A: Do not reduce below the dryer outlet size. Use the correct diameter and modify the opening instead.
Q: Why does the damper clatter in wind? A: Lightweight or ill-fitting dampers can flutter. Upgrade to a better-sealing dryer-rated hood and verify alignment.
Q: How often should I clean the duct? A: Inspect monthly at the hood and schedule a thorough cleaning annually, or sooner if you notice performance changes.
Q: Do I need a permit to change the vent route? A: Many jurisdictions require permits for new or altered exhaust systems. Check with Somerville’s building department before starting.
Putting Solutions into Action
Effective troubleshooting follows a simple sequence: inspect the termination, verify the transition hose, measure equivalent length, and correct support and sealing along the run. Each fix improves airflow and reliability. Address root causes—overlength runs, tight elbows, poor terminations—rather than just symptoms. When in doubt, a technician skilled in dryer vent installation can evaluate the system end-to-end, recommend the highest-impact changes, and confirm results with performance testing.
Ready for a Reliable Fix
If you want lasting results without trial and error, consider scheduling professional dryer vent installation that includes diagnostics, optimized routing, and commissioning. With careful attention to Somerville’s climate and housing styles, you can restore strong airflow, shorten dry times, and protect your home for the long term.
