
When you search for dryer vent installation near you in Somerville, New Jersey, you are doing more than planning a quick home upgrade—you are taking a critical step toward safeguarding your home, improving appliance efficiency, and protecting indoor air quality. Thoughtful planning, quality materials, and precise workmanship matter, especially in a town with a mix of historic and newer construction like Somerville. Whether you live near Main Street, in a condo community, or in a single-family home on a quiet cul-de-sac, the right design and execution will determine how well your vent performs and how safe your laundry area remains over time. Early in the process, it helps to understand the essentials of dryer vent installation, from duct types and routing to termination and maintenance.
Somerville homeowners often inherit older vent layouts that no longer meet modern best practices, or they may be finishing basements, moving laundry rooms, or replacing dated flexible hoses with safe, smooth metal ducts. A nearby professional can evaluate framing, existing mechanicals, and exterior walls to create a compliant, efficient path. Even if you plan to complete parts of the project yourself, knowing local norms and code expectations will help you avoid restrictions, minimize elbows, and ensure that lint and moisture exit the house reliably in all seasons.
Why local knowledge in Somerville matters
Somerville sits in a mid-Atlantic climate with humid summers, cold winters, and a fair share of rain and snow. Each of these variables influences how a dryer vent performs. Long winter runs can cause condensation in ducts if they are not insulated in unconditioned spaces. Summer humidity can magnify moisture concerns if the vent leaks or terminates too close to a soffit intake, crawlspace opening, or window. Local knowledge helps you balance these concerns with the practical realities of wall cavities, joist directions, and the shortest safe route to an exterior termination.
Many homes in town feature additions or retrofits that alter ideal vent paths. A seasoned installer will spot framing transitions, knee walls, and soffits that hide previous ductwork, then advise whether to re-route, replace with smooth rigid metal, or add supports and hangers to correct sagging lines. They will also plan for service access, because your vent system should be cleanable without tearing into finished walls every time lint accumulates.
Core principles of safe dryer venting
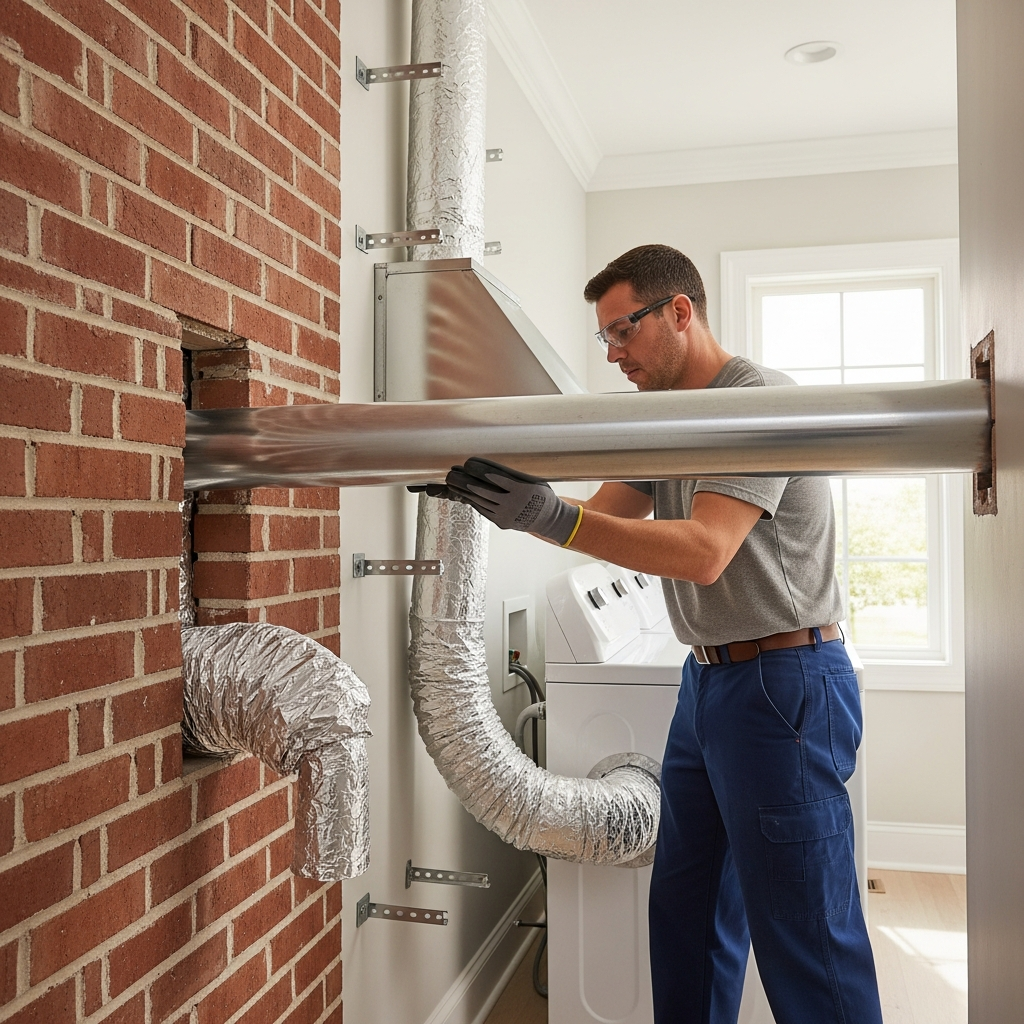
Good venting is not guesswork; it is a set of principles that keep air moving and lint under control. The duct should be as short and straight as possible, sized for the appliance (commonly 4 inches in diameter for standard dryers), and built from material that resists heat and crushing. Smooth-walled rigid metal is preferred for main runs because it reduces friction, lowers lint adhesion, and stands up to vibration. The transition connector between the dryer and the wall outlet should be a UL-listed semi-rigid metal or a compatible listed product designed for dryers, kept as short as the installation allows.
Elbows add resistance, so count them carefully and minimize total equivalent length. The termination hood should include a backdraft damper to prevent pests and swirling cold air from entering, and it should never have a screen that could trap lint. Joints should be secured with metal foil tape rated for high temperature; screws or fasteners that protrude into the airstream can snag lint and are typically discouraged. The entire system needs support at appropriate intervals to avoid dips that collect moisture and lint.
Planning the route: shortest path, best performance
In Somerville’s varied housing stock, the ideal vent route depends on where your laundry sits. A first-floor laundry located on an exterior wall might exit directly outdoors with a short run and one elbow. A basement laundry often requires a vertical rise between joists, a horizontal run to an exterior rim joist, and then a termination through a band board. Second-floor laundry closets within townhomes or newer builds might require a vertical riser to the roof with specific fire safety and weatherproofing considerations. In each scenario, measure the path, count fittings, and confirm that the total effective length meets the dryer manufacturer’s limits.
The exterior termination must be elevated above ground or snow lines and away from mechanical intakes, doors, and windows. In crowded side yards, installers sometimes prefer a rear wall or alley-facing termination to maintain clearance and reduce lint collection on patios or shrubs. Orientation also matters: a downward-angled hood with an effective damper helps keep wind-driven rain at bay.
Material choices: rigid, semi-rigid, and transitions
Rigid metal duct is the gold standard for main runs. It maintains shape, offers low airflow resistance, and is cleanable. Semi-rigid aluminum can be acceptable for short transitions where flexibility is required but should be kept as straight and short as possible. Plastic or vinyl materials are not appropriate for dryers because they can melt or ignite and trap lint. Use metal elbows with smooth interiors, and avoid crimped or crushed segments that will produce turbulence.
Couplings should be tight and sealed with UL- or HVAC-rated foil tape, never cloth duct tape. When passing through framing, provide protection against nail or screw penetration, and maintain required clearances from combustibles if specified by the appliance manufacturer. Where the duct travels through unconditioned spaces, consider insulation to curb condensation. Condensation in winter can drip back toward the dryer or create hidden moisture issues that lead to corrosion or biological growth.
Working around structural constraints
Older Somerville homes often have dimensional lumber and quirky framing that do not align with modern layouts. Professional installers know how to evaluate these conditions without compromising structure. Sometimes a slightly longer route with fewer sharp elbows outperforms a shorter path that snakes around framing. In basements with low headroom, appropriately sized elbows and secure hangers can keep ducts high and out of the way of storage or mechanical equipment service zones.
Penetrations through exterior walls must be carefully sealed to block air and water. Use a termination hood with a proper flange and weatherproof sealant or compatible flashing detail, depending on cladding (brick, vinyl, fiber cement, stucco). On brick, pre-drilling and anchoring the hood securely is essential. On vinyl siding, a mounting block can help create a flat surface and neat finish.
Performance testing and start-up
After installation, a performance check helps confirm airflow. While not every homeowner owns an anemometer, a professional can measure back pressure and verify that the dryer’s exhaust flow meets manufacturer targets. Even without instruments, you can confirm that the damper opens fully under load and that warm, moist air exits freely outdoors. Inside, watch for error codes on modern dryers that detect poor airflow, and listen for unusual vibrations that might indicate a crushed connector or loose joint.
A smoke pencil or incense stick near joints can reveal leaks; sealed connections keep lint and moisture inside the duct and out of wall cavities. If the dryer cycles take longer than expected after installation, re-check fittings and the termination for obstructions or paint overspray. Correcting issues early prevents lint accumulation from accelerating.
Upgrading older or unsafe vents
Many homeowners discover that their existing dryer vents use a plastic flex hose snaking across a basement floor, an overly long route to a distant corner, or a termination under a deck where lint festoons joists. Upgrading to a smooth, direct route transforms performance and reduces fire risk. If your current termination hood is screened, replace it with a dampered, screen-free model designed for dryers. If your laundry was moved during a renovation and the vent was never updated, now is the time to bring it into alignment with best practices.
Apartment or condo residents must also coordinate with building management and follow property bylaws. Shared walls and common elements complicate venting, requiring a plan that respects fire separation and access for maintenance. A reputable local installer can navigate these requirements with building officials or property managers.
Mid-project considerations and local coordination
In the middle of the project, communication matters as much as craftsmanship. If walls are open, take photos of the duct path and supports for your records. Clarify who will handle exterior siding or masonry patching around the new termination. Confirm that the final connection between the dryer and the wall box will be a short, listed transition piece rather than an excessively long flex run. If you need expert help evaluating these details, look for a Somerville provider experienced in dryer vent installation who can verify airflow and document the work for your home files.
Maintenance and long-term care
Even the best installation requires periodic cleaning. Lint will collect over time, especially near elbows, at the termination, and at the dryer’s internal lint trap housing. How often you clean depends on usage, the type of fabrics you dry, and the length and geometry of your vent. Many households benefit from an annual or biannual cleaning schedule. Between professional cleanings, inspect the termination to ensure the damper opens and closes freely and that no nesting materials or debris are present.
Be attentive to symptoms: longer drying times, excessive heat in the laundry area, a burning smell, or lint collecting behind the dryer may mean that the duct is obstructed. Addressing these issues promptly preserves the life of the appliance and reduces energy waste.
Common mistakes to avoid
Several recurring errors undermine vent performance. These include using screws that penetrate the airstream, installing screens on the termination hood, relying on flimsy plastic flexible hose, running the duct too long with multiple tight elbows, and ignoring manufacturer limits on equivalent length. Failing to secure ducts can create sags that trap moisture. Neglecting to seal the exterior penetration invites pests and water. Each of these issues is preventable with planning and proper materials.
Another pitfall is pushing the dryer back so far that it crushes the transition connector. Allow room for the dryer to vent freely, and consider an inset dryer vent box to recess the connection and save space without kinking the duct. Always verify that the transition connector is rated and listed for dryer use.
Choosing a local professional
Hiring a nearby specialist offers several advantages: quick response, familiarity with Somerville’s building styles, and relationships with code officials where permits are required. A competent installer will discuss route options, materials, performance goals, and aftercare, then provide documentation of the work. They will also educate you about safe operation—cleaning the lint screen each cycle, keeping the area around the dryer clear, and scheduling periodic duct maintenance.
Before work begins, ask about how they will protect finished spaces, manage dust, and verify airflow. Request that joints be sealed with appropriate tape and that any roof or wall penetrations be weatherproofed to manufacturer recommendations. Good communication today prevents callbacks tomorrow.
Frequently asked questions
Q: How long should a dryer vent run be? A: Shorter is better. Each elbow adds resistance, and most dryer manufacturers publish maximum equivalent lengths. A local pro can measure and design a route that stays within those limits for your specific model.
Q: Can I vent a dryer into a garage, attic, or crawlspace? A: Dryers must vent outdoors. Venting indoors or into enclosed spaces leads to lint and moisture problems, damaging structures and creating safety hazards.
Q: What material is best for dryer ducts? A: Smooth rigid metal is preferred for main runs, with a short, listed semi-rigid transition at the appliance. Avoid plastic or unlisted flexible ducts.
Q: How often should I clean the vent? A: Many homes benefit from annual or biannual cleaning, but heavy use or longer duct runs may require more frequent service. Pay attention to drying times and visible lint at the termination.
Q: Do I need a screen on the exterior hood? A: No. Screens trap lint. Use a hood with a backdraft damper designed specifically for dryers.
Q: What are signs my vent is failing? A: Long cycles, overheating, a musty smell in the laundry area, or visible lint around the termination or behind the dryer often indicate restrictions or leaks.
Q: Is roof venting acceptable? A: It can be, provided the roof cap is designed for dryers and installed with proper flashing and backdraft protection. Maintenance access must remain practical.
Q: Will a new vent improve energy efficiency? A: Yes. Better airflow shortens drying times, which reduces energy use and wear on your appliance.
Make the right move for your home
Your laundry room should be safe, efficient, and easy to maintain. If you are unsure about your existing setup or planning a new route after a renovation, connect with a Somerville specialist who can inspect, design, and complete the work to a high standard. For trusted local help, schedule expert dryer vent installation and enjoy better performance, safer operation, and peace of mind season after season.
