
Selecting the right dryer vent installation kit in Somerville, New Jersey is about more than picking a box from a shelf. The layout of your laundry area, the wall or roof where you plan to terminate, and the type of dryer you own each play a role in performance and safety. Kits can simplify material selection and streamline the process, but knowing which components to prioritize will make the difference between a system that works well and one that struggles. For homeowners who want professional guidance and dependable results, turning to expert dryer vent installation is a smart way to ensure that each component is matched to your home’s needs.
What a Good Dryer Vent Kit Should Include
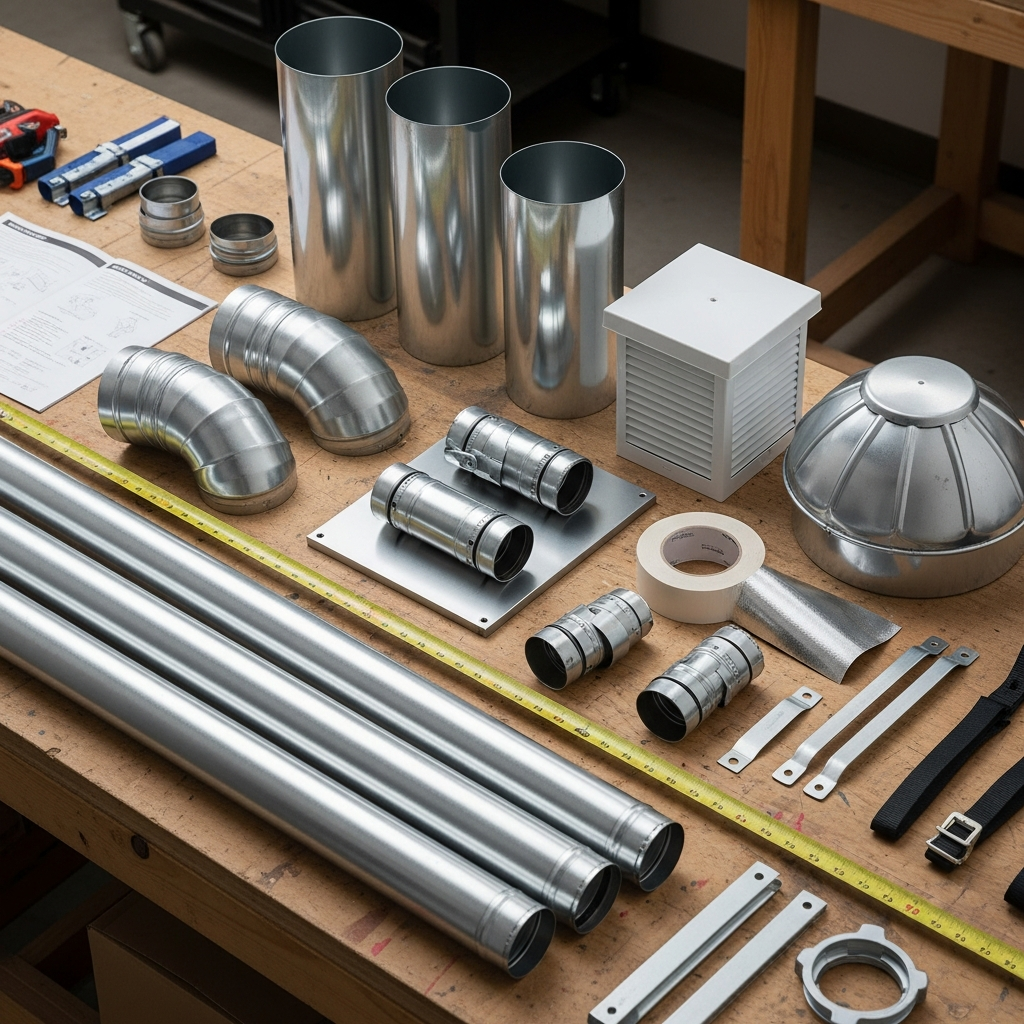
Strong kits focus on safety, airflow, and durability. For the permanent vent run, rigid metal duct sections with smooth interiors shed lint and stand up to everyday use. When a short, gentle bend is necessary behind the dryer, semi-rigid metal can help without kinking. Quality elbows, proper supports, and a wall or roof termination hood with a free-moving damper are also essential. Foil-backed HVAC tape (not cloth duct tape) is used on joints to keep the system airtight.
Common Kit Types for Somerville Homes
- Wall-Termination Kits: Designed for dryers near exterior walls, these sets often include rigid duct, elbows, a wall hood with a damper, and exterior trim.
- Roof-Termination Kits: For upstairs laundry rooms or when a wall exit is not feasible, roof kits provide specialized caps and flashing that shed water and resist backdrafts.
- Periscope Connector Kits: Ideal for tight spaces where the dryer must sit close to the wall, these low-profile, all-metal channels reduce kinks and preserve clearance.
- Semi-Rigid Transition Kits: Used as a short connector between the dryer and wall, semi-rigid metal handles gentle curves better than rigid while maintaining a smoother interior than flexible foil.
- Through-Basement or Crawlspace Kits: When venting to an accessible exterior wall from a basement or crawlspace, kits may include supports and moisture-resistant exterior components.
What to Avoid
Not all kits are created equal. Avoid thin, easily crushed foil hoses for the permanent run, and skip any kit that relies on interior screws or sharp edges inside the airflow. Bird or insect screens at the termination can trap lint and restrict exhaust, so look for a damper-style hood instead. Aim for components with smooth interiors, durable metals, and fittings that seal tightly without penetrating the airstream.
Matching Kits to Laundry Room Layouts
Each laundry layout in Somerville brings unique challenges. If your dryer is on an exterior wall, a short, straight path with a wall kit often provides the best results. For second-floor or centrally located laundry rooms, a roof kit may be necessary, with careful routing to minimize elbows. In basements, you might route horizontally to the closest exterior wall, maintaining support and slight slope as appropriate to discourage condensation. In all cases, prioritize the fewest turns and a direct path to the outdoors.
Periscope Connectors for Tight Clearances
Many homes place laundry areas in closets or alcoves where every inch counts. Periscope-style metal connectors allow the dryer to sit closer to the wall without crushing a hose. They align with the wall outlet, maintain a smooth pathway, and reduce the risk of kinks that can slow airflow. Combined with rigid duct runs and long-radius elbows, they offer a tidy, durable solution.
Elbows, Supports, and Sealing
Elbows should be long-radius whenever possible to maintain velocity and reduce backpressure. Supports keep ducts from sagging, which can trap lint and moisture. Joints must be sealed with foil-backed tape appropriate for HVAC use, never cloth duct tape that degrades with heat and humidity. Attention to these small details in your kit selection and installation has a large impact on overall performance.
Exterior Hoods and Weather Resistance
Choose a termination hood that opens freely, matches duct size, and closes when the dryer is off. A hood with a well-designed damper prevents drafts, rain entry, and pest intrusion. For Somerville’s winters, look for robust materials that resist freezing and warping. Placement also matters: mount the hood in a location that avoids snow accumulation, splashback, and excessive wind exposure.
Roof vs. Wall Termination
Wall terminations are generally preferred for simplicity and accessibility. Roof terminations require careful flashing and weatherproofing to protect your home, along with a cap that opens reliably under exhaust pressure. If you must vent through the roof, choose a kit with sturdy flashing, a compatible cap, and instructions that emphasize proper slope and sealing. In either case, ensure the route avoids sharp turns and unnecessary length.
Compatibility With Your Dryer
Most modern dryers specify a certain duct diameter and maximum equivalent length (a combination of straight runs and fittings). A good kit and installation plan will respect these guidelines, reducing the chance of excess run length or restrictive elbows. The right components keep your dryer within its designed airflow range, helping to avoid long cycles and overheating.
DIY or Professional Installation?
Homeowners comfortable with measuring, cutting, and sealing can tackle straightforward installations, especially on exterior walls with direct exits. However, when the route is long, passes through finished spaces, or must reach a roof termination, professional help is invaluable. A skilled installer will navigate obstacles, protect finishes, and test performance at the end of the job. If you prefer a confident, end-to-end solution, Somerville specialists in dryer vent installation can specify the right kit and set it up for dependable use.
Maintenance Considerations for Any Kit
Clean the lint screen before every load and check the exterior hood regularly to ensure free movement. Even with top-tier kits, routine vent cleaning based on household usage supports consistent airflow. If dry times lengthen or the laundry area feels unusually warm or humid, schedule an inspection to verify that nothing has shifted or become obstructed.
Frequently Asked Questions
Q: What diameter duct should I use? A: Most dryers require a specific diameter listed in the manual. Kits should match that size to maintain proper airflow.
Q: Can I use flexible foil for the entire run? A: It is not recommended. Rigid metal ducts are preferred for the permanent run because they resist crushing and have smoother interiors.
Q: How many elbows are too many? A: Fewer is better. Each elbow adds resistance. Long-radius elbows help if turns are unavoidable.
Q: Do I need a special hood for roof exits? A: Yes. Roof terminations require caps and flashing designed to resist weather and open reliably under exhaust pressure.
Q: What sealing method should I use? A: Use foil-backed HVAC tape rated for the temperatures involved. Avoid cloth duct tape.
Q: Should I include a screen at the outlet? A: No. Screens trap lint and restrict flow. Choose a damper-style hood instead.
Q: Are periscope connectors safe? A: When properly sized and installed, they are a strong option for tight spaces because they are metal and maintain clearance without kinking.
Q: How often should I check the system after installation? A: Inspect the exterior hood seasonally and monitor your dryer’s performance. If you notice longer cycles or unusual heat, schedule a professional review.
Take the Guesswork Out of Kit Selection
The right kit brings together quality ducting, reliable fittings, and a weather-ready termination in a package that suits your home’s layout. When combined with careful routing and thorough sealing, these components deliver safer, faster drying. If you would rather have a specialist evaluate your space, choose appropriate materials, and complete the work neatly, consider scheduling professional dryer vent installation with a trusted Somerville team that understands how to balance performance, durability, and local conditions.
