
Introduction
Dryer vent installation is one of those behind-the-scenes projects that has an outsized effect on safety, energy efficiency, and day-to-day convenience. In Somerville, New Jersey, where seasonal temperature swings and older housing stock can complicate airflow, getting it right matters. If you are weighing whether to handle the work yourself or bring in a specialist, learning the fundamentals will help you make better decisions and supervise the finished product. For homeowners who prefer expert support, trusted local pros can deliver code-compliant dryer vent installation that protects your home while improving laundry performance.
This comprehensive guide explains the purpose of a well-designed vent, the materials to use and avoid, Somerville-specific climate and code considerations, and a step-by-step process for planning, installing, testing, and maintaining a safe exhaust path. By the end, you will understand how to lay out the shortest, straightest route; how to select the right duct and termination; and how to prevent the common mistakes that lead to clogs, moisture, and premature dryer failure.
Why Proper Dryer Venting Matters
Every load you dry carries lint and moisture out of the appliance. Without a smooth, direct, sealed vent, those byproducts accumulate inside the home or within the duct itself. The consequences include longer drying times, higher utility usage, mold-friendly humidity, and—most importantly—elevated fire risk. National safety data points to lint accumulation as a primary ignition source in laundry-area fires. Good design reduces those risks by minimizing airflow resistance, containing heat, and channeling exhaust outdoors through a backdraft-protected termination.
Beyond safety, proper venting extends appliance life. When air can move freely, the motor and heating elements operate in their intended range, reducing wear. Clothes also dry faster and more gently, preserving fabrics. In Somerville, winter air is cold and dry while summers can be humid. A correctly installed vent keeps your home’s indoor climate stable by preventing excess moisture from spilling into conditioned spaces.
Codes, Standards, and Local Factors in Somerville, New Jersey
Somerville follows New Jersey’s adoption of the International Residential Code (IRC) with state amendments. While you should verify specifics with your local building department, the common requirements include using listed duct materials, keeping total equivalent length within limits, providing a backdraft damper at the termination, and prohibiting fasteners that protrude into the airstream. Bathroom or attic terminations are not allowed; exhaust must discharge outdoors. Gas dryers require proper clearances and adherence to manufacturer instructions for combustion air and venting.
Climate also matters. In cold winters, ducts routed through unconditioned attics or crawlspaces can accumulate condensation if poorly insulated or excessively long. In warm months, wildlife can be active around exterior vents, making a robust termination and periodic inspection essential. Consider snow lines, landscaping, and walkway placement when you choose a termination point to avoid recirculating moist air onto siding or people.
Materials: What to Use and What to Avoid
- Rigid metal duct (commonly smooth-walled aluminum or galvanized steel) for the main run. Smooth interiors reduce lint buildup and improve airflow.
- UL 2158A–listed transition duct between the dryer and the in-wall connection. Keep this short and accessible.
- Foil-backed or mastic-rated HVAC tape for sealing exterior joints; confirm compatibility with the duct material.
- Exterior termination hood with integrated backdraft damper and bird/rodent guard designed for dryer exhaust.
- Low-profile elbows with large radius where direction changes are unavoidable, reducing equivalent length penalties.
- Mounting straps or hangers to support the duct at regular intervals and prevent sagging.
- Avoid plastic or vinyl flex duct. It is not permitted for concealed spaces and is prone to sagging, tearing, and lint accumulation.
- Avoid screws that penetrate the duct interior. Use mechanical crimps and appropriate tape or clamps to secure joints without creating lint-catching points.
- Avoid screens with fine mesh at the exterior; they clog easily. Choose a termination designed specifically for dryers.
Planning the Route
Before you cut any holes, map the shortest, straightest path from the dryer to the exterior. Every foot of run and every bend adds resistance. Equivalent length tables show that a single sharp 90-degree elbow can add many feet of effective distance. If your layout forces turns, aim for gentle-radius elbows and keep the total equivalent length within the appliance manufacturer’s limit. Many dryers print a chart in the manual indicating maximum length based on the number and type of elbows.
Identify obstacles such as studs, joists, plumbing, electrical lines, and existing vents. Plan clearances and support points every few feet to maintain a straight grade without sags. Consider where a service loop or cleanout access might be helpful, especially in longer runs. If the path crosses unconditioned spaces, plan for insulation around the duct to minimize condensation risk.
Wall vs. Roof Termination
Wall terminations are often preferred because they are easier to access, inspect, and maintain. They also avoid roof penetrations that may be more vulnerable to weather and require careful flashing. However, depending on your home’s layout, a roof termination may produce a shorter overall path. If you exit through the roof, use a termination specifically rated for dryer exhaust, flash it according to roofing best practices, and verify the backdraft damper swings freely.
Regardless of the location, place the termination where lint will not stain visible siding features and where the damper can open fully. Keep it clear of snow accumulation zones, shrubbery, and places where kids or pets might interfere with the flap. Maintain distance from windows, doors, and fresh-air intakes according to code and the termination manufacturer.
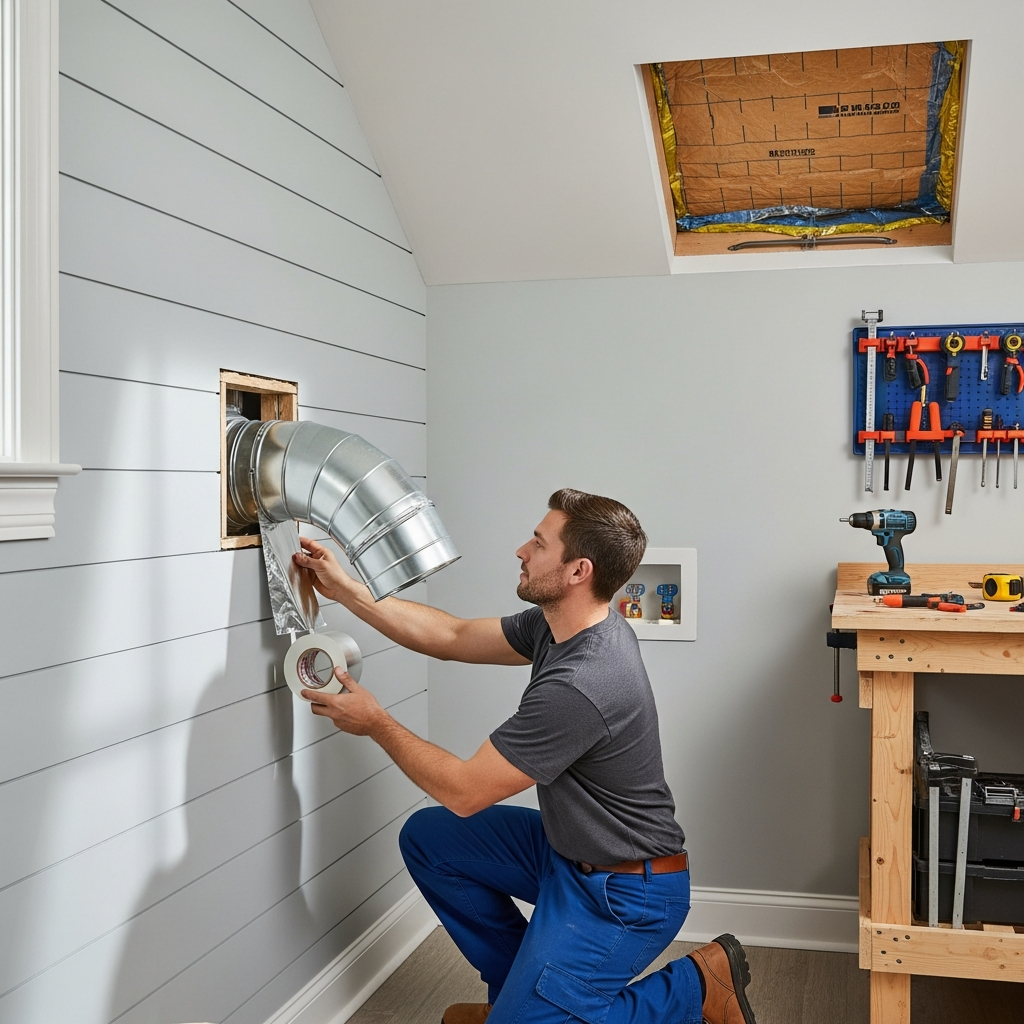
Step-by-Step Installation
- Measure and confirm the route. Verify the total equivalent length and note where elbows and supports will be installed.
- Prepare the dryer location. Level the appliance space, confirm the electrical or gas hook-up is code-compliant, and ensure there is room to connect and service the transition duct.
- Mark and cut the exit opening. Use a hole saw or appropriate tools to create a clean penetration through siding or the roof, protecting nearby materials.
- Install the exterior termination hood. Caulk or flash as required, and fasten securely so wind cannot rattle or loosen it. Confirm the damper moves freely.
- Assemble the first duct segment. Crimped ends should face the direction of airflow to prevent lint catching at joints. Dry-fit without screws penetrating the airstream.
- Route the duct along the planned path. Use gentle elbows rather than tight turns. Keep runs straight, with slight pitch toward the exterior to discourage condensation pooling.
- Support the duct. Install straps or hangers at regular intervals to prevent sagging and vibration, leaving access for inspections.
- Seal exterior joints. Use listed foil-backed tape or mastic-rated products compatible with metal duct. Avoid cloth-backed duct tape.
- Connect the transition duct. Use a short UL 2158A–listed transition between the dryer and the in-wall fitting. Secure with appropriate clamps, ensuring there are no kinks.
- Test the system. Run the dryer on a heated cycle with a clean lint screen. Check airflow at the termination, listen for rattles, and verify warm, moist air is exhausting outdoors.
Mid-Project Quality Checks
Even a careful installer can miss details that compromise performance. Before closing up any walls or pushing the dryer into place, verify the following items. Ensure every joint is fully seated with the crimped end pointing downstream. Confirm there are no screws or rivets protruding into the airstream. Look for sharp bends, crushed sections behind the appliance, or unsupported spans that may sag over time. Check that the termination damper opens fully during dryer operation and closes when off. If you are unsure about any element, consider consulting a pro who focuses on dryer vent installation to validate your design and workmanship.
Common Mistakes to Avoid
- Using plastic flex duct in concealed spaces. It degrades quickly, traps lint, and is often prohibited.
- Overusing elbows. Each bend significantly increases equivalent length; route for straightness wherever possible.
- Allowing long, sagging transition hoses. Keep the transition short, smooth, and accessible.
- Terminating into attics, crawlspaces, or garages. Exhaust must go outside, never indoors.
- Adding screens at the termination. Screens trap lint; rely on a proper dryer termination with a damper and guard.
- Ignoring manufacturer limits. The dryer manual provides maximum length charts based on elbow count and type.
- Failing to seal joints. Air leaks reduce airflow and can deposit lint and moisture inside walls.
Testing and Commissioning
After installation, confirm performance with a few basic tests. With the dryer running on a warm cycle and the lint screen cleaned, check airflow at the termination. The damper should open fully and stay open without fluttering excessively. Inside, listen for vibrations that might signal a loose strap or an out-of-round elbow. Use your hand to feel for leaks at joints; any noticeable warm air should be addressed with additional sealing.
Observe a full drying cycle on commonly laundered items such as towels or denim. If drying times remain long, revisit the route length, elbow count, or any crushed sections. A simple vane anemometer at the termination can help quantify airflow, though most homeowners rely on performance cues such as damper opening angle and cycle duration.
Maintenance and Upkeep
Even a perfect install will collect some lint over time. Build a maintenance habit that includes cleaning the lint screen before every load, vacuuming behind and under the dryer seasonally, and inspecting the exterior termination monthly for visible buildup, stuck dampers, or animal activity. At least annually, consider a full duct inspection and cleaning, especially if the route is long or includes multiple elbows. If anyone in the home dries high-lint items frequently—like fleece, towels, or pet bedding—increase the inspection cadence.
Watch for signs of trouble: a burnt-lint odor, unusually hot surfaces on the dryer, condensation on nearby walls, or lint accumulation around the exterior hood. These suggest partial blockages or airflow restrictions that should be addressed promptly to maintain safety and efficiency.
Special Considerations: Gas vs. Electric Dryers
Gas dryers vent combustion byproducts in addition to moisture and lint. Follow the manufacturer’s instructions and local code for clearances to combustibles and for proper room ventilation. Never reduce duct diameter below the appliance outlet, and ensure the termination damper opens freely to prevent backdrafting. Electric dryers face many of the same airflow concerns, but gas models make strict adherence to venting standards even more critical.
Somerville-Specific Tips
Older Somerville homes may have plaster walls, irregular framing, or legacy mechanical routes that complicate a direct path to the exterior. When retrofitting, consider wall cavities that align vertically with open bays to the basement or attic to keep elbows to a minimum. In winter, confirm that snow removal does not pile drifts against the termination. In summer, trim vegetation to preserve clearance and prevent pests from nesting near the hood.
If the duct must traverse unconditioned space, use insulation sleeves rated for the application to limit condensation. Keep an eye on attic dew points during shoulder seasons; a well-insulated and properly sloped duct helps drain incidental moisture outward.
Upgrades and Accessories
- Low-profile periscope transitions allow tight clearances behind the dryer while maintaining smooth airflow.
- Through-the-wall boxes with recessed connections keep hoses from crushing when the dryer is pushed back.
- Magnetically latched or weighted dampers can improve backdraft resistance in windy conditions if properly rated for dryers.
- Inline booster fans are a last resort and must be listed for dryer use, accessible for service, and installed per manufacturer guidelines.
Frequently Asked Questions
Q: Can I share a dryer vent with a bathroom fan or another dryer? A: No. The dryer must have its own dedicated exhaust path to the outdoors with a listed termination and damper.
Q: How often should the vent be cleaned? A: Inspect monthly at the exterior and perform a thorough cleaning at least annually, adjusting frequency for heavy use or long, elbow-heavy runs.
Q: Is foil flex acceptable behind the dryer? A: Use only UL 2158A–listed transition duct, kept short and accessible. Avoid unlisted products and never run them through walls or concealed spaces.
Q: Can I vent into the attic with a filter? A: No. Exhaust must terminate outdoors. Attic venting risks moisture damage and lint accumulation.
Q: What if my route is too long? A: Reevaluate the path for a closer termination point or fewer elbows. If unavoidable, consult the dryer manual about maximum lengths and consider a listed booster fan as a code-compliant exception.
Q: Do I need a permit? A: Many jurisdictions require a permit for new or altered venting; check with Somerville’s building department for current requirements before starting work.
Q: Why is my damper stuck open? A: Lint buildup, corrosion, or a poorly sized hood can cause sticking. Clean, lubricate if allowed by the manufacturer, or replace with a proper dryer-rated termination.
Q: Should I insulate the duct? A: In unconditioned spaces, insulation can reduce condensation. Use a product appropriate for the environment and maintain clearances to heat sources.
Bringing It All Together
A successful installation aligns three goals: the shortest feasible path, smooth and sealed components, and a durable termination placed for year-round access. When each element reinforces the others, you get faster dry times, fewer repairs, and lower risks. Whether your Somerville home is a historic gem or a newer build, the principles remain the same—plan carefully, use the right materials, and test thoroughly.
Ready for Professional Help?
If you would rather have a seasoned technician design the route, handle penetrations, and verify airflow with specialized tools, consider scheduling professional dryer vent installation. With expert attention to codes, climate, and craftsmanship, you can safeguard your home, protect your appliance, and enjoy consistently quick, reliable laundry cycles for years to come.
