
Inspection Guide: How to Evaluate Your Dryer Vent in Somerville, NJ
Regular inspections are the foundation of safe and efficient dryer operation. In Somerville, New Jersey, weather shifts, older housing stock, and remodeling trends can create unique venting conditions that deserve attention. This guide explains how to evaluate your vent system from the dryer to the exterior hood, what issues to watch for, and when to call a professional. If you prefer to pair these checks with expert care, consider arranging professional dryer vent cleaning to ensure hidden problems are addressed thoroughly.
Start with Safety and Access
Begin any inspection by cutting power to the dryer and ensuring the gas supply is handled safely if you have a gas model. Clear space around the appliance to avoid snagging the transition duct when you move it forward. Have a flashlight ready and note any recent changes in performance, such as longer drying times, a hot laundry room, or unusual odors. These symptoms often point to airflow restrictions or vent damage that the inspection should confirm.
Pull the dryer forward gently and examine the transition duct. Look for crushing, kinks, or excessive length coiled on the floor. The transition duct should be as short and straight as practical, with smooth curves that do not compress airflow. If the material is old foil or plastic, make a note; upgrading to smooth metal ducting is typically recommended for improved safety and performance.
Interior Vent Path Assessment
Identify the route the vent takes through the home. Does it run up an interior wall and through the roof? Across a basement ceiling toward an exterior wall? Every elbow and extra foot of duct increases resistance. While you might not see every section, you can often infer length and layout from attic, basement, or crawl space access. Long, complex runs benefit the most from professional cleaning techniques that can reach and agitate compacted lint.
As you trace the path, look for signs of damage such as disconnected joints, missing screws, or tape that has dried out and failed. Lint streaks on the duct exterior may indicate leaks where lint-laden air escapes. If the vent travels through unconditioned spaces, consider whether condensation might be occurring; moisture encourages lint to cling to the duct walls and can increase buildup.
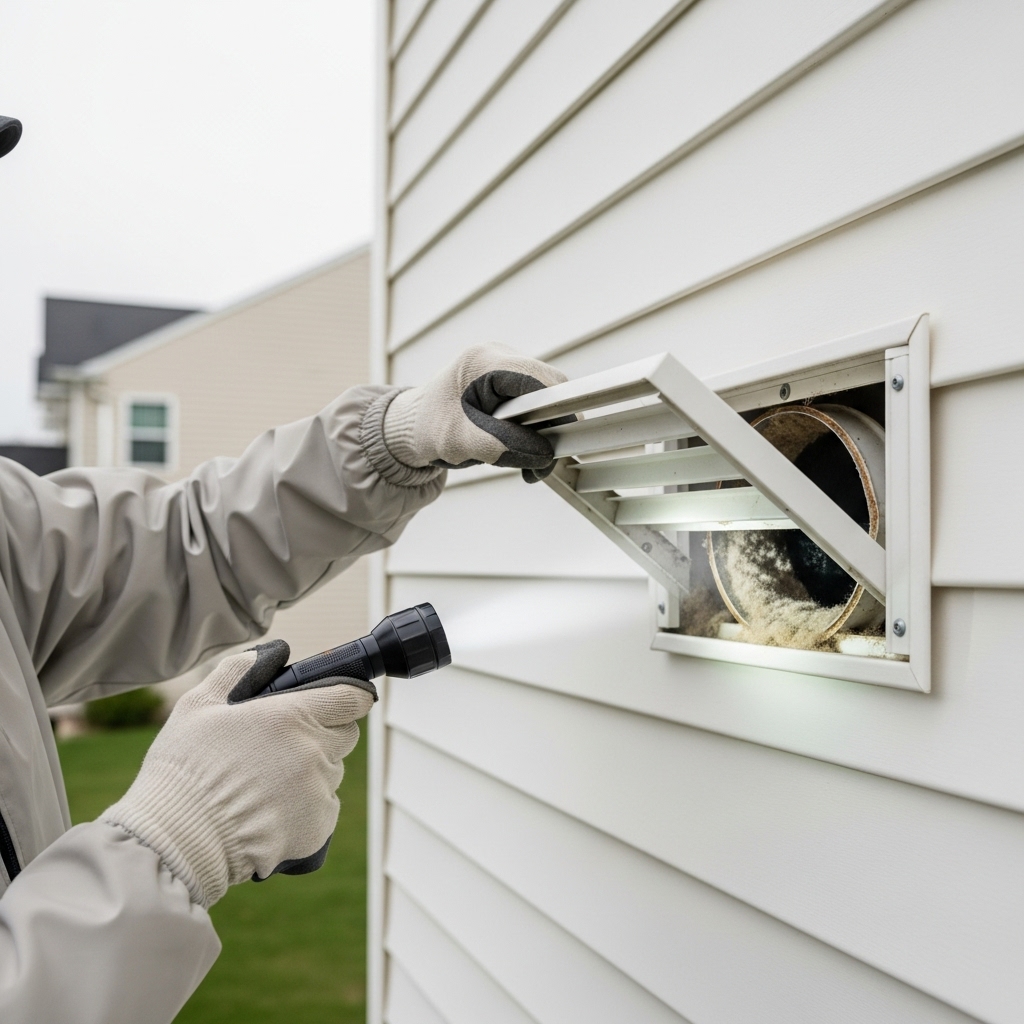
Exterior Termination Inspection
Visit the exterior hood or louvered vent where the dryer exhausts outdoors. Verify that the flap opens freely during operation and closes when the dryer stops. Any sticking or resistance warrants attention. Look for lint matting around the cap, and check for signs of insects or nesting birds. If a fine mesh screen is present, note that screens can trap lint quickly and may not be suitable for dryer exhaust. A well-designed hood with a backdraft damper reduces blockages and allows for efficient exhaust.
In winter, ice can accumulate on the cap, especially if moisture condenses around the opening. Ensure the hood is properly oriented and sealed to the exterior wall to prevent water intrusion. Caulk or flashing failures near the cap can allow drafts and moisture into the home.
Airflow and Backpressure Clues
Run the dryer with a small load to observe performance. If the laundry room heats up, the dryer’s top or sides feel unusually hot, or the exterior flap opens weakly, airflow may be restricted. Persistent musty odors on clothing after drying also suggest incomplete exhaust. If you have access to an anemometer or backpressure gauge, measurements can confirm what you observe, but your senses are often enough to justify a professional visit when results are concerning.
Listen for rattling or whistling noises along the vent path, which might indicate a loose joint or a partially blocked section. A rhythmic tapping at the exterior cap may be the flap struggling against lint accumulation or wind resistance.
Common Inspection Findings in Somerville Homes
In older properties or homes with multiple remodels, it is common to find long vent runs with numerous elbows. Each bend can catch lint, especially where humidity and temperature differences cause condensation. Another frequent issue is a transition duct crushed behind the dryer when the appliance is pushed back after cleaning or moving. You may also encounter outdated materials; flexible plastic or foil duct is vulnerable to heat and crushing and can host more lint than smooth metal.
Occasionally, vents are misrouted into attics, crawl spaces, or garages. This is unsafe and can cause moisture damage, mold growth, and unpleasant odors. The vent must terminate outdoors with a proper hood. If you discover or suspect this condition, correct it promptly with the guidance of a professional.
Professional Cleaning and Verification
When your inspection reveals warning signs—or when more than a year has passed since the last cleaning—call a qualified specialist. Professionals use rotary brushes, air tools, and powerful collection systems to remove lint throughout the vent. They verify that the hood opens and closes properly, replace or recommend replacement of unsafe components, and measure airflow to confirm improvement. For many Somerville households, this annual visit fits neatly into a home maintenance plan alongside HVAC servicing and other safety checks.
Midway through your maintenance calendar, it is smart to schedule a thorough appointment that combines inspection with cleaning. A reputable provider of Somerville dryer vent cleaning can find hidden trouble spots, ensure code-aligned materials, and improve performance in a single visit.
Maintenance Habits That Support a Clear Vent
Clean the lint screen before or after every load, and wash it occasionally to remove residue that reduces airflow. Keep the area behind the dryer tidy to prevent dust accumulation. Avoid overloading the dryer; balanced loads dry faster and generate less lint. After renovations or storms, glance at the exterior hood to make sure it moves freely and remains free of debris.
Consider the proximity of storage items to the dryer. Boxes or laundry supplies pressed against the appliance may shift and compress the transition duct. Maintain a clear zone so connections stay intact and air can move freely.
Frequently Asked Questions
How often should I inspect my dryer vent? Perform a quick visual check monthly and a more thorough review every six months. Schedule professional cleaning annually or more often for heavy use households.
What if I cannot trace the full vent path? Many homes have hidden runs. A professional can use tools and experience to assess and clean the entire system, including behind walls or ceilings.
Is a screen on the exterior vent acceptable? Screens can trap lint quickly. A proper dryer vent hood with a backdraft damper is typically preferred to maintain airflow and reduce blockage.
Why does my laundry room get hot and humid? Restricted airflow forces heat and moisture to linger. A clear vent releases exhaust outdoors, stabilizing room temperature and humidity.
Can I leave excess transition duct coiled behind the dryer? Excess length and tight coils invite crushing and kinks. Use the shortest practical length with smooth curves for best performance.
Will professional cleaning reduce odors? Yes. Removing lint and moisture from the vent path often eliminates musty smells on clothing and in the laundry room.
Take the Next Step for a Safer, More Efficient Dryer
Routine inspections paired with expert service will keep your dryer vent performing reliably. For clear airflow, safer operation, and fewer headaches, schedule dryer vent cleaning with a trusted Somerville specialist and enjoy confidence in your home’s laundry system all year long.
