
Clear steps make complex projects manageable. If your Somerville, New Jersey home has rooms that never quite reach the right temperature, dusty vents, or a blower that runs too hard, disciplined air duct repair can restore comfort and efficiency. This guide lays out a start-to-finish process you can follow safely, with checkpoints that prevent mistakes and verify results. If you decide a professional assessment is a better first move, schedule trusted air duct repair to get baseline testing and a targeted plan before you lift a tool.
The steps below build on each other. Shut down and assess before you open anything. Contain dust before you disturb it. Seal air pathways before you insulate. Verify performance before you call the job complete. With Somerville’s winter cold and summer humidity, that order protects your health and ensures repairs last.
Step 1: Safety and system shutdown
Turn off the thermostat so the blower will not start during work. Cut power to the air handler or furnace at the service switch or breaker. This prevents moving parts and reduces electrical risk. Keep a bright headlamp, cut-resistant gloves, eye protection, and a particulate respirator available—sheet metal edges are sharp and attics and basements can be dusty.
Survey the work area for hazards: standing water, vermiculite insulation that could indicate asbestos, mold on porous materials, or exposed electrical wiring. If any of these appear, stop and bring in the appropriate professional. In tight crawlspaces, confirm you have a safe path and adequate lighting before proceeding.
Step 2: Map the system
Sketch where the air handler sits, which way the supply trunk travels, where branches tee off, and where returns draw air back. Label register rooms on your sketch. This visual helps you anticipate airflow needs and identify likely chokepoints like long runs, tight elbows, or stacked flex duct. Photograph existing issues—leaks, disconnected collars, kinks, crushed sections, and missing insulation. A map and photos keep repairs organized and measurable.
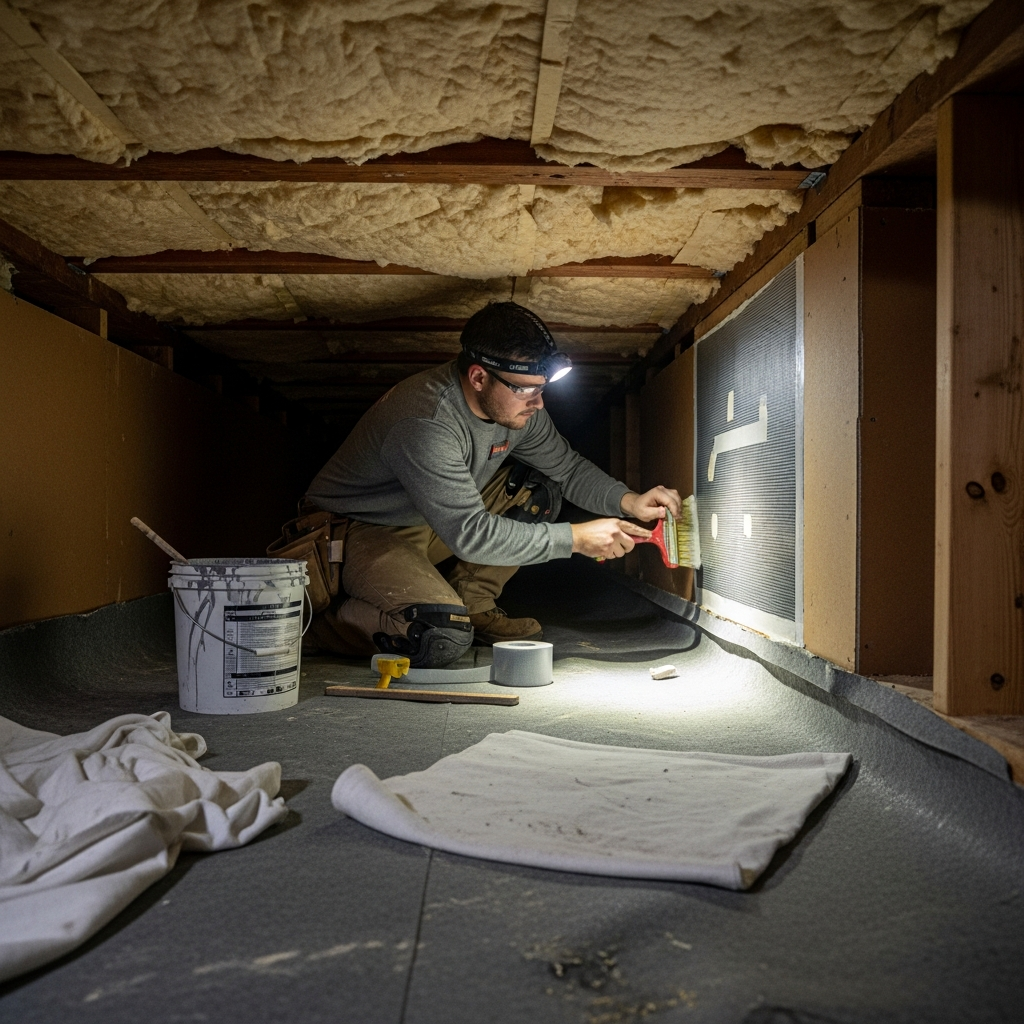
Step 3: Gather the right materials
- UL 181-rated mastic and UL 181 foil tape for sealing
- Sheet metal screws, hanger straps, drawbands or zip ties for flex duct
- Tin snips, a nut driver, measuring tape, and a chip brush
- HEPA-filtered vacuum and rags for surface prep and cleanup
- Duct wrap insulation with a foil-faced vapor barrier for unconditioned spaces
- Personal protective equipment: gloves, glasses, respirator, and knee pads
Skip cloth “duct tape.” It fails quickly under temperature and pressure. Stick with code-approved products that stand up to Somerville’s seasonal swings.
Step 4: Contain dust and prepare
Lay drop cloths or plastic under the work area. Close supply registers in living areas while you work and place a temporary filter over return grilles to catch stray dust if you must open a plenum. Vacuum loose debris before sealing; mastic sticks poorly to dirt. Keep a trash bag nearby to collect old tape, insulation scraps, and cuttings as you go.
Step 5: Repair sheet metal leaks
- Clean seams and joints with a dry cloth.
- Apply a first coat of mastic, pressing it into gaps with a brush.
- Embed fiberglass mesh where gaps exceed 1/8 inch.
- Apply a second coat to achieve the recommended thickness.
- Where appropriate, use UL 181 foil tape on clean, dry metal for quick reinforcement.
Allow sealant to cure per label directions. Avoid covering moving parts or dampers. If you discover rust or staining, investigate moisture sources before sealing.
Step 6: Reconnect and straighten flex duct
- Slide the inner liner fully over the metal collar bead.
- Secure with a drawband or heavy zip tie behind the bead; add three screws into the helix if allowed.
- Seal the joint with mastic or UL 181B tape.
- Pull the outer vapor barrier over the assembly and tape it separately for a moisture-tight jacket.
- Straighten runs, minimize bends, and support every four feet with wide straps that cradle, not pinch.
Replace crushed sections rather than trying to reshape them. Keep flex lengths as short and direct as practical; long, meandering runs starve distant rooms and raise system pressure.
Step 7: Seal boot perimeters and returns
Air lost at boot-to-drywall gaps and return plenums adds up. Seal boot perimeters to finished surfaces with appropriate sealant or metal-to-gypsum tape. At the air handler platform and filter rack, seal all holes and seams so return air cannot bypass the filter. Recoat duct board plenum joints with mastic if they show age-related cracking.
Step 8: Insulate and protect
In Somerville’s climate, supply ducts in unconditioned spaces need insulation with sealed vapor barriers. After air sealing, wrap ducts with appropriate R-value insulation, staggering joints and sealing all seams with matching foil tape. Do not compress insulation; thickness equals performance. Keep insulation clear of flue pipes and high-heat components per code clearances.
Step 9: Verify performance
With power restored and a clean filter installed, run the system. Feel for air at previously leaky seams; use a smoke pencil or incense to visualize airflow. Compare register strength room to room. If available, measure static pressure at the air handler and aim to stay within the blower’s rated range. Record temperature splits across the coil or heat exchanger and note any outliers that suggest remaining restrictions.
Step 10: Final cleanup and documentation
Vacuum dust from work areas, wipe registers, and remove any temporary filters on returns. Photograph finished seals and supports and update your system sketch. Note materials used and dates. A record helps with warranty claims, real estate disclosures, or future tune-ups.
Mid-project check: pivot points that save time
Not every obstacle is worth wrestling. If you encounter inaccessible returns inside walls, suspected asbestos, or widespread mold, pause and reassess. When performance issues persist after you seal and straighten runs, it may be a sizing or design problem rather than a leak problem. At these points, coordinated Somerville air duct repair with duct pressurization and balancing can diagnose what DIY cannot see.
Seasonal notes for Somerville homes
Winter cold amplifies condensation on uninsulated metal ducts. Verify insulation and vapor barriers on supply runs in basements and attics. Summer humidity makes return leaks especially costly; unfiltered attic or crawlspace air undermines dehumidification and leaves rooms clammy. Seal returns meticulously, especially at the air handler platform and boot perimeters.
Safety and compliance reminders
- Keep clearances around flues, draft hoods, and heat exchangers; never seal moving or hot components.
- Do not compress electrical wiring under duct hangers or run ducts over junction boxes.
- Use ladders safely in attics; watch footing on joists and avoid stepping through drywall ceilings.
- Bag and dispose of debris promptly; avoid stirring dust back into living areas.
Troubleshooting persistent comfort issues
If one room remains stubbornly uncomfortable, check for hidden kinks behind finishes, long unsupported spans, or poorly aimed boots. Slight damper adjustments can help, but avoid closing many registers to “force” air elsewhere; that raises static pressure and can cause noise or equipment strain. In some cases, a short run needs upsizing or rerouting, which is best handled by a pro.
Frequently asked questions
How long does a typical repair take? Small sealing and reconnection tasks can take a few hours, while larger projects stretch to a weekend. Allow extra time for curing, cleanup, and testing.
What is the best sealant? UL 181-rated mastic is the go-to for irregular seams and long-term durability. UL 181 foil tape works well on clean, smooth metal. Avoid cloth duct tape.
Should I replace old flex duct? Replace if it is brittle, moldy, or badly kinked or crushed. New, properly supported flex often improves airflow immediately.
Can I seal in cold weather? Yes, but follow product temperature ranges and protect curing areas from dust and condensation.
Why are my returns so important? Return leaks pull in dusty, humid, or even fume-laden air from attics, basements, or garages. Sealing returns improves IAQ and system performance.
Do I need special tools to test? A smoke pencil and a simple anemometer help. For deeper insight, manometers and duct pressurization tests are used by professionals.
Will sealing make my system louder? Usually the opposite. Sealing reduces whistling and allows airflow to follow intended paths, which can reduce noise.
Finish strong with confidence
Follow the process, respect safety, and verify your results, and your Somerville home will feel more comfortable and consistent in every season. When you want measured diagnostics, hard-to-access sealing, or system balancing, schedule dependable air duct repair solutions and enjoy reliable performance backed by expert testing.
