
Airflow problems rarely appear overnight, and when they do, the safest solution starts with understanding the system that moves air through your home. If you live in Somerville, New Jersey, your ductwork faces seasonal swings that demand reliable sealing, insulation, and support. This guide explains how to approach air duct repair with a safety-first mindset—so you can protect your health, home, and HVAC equipment while restoring comfort and indoor air quality.
Before you pick up a tool, remember that safety is a sequence, not a single step. You will diagnose methodically, protect yourself from contaminants and sharp metal, control the work area so dust does not spread, and verify results with simple tests. Many issues are within the reach of careful homeowners, while others warrant professional attention—especially when you encounter hidden hazards like mold, suspected asbestos, or structural failures in concealed spaces. The following sections walk you through risk assessment, preparation, the safest materials and methods, and post-repair checks appropriate for Somerville’s climate and housing stock.
As you read, treat every part of the duct system as a potential source of exposure. Sheet metal edges can slice skin; fiberglass particles can irritate eyes and lungs; and negative pressure from the air handler can draw in garage fumes or attic dust if gaps exist. By taking a conservative approach and pausing any time you are unsure, you minimize risk while maximizing the quality of the repair.
Safety starts with a hazard assessment
Begin with a full system shutdown. Turn off the thermostat at the wall, then switch power to the air handler or furnace off at the service switch or breaker. This prevents moving parts and eliminates the chance that the blower will activate and pull dust into living spaces while you are working. If your system includes electric heat strips or a gas furnace, de-energizing also reduces the risk of shock or ignition.
Next, identify the work area and the type of duct. In Somerville, many homes have a mix of sheet metal trunk lines and flexible branch runs. You may also see duct board plenums or older fiberboard components. Write down where you notice issues: disconnected joints, visible gaps, kinks in flex duct, crushed sections, missing or damaged insulation, and signs of moisture such as rust, staining, or microbial growth. Take photos so you can compare before and after conditions and track anything that needs a pro.
Evaluate environmental risks. If you see gray, vermiculite-like insulation, treat it as potentially asbestos-containing and stop. If you notice black or green growth on porous material, assume mold and avoid agitation. If you smell fuel or chemical odors near duct openings, ventilate carefully and investigate for unintended air pathways that may be drawing contaminants into supply air. In a basement or crawlspace, check for standing water, pests, and exposed electrical conductors before proceeding.
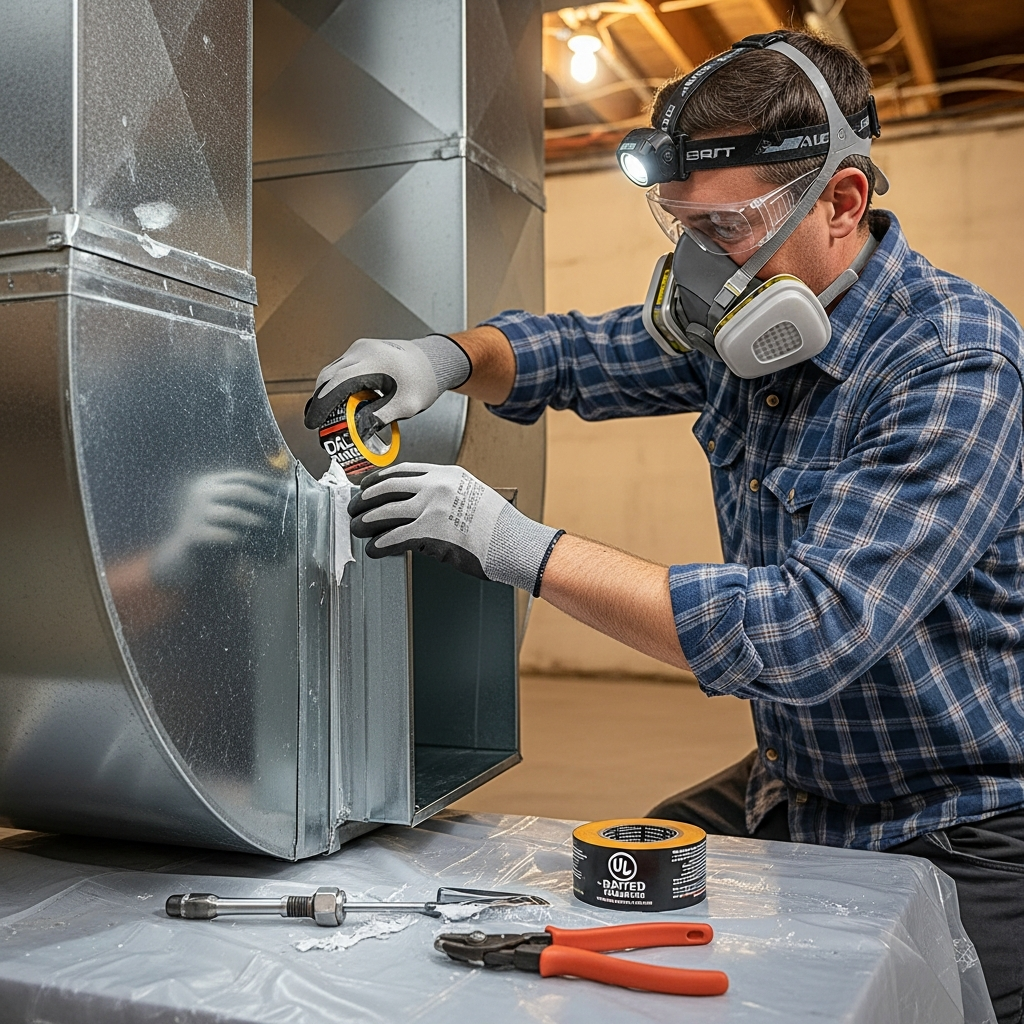
Personal protective equipment and safe handling
Use PPE appropriate to the task. At minimum, wear cut-resistant gloves when handling sheet metal, safety glasses, and a well-fitting respirator rated for fine particulates when you are in dusty attics or crawlspaces. Long sleeves can protect your forearms from insulation irritation, and knee pads help when working in tight areas. Keep a fully charged headlamp so both hands remain free. If you will use solvents or primers, add chemical-resistant gloves and provide cross-ventilation.
Prepare a basic kit with the safest, building-science-backed materials. For sealing, use UL 181-rated mastic or UL 181B-FX foil tape; cloth “duct tape” fails quickly and is not code-approved for most duct sealing. Carry sheet metal screws, zip ties for flex duct inner liners, hanger straps for sag corrections, plenum-rated sealants as needed, tin snips, a nut driver, a small mirror, and a vacuum with a HEPA filter for cleanup. Keep packaging and product datasheets so you can confirm temperature ratings and application limits.
Control dust and protect living areas
Containment reduces the chance of spreading fibers and debris. Lay plastic sheeting or drop cloths under the work area, especially if you are opening a return plenum or disconnecting a branch. Close supply registers in occupied rooms during repairs and consider placing a furnace filter over return grilles to catch stray dust while the system remains off. If you must cut into duct board or remove degraded insulation, dampen surfaces slightly to reduce airborne fibers and bag waste immediately.
In multi-level Somerville homes with basements, returns often travel through wall cavities. Accessing these can release old dust. Work slowly, keep a shop vacuum nearby, and never run the blower during disassembly. When finished, wipe registers and grilles and vacuum nearby floors to remove residue that could otherwise re-enter the system on the next cycle.
Common duct problems and the safest ways to fix them
Leaks at joints and seams are the most frequent issue. For sheet metal ducts, brush a thin layer of mastic over the seam, work it into gaps, and then apply a second coat after the first sets to achieve the manufacturer’s recommended thickness. For small gaps, UL 181 foil tape applied to a clean, dry surface can be effective. Always clean surfaces first with a dry cloth and remove loose dust to promote adhesion. Avoid mastic on moving parts such as damper pivots.
Disconnected flex duct is another common problem. To repair, slide the inner liner fully over the metal collar, secure with a drawband or zip tie behind the collar bead, add three sheet metal screws through the collar into the liner’s metal helix if permitted, and seal the joint with mastic or UL 181B tape. Pull the outer vapor barrier over the assembly and tape it to the collar separately to maintain a continuous air and moisture seal. Never crush the flex or leave long unsupported spans; they increase resistance and reduce airflow.
Crushed or kinked sections require cautious replacement. Measure the existing length and diameter, select a flex duct of the same size and R-value or greater, and maintain a gentle radius at turns. Support the duct every four feet horizontally and at each connection with 1.5-inch-wide straps to avoid point loads that can deform the helix. In cold New Jersey winters, poor support leads to sags where condensation can accumulate; properly hung duct stays dry, reducing mold risk.
Rust or moisture in metal ducts points to condensation, leaks from above, or infiltration of humid outdoor air. Find the source before sealing. Look for missing insulation, gaps at the building envelope, or unsealed boots at floor registers where basement or crawlspace air can be pulled into the system. After addressing moisture, remove loose rust with a wire brush and seal pinholes with mastic-compatible mesh and coating per product instructions.
Step-by-step sealing sequence for safety and durability
- Shut down power to the air handler or furnace and confirm the blower will not start.
- Inspect and photograph each problem area to document baseline conditions.
- Clean surfaces with a dry cloth; vacuum dust and debris with a HEPA-filtered vacuum.
- Dry-fit components to ensure proper alignment; correct sags or misaligned collars before sealing.
- Apply mastic with a chip brush to seams and joints; embed mesh where gaps exceed 1/8 inch.
- Reinforce with UL 181 foil tape where appropriate, smoothing from the center outward to avoid wrinkles.
- Secure flex duct with a mechanical fastener (zip tie or drawband) behind the collar bead, then seal.
- Insulate or re-insulate as required using duct wrap of appropriate R-value, sealing vapor barriers at seams.
- Allow sealants to cure per manufacturer instructions; prevent dust contact during curing.
- Re-energize the system only after cleanup and a visual confirmation that tools and debris are removed.
Midway through many projects, homeowners realize the challenge is not just sealing but verifying that air actually moves the way it should. If diagnostics or access become difficult, consider scheduling professional air duct repair to complement your work with pressure tests, airflow measurements, and calibrated sealing techniques that are difficult to replicate with basic tools.
Electrical and combustion safety around HVAC equipment
Work around furnaces and air handlers deserves special care. Never block combustion air openings or cover a draft hood with insulation or tape. Keep sealants away from heat exchangers, burners, or flue connections. If you smell gas, stop work, ventilate, and contact your utility before touching any component. When routing or supporting ducts near electrical wiring, maintain clearances and avoid compressing NM cable under straps or ducts.
In older Somerville properties, you may encounter abandoned wiring or junction boxes in attics. Do not bury these under new insulation while repairing ducts. Exposed splices must be enclosed in code-compliant boxes with covers. If you see scorching, melted insulation, or nonstandard wiring practices, call a licensed electrician before proceeding with duct repairs in the area.
Protect indoor air quality while you work
Even simple duct repairs can stir settled dust, pollen, and fiberglass. Wear your respirator and minimize disturbance. If you open a return plenum, gently vacuum with a HEPA unit and seal open edges while you work to prevent unfiltered air from entering. After reassembly, replace or upgrade the system filter, verify it fits tightly in the rack, and set a reminder to check it again two weeks after the repair—newly sealed ducts often pick up some residual dust that will clog a neglected filter prematurely.
Homes in Somerville cope with spring pollen bursts and humid summers. Properly sealed returns keep that outdoor air in the attic or crawlspace where it belongs. Additionally, check that bath and kitchen exhausts do not terminate into return cavities or near return grilles; cross-contamination is both a comfort and a health issue. If you suspect microbial growth inside porous duct board or liner, avoid DIY cleaning and call a professional trained in remediation protocols.
Balancing safety with performance testing
After sealing, confirm your efforts worked. Use simple tests: feel for escaping air at previous leak sites with the system running; use a smoke pencil or incense stick to see if smoke is drawn into return leaks or blown from supply leaks; listen for whistling sounds that indicate new gaps. If you have access to a manometer, a static pressure reading across the air handler can show whether restrictions exist; excessive pressure is a red flag for crushed flex, undersized ducts, or clogged filters.
Measure temperatures at supply registers and returns to confirm proper delta-T for cooling and heating seasons. While DIY instruments are not lab-grade, consistency across rooms matters. If a bedroom still lags behind others, inspect for hidden kinks or long, unsupported flex runs. In some Somerville Cape Cod or split-level layouts, older renovations left overly long branches feeding finished attic spaces; shortening or resizing those runs may be necessary to balance comfort.
Local considerations in Somerville, New Jersey
Cold winters increase the risk of condensation on uninsulated metal ducts in unconditioned basements or attics. Verify that supply ducts outside the thermal envelope are insulated to an appropriate R-value and that vapor barriers are intact and sealed. During hot, humid summers, air leaking into returns from attics can overwhelm dehumidification and create clammy conditions. Sealing returns, boots, and panned joist bays dramatically improves moisture control.
Homes near busy corridors or rail lines may experience fine soot and dust infiltration if returns are leaky. Pay special attention to boot-to-drywall gaps and to the air handler platform; these are common hidden leakage points. If your home has a crawlspace, ensure ground vapor barriers are intact and vents or encapsulation strategies are functioning as intended so your newly sealed ducts are not bathing in damp air.
Maintenance habits that keep repairs safe and lasting
Set a quarterly reminder to inspect visible ductwork, supports, and insulation. Look for new sags, condensation, or chewed insulation that might indicate pests. Replace filters on schedule, and after any renovation that generates dust. Keep storage boxes and seasonal items clear of duct runs in attics and basements; compression reduces airflow and can pull joints apart. If you notice unusual blower noise or repeated dust accumulation around registers, schedule an inspection to catch small issues before they become major problems.
Document what you repaired and the materials you used. Future you—or a future technician—will make safer choices with a clear record. Keep leftover mastic or tape labeled and sealed for touch-ups, and discard products that exceed their shelf life. Finally, remember that sealed ducts are part of a system: air sealing the building envelope, adding insulation, and verifying balanced supply and return flows all contribute to safety and comfort.
Frequently asked questions
How do I know if my duct leak is a safety issue? Leaks near combustion equipment or in return paths can pull in fumes, dust, or attic insulation. If you smell exhaust, experience headaches around system operation, or see soot, stop and call a professional. Supply leaks are usually less hazardous but still waste energy and reduce comfort.
Is it safe to use regular duct tape? No. Cloth “duct tape” dries out and fails under heat and pressure. Use UL 181-rated mastic or foil tape designed for ducts. These materials resist temperature swings common in Somerville attics and basements.
What if I find mold? If growth is on porous material like duct board or insulation, avoid disturbing it and contact a remediation professional. For small spots on nonporous metal, you can clean with appropriate cleaners using PPE, but always address the moisture source first.
Can I seal ducts in winter? Yes, but follow product temperature guidelines. In cold spaces, warm the area or the sealant per the label. Curing may take longer, so protect the seal from dust until fully set.
Do I need to insulate after sealing? If ducts are outside conditioned space, yes. Insulation prevents condensation and heat loss or gain. Seal the air path first, then insulate to the recommended R-value with intact vapor barriers.
How tight is too tight for flex duct supports? Straps should cradle, not pinch. A minimum of 1.5-inch width is recommended, with supports every four feet. Over-tightening creates restrictions that increase static pressure and noise.
What if a return is in a wall cavity? Panned returns are common but often leaky. Seal all seams and transitions, and consider installing a dedicated return duct for best performance, especially in homes with comfort imbalances.
Is duct sealing a one-time job? Well-done sealing lasts, but mechanical systems move and age. Plan for periodic inspections, especially after storms, renovations, or equipment changes that can stress connections.
Ready to breathe and live safer at home
Whether you are fixing a loose flex connection or sealing a leaky plenum, approaching the work deliberately keeps your family safe and your equipment efficient. If you want expert diagnostics, clean execution, and durable results, schedule trusted air duct repair services in Somerville and get your system back to peak performance.
