
Why This Homeowner Guide Matters in Somerville, New Jersey
Somerville homeowners care deeply about comfort and indoor air quality, but ductwork often hides behind walls, above ceilings, and in crawlspaces, making its condition easy to overlook. When ducts leak or sag, your system runs longer than necessary, rooms drift out of balance, and dust finds new pathways into living spaces. This homeowner guide explains how to recognize problems, plan repairs, and maintain ducts for the long term, with an emphasis on the climate and building styles typical of central New Jersey. If you prefer expert support from the outset, you can count on local specialists who provide dependable air duct repair tailored to Somerville’s unique housing stock.
Understanding the basics helps you decide when to DIY and when to call a professional. Many leaks and loose joints are straightforward to seal. However, extensive damage, complex layouts, or suspected contamination may exceed a comfortable DIY scope. Reading the signs carefully and moving step by step protects your system and your home.
Recognizing Symptoms of Duct Problems
Inconsistent room temperatures are a classic signal. If the family room is comfortable but the upstairs bedroom is stuffy, suspect airflow imbalance due to leaks, crushed branches, or blocked returns. Dust accumulation near registers or along baseboards can indicate unfiltered air being pulled into the system through gaps. Unusual odors, such as musty or earthy notes, may point to return leaks in basements or crawlspaces where humidity is higher. Finally, listen for whistles or rattles during operation—these often accompany gaps at seams or unbraced sections that vibrate under pressure.
Pay attention to seasonal patterns. In winter, cold returns can create condensation if uninsulated metal passes through a humid basement; in summer, cold supply ducts in warm spaces can sweat and drip. Both scenarios highlight the importance of insulation and vapor barriers, which work in tandem with airtight joints.
Planning Your Repair Strategy
Begin with a walkthrough of accessible spaces: basements, utility rooms, attics, and crawlspaces. Bring a flashlight, a notepad, and a phone or camera. Map the system—identify the air handler, supply trunk, return trunk, and branches. Note material types and connector styles. Mark problem spots with painter’s tape. Planning upfront saves time and ensures you have the right materials on hand before you start.
Decide on priorities. Address safety issues first—loose panels near moving parts or exposed sharp edges. Next, seal the biggest leaks and reconnect any separated joints. Restore insulation where missing, then verify supports to prevent future sagging. Finish with performance checks to confirm improved airflow and noise reduction. If, at any point, you encounter questionable materials or conditions beyond your comfort level, shift to a professional plan without hesitation.
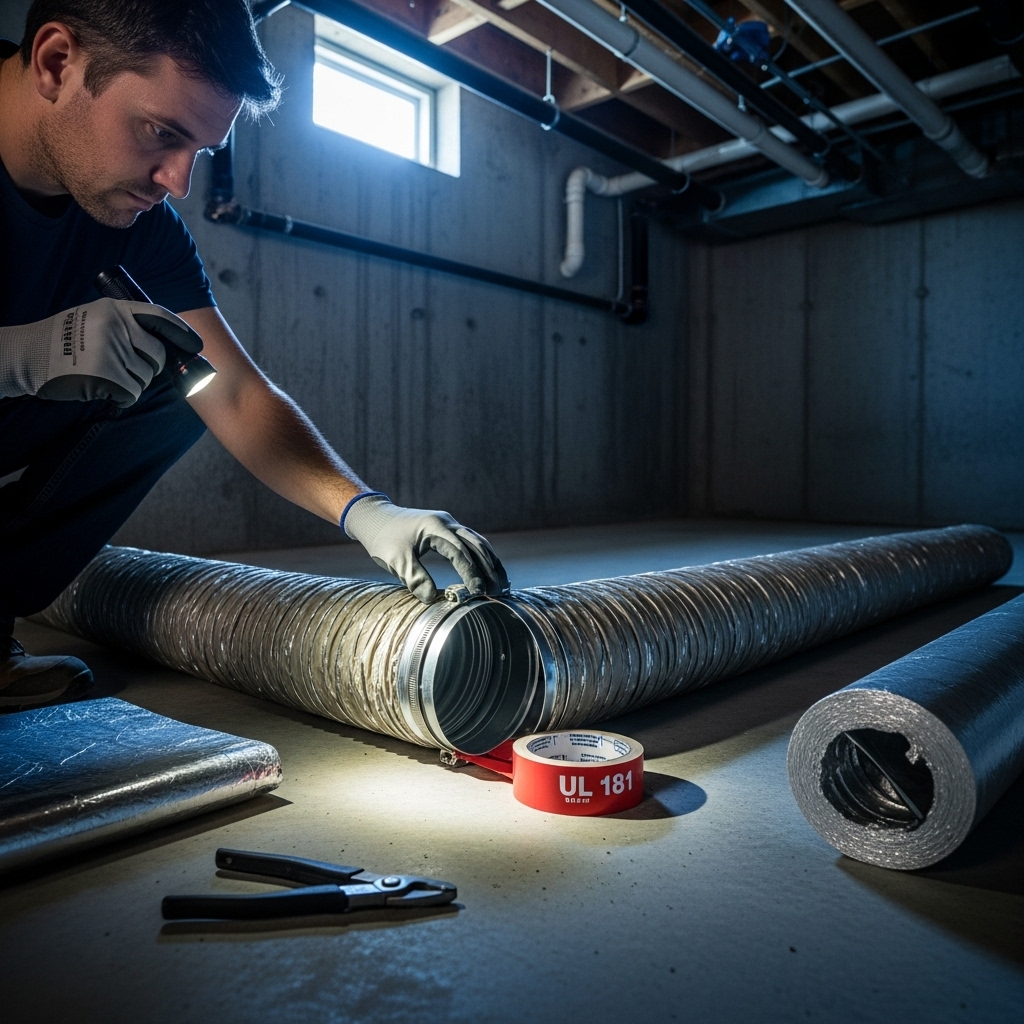
Materials and Techniques That Work
Use UL 181-rated foil tape and a water-based mastic designed for duct sealing. Clean surfaces before application; dust and oils weaken bonds. Press tape firmly with a squeegee-like tool or the back of a spoon to activate adhesives. Apply mastic in a continuous layer, working it into seams. For gaps larger than an eighth of an inch, embed mesh tape into the mastic. For flexible ducts, secure the inner liner to collars with clamps or wide ties, seal with mastic, then pull insulation and vapor barriers back into place and tape the outer layer. Avoid narrow straps that cut into flex duct; support weight with wide hangers and gentle arcs, not tight bends.
Insulation is equally important. In unconditioned spaces, wrap supply ducts to prevent condensation. Where returns run through humid areas, sealing is crucial to stop damp, unfiltered air from entering the system. Aim for continuous coverage with carefully sealed seams; gaps in insulation create cold spots where moisture can form.
Step-by-Step Homeowner Process
Shut off the system at the thermostat and breaker for safety. Remove access panels to plenums if necessary, documenting screw placement and panel orientation. Inspect seams for gaps and look for dust streaks, which reveal leakage paths. Check each branch connection at the trunk, confirming that collars are fully seated and secured. Where you find loose joints, reseat them, add sheet metal screws if appropriate, and seal.
Move on to flexible branches. Straighten kinks, re-route tight turns into smoother sweeps, and create a gentle support path with wide hangers. If a section is crushed or torn, replace it rather than rely on a patch that will fail under pressure. Keep the inner liner taut to reduce turbulence and noise. Once branches are secure, verify that boots are sealed to wall or floor openings to stop air from escaping into cavities.
Balancing Comfort Across Rooms
After sealing major leaks, reassess airflow at each register. If one room still lags, double-check for hidden issues: partially closed dampers, blocked grilles, furniture too close to returns, or a collapsed flex segment in a hard-to-see corner. Small adjustments can make significant differences once leaks are eliminated. Document your changes and take notes on which rooms improved and which require further attention.
Sometimes balancing is less about dampers and more about design. Older homes may have undersized returns or long runs to finished attic spaces. If you inherit such a layout, targeted upgrades—adding a properly sized return or rerouting a branch—may be the key. This is where seasoned technicians familiar with Somerville’s home styles can advise and implement changes effectively.
Mid-Project Checkpoint for Somerville Homes
Pause halfway through your project to evaluate progress. Have you sealed the major leakage points around the air handler? Are the longest branches properly supported? Did you restore insulation after each repair so condensation will not become a problem in humid months? If you realize the scope is broader than expected, you can always engage trusted providers of air duct repair services to finish the job and verify performance with professional testing tools.
While you assess, inspect for indirect issues such as gaps where ducts pass through framing. Air leaks into wall cavities not only waste energy but can drive dust into living areas. Seal penetrations with appropriate fire-safe materials where required, and verify that ducts do not rest directly on rough edges that could abrade vapor barriers over time.
Noise, Odor, and Moisture Controls
Whistling indicates air velocity through small openings—double back to those seams with mastic. Rattles and buzzing often trace to loose supports or panels; tighten fasteners and pad any contact points that transmit vibration. If odors persist after sealing returns, look for sources beyond the duct system, such as damp carpet, unsealed crawlspace soil, or nearby chemical storage, because a tight return will simply circulate the existing indoor air more effectively.
Moisture deserves special attention. In a humid summer, cold supply ducts in a warm attic or garage can sweat. Condensation can drip onto ceilings and framing. Ensure insulation is continuous with sealed vapor barriers. Keep ducts away from unvented roof decks or heat sources that cause temperature extremes. Address any water intrusion in basements to protect both ducts and the equipment itself.
Verification and Maintenance
Restart the system and verify results. Walk room to room, noting comfort and sound. Hold a tissue to registers and returns to compare relative airflow. Over the next week, observe humidity and temperature stability during different weather. Replace filters as needed and set reminders for seasonal checks.
Maintenance is routine but powerful: change filters on schedule, inspect visible duct runs every few months, ensure hangers remain tight, and keep storage items off ducts. Mark inspection dates and keep a simple log that lists what you found and fixed. This practice pays off, especially before seasonal extremes.
Frequently Asked Questions
Q: What materials are safe for sealing ducts? A: Use UL 181-rated foil tape and water-based mastic designed for HVAC applications. Avoid cloth “duct tape,” which fails quickly. Follow manufacturer instructions and allow proper curing time.
Q: Can I fix a noisy duct? A: Often, yes. Noise may stem from leaks, loose supports, or sharp bends. Seal gaps, adjust supports, and smooth airflow paths. If noise persists near the blower, consult a professional to assess static pressure and equipment settings.
Q: How do I handle mold? A: If you suspect mold inside ducts, proceed carefully. Limited surface growth on metal may be addressed with cleaning and sealing. However, widespread contamination—especially in porous materials—requires professional remediation and possibly replacement.
Q: How long should a repair last? A: When done correctly with quality materials, seals can last for many years. Inspect periodically for signs of adhesive failure, particularly in areas with temperature swings.
Q: Are there Somerville-specific concerns? A: Yes. Basements and crawlspaces here can be humid, and older homes may have unconventional duct routes. Focus on sealing returns tightly, insulating supplies, and providing solid supports to handle seasonal changes.
Q: When is replacement better than repair? A: Replace when ducts are severely damaged, contaminated, or incorrectly sized for the system. Repair is ideal for localized leaks, minor damage, and support or insulation improvements that restore intended performance.
Move Forward with Confidence
Whether you complete your repairs personally or decide to partner with an experienced team, the goal is the same: healthy airflow, steady comfort, and peace of mind in every room. If you are ready for assistance, schedule professional air duct repair and let Somerville experts deliver results that stand up to real-world seasons and real family life.
