
Understanding the air duct repair process helps Somerville, New Jersey homeowners approach HVAC problems with confidence and achieve long-lasting improvements in comfort and efficiency. Whether you are dealing with uneven temperatures, excessive dust, or suspicious noises from your vents, a structured process ensures that repairs address root causes—not just symptoms. This guide breaks the work into stages from the first walkthrough to final verification, showing you what to expect at each step and how to prepare your home for a smooth, successful outcome. Early, targeted air duct repair shortens equipment runtime, supports healthier air, and brings steady comfort back to every room.
Stage 1: Initial Conversation and Planning
The process starts with a conversation about your home and comfort goals. You will describe rooms that feel hot or cold, noises you have noticed, and any history of renovations or pest activity. Providing photos of ductwork or access areas can help the technician plan tools and materials for the visit. Scheduling is typically coordinated around times when the system can be shut down briefly for testing.
During this planning phase, expect to discuss priorities. For example, if a particular bedroom or home office is problematic, the plan may emphasize that branch first. Clarifying your expectations at the outset helps the technician tailor the inspection and repair sequence to your needs.
Stage 2: On-Site Walkthrough and Safety Setup
Upon arrival, the technician reviews the layout of the air handler, filter location, and primary trunks and returns. They set up safe access to basements, attics, or crawl spaces, laying down protective coverings as needed. They will confirm that power can be safely switched off during certain tests and that ladders or platforms can be used without disturbing your belongings.
Clear pathways are important. Before the visit, move storage away from visible duct runs and ensure attic hatches are accessible. Securing pets and noting any fragile items in service areas prevents accidents and keeps the process efficient.
Stage 3: Baseline Testing and Measurements
Next comes baseline testing. The technician measures static pressure at the air handler to assess how hard your blower is working. They may check temperature differences across the coil or heat exchanger and measure airflow at representative registers. The goal is to establish how the system performs before any changes are made.
These numbers guide the repair plan. High static pressure might point to undersized returns or blockages. Weak airflow at distant rooms could indicate crushed or disconnected branches. The data-driven approach prevents guesswork and ensures each action moves performance in the right direction.
Stage 4: Detailed Inspection of Duct Components
With initial readings in hand, the technician examines supply and return runs, focusing on transitions, take-offs, boots, and supports. In flex duct, they look for kinks, sharp bends, or compression that restricts airflow. In sheet metal, they look for gaps at seams and around joints where vibration can open tiny pathways for air to escape.
Whenever ducts pass through unconditioned spaces like attics or crawl spaces, insulation becomes part of the inspection. Gaps, compressed insulation, and moisture staining are red flags—especially in humid Somerville summers when cold supply ducts can sweat.
Stage 5: Repair Strategy and Homeowner Review
After inspection, the technician presents a prioritized plan. High-impact actions often include sealing leaky seams with mastic, reconnecting loose boots, replacing damaged flex sections, and addressing missing insulation. If returns are undersized, the plan may include adding or resizing them to reduce static pressure and improve airflow balance.
Clear communication is key. You should understand which actions will be done first, how access will be managed, and what the expected outcomes are. Photos of problem areas and a simple outline of steps help you visualize progress.
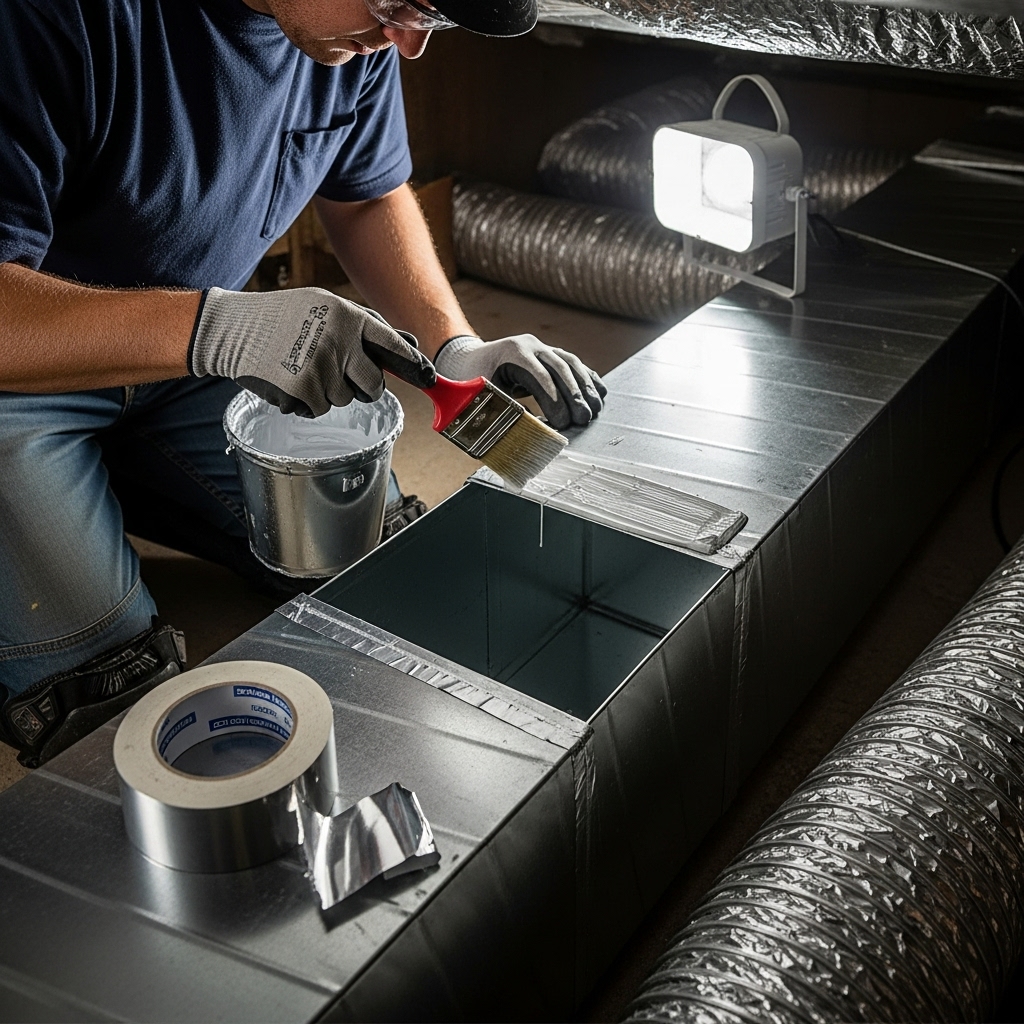
Stage 6: Implementing Repairs
Repairs begin with cleaning and preparing surfaces so mastic adheres properly. Metal connections are secured with screws where appropriate, seams are sealed, and collars are tightened. Flex sections that are kinked or torn are replaced with properly sized runs, hung with wide supports, and routed to minimize sharp turns. Boots are sealed to the building envelope to prevent air loss into wall or floor cavities.
In unconditioned spaces, ducts are insulated to recommended R-values to minimize heat gain or loss. Special attention is given to elbows and transitions, where turbulence can reduce airflow. The technician aims for smooth, gradual bends and proper sizing to keep static pressure within acceptable limits.
Stage 7: Balancing and Optimization
Once leaks are sealed and damaged sections addressed, the system is balanced. If your ducts have manual dampers, the technician adjusts them while measuring register airflow to achieve even distribution across rooms. Registers may be fine-tuned as well. This step translates structural improvements into real-world comfort.
Balancing also considers doors and return pathways. If a bedroom door closes and the room lacks a dedicated return, undercutting the door or creating a transfer grille may be discussed to ensure adequate airflow.
Stage 8: Verification and Documentation
With work complete, baseline tests are repeated. The technician compares static pressure, airflow, and temperature readings to confirm improvements. You should receive a straightforward explanation of the results and any maintenance recommendations to protect the repairs, such as filter schedules and quick visual checks each season.
Photos of repaired areas and notes about materials used provide a useful record for future service. If phased work is planned, the documentation identifies which items were completed and which remain for a future visit.
Stage 9: Homeowner Maintenance and Prevention
Ongoing care extends the life of your repairs. Replace filters on schedule, keep registers and returns clear, and avoid compressing ducts with attic storage. If you notice new noises, changing airflow, or dust accumulation, schedule a checkup. Seasonal humidity management in basements and attics helps prevent condensation and insulation degradation.
During other home projects, coordinate with contractors to protect ducts from accidental damage. Electrical, roofing, or insulation work often involves moving through the same spaces as duct lines; a quick conversation can prevent setbacks.
Somerville-Specific Considerations
Somerville’s climate requires attention to insulation around ducts that run through unconditioned spaces. Attics can become very hot in summer, increasing the risk of condensation on cold supply lines, while winter lows can drive heat loss through poorly insulated trunks. The area’s mix of older and newer homes means duct systems vary widely; older houses may feature retrofits with tighter bends and long runs, whereas newer homes commonly use flex duct that depends on correct supports to maintain shape and airflow.
Pollen in spring and leaf debris in fall can load filters quickly. Staying on top of filter changes and return cleanliness helps your newly repaired system maintain performance across the seasons.
Frequently Asked Questions
How long does the repair process take? Many homes can be inspected and repaired within a day, but complex layouts or extensive attic work may require additional time.
Will sealing ducts make my rooms quieter? It can. Reduced air turbulence and secure connections often lower whistling and rattling sounds.
What if my problem is only in one room? Localized issues can often be corrected by addressing a crushed branch, loose boot, or balancing adjustment. Inspection confirms the best path.
Do I need to replace all flex duct if one section is damaged? Not necessarily. Targeted replacement of damaged runs combined with sealing and support improvements is common.
How will I know repairs worked? Verification testing compares before-and-after numbers for static pressure, airflow, and temperatures. You should feel more even comfort shortly after the work is complete.
Can I remain at home during repairs? Yes. Technicians coordinate with you to minimize disruption and will let you know when system downtime is needed for testing.
Move Confidently From Problems to Solutions
If your Somerville home has uneven temperatures, dust issues, or noisy vents, a well-structured process is the fastest route to lasting improvements. Start with a professional assessment, prioritize the highest-impact repairs, and verify the results so you can enjoy steady comfort all year. When you are ready to begin, schedule reliable air duct repair with a local team that documents findings, explains options, and delivers measurable results.
