
A clear, practical checklist makes it easier to evaluate and repair ductwork in Somerville, New Jersey homes. Use the following guide to inspect each part of your system, identify issues, and prioritize improvements. Work safely, turn off equipment before opening panels, and remember that a checklist does not replace professional expertise. If you uncover extensive damage or complex issues, experienced local teams that deliver precise air duct repair can validate findings and complete work to current standards.
How to Use This Checklist
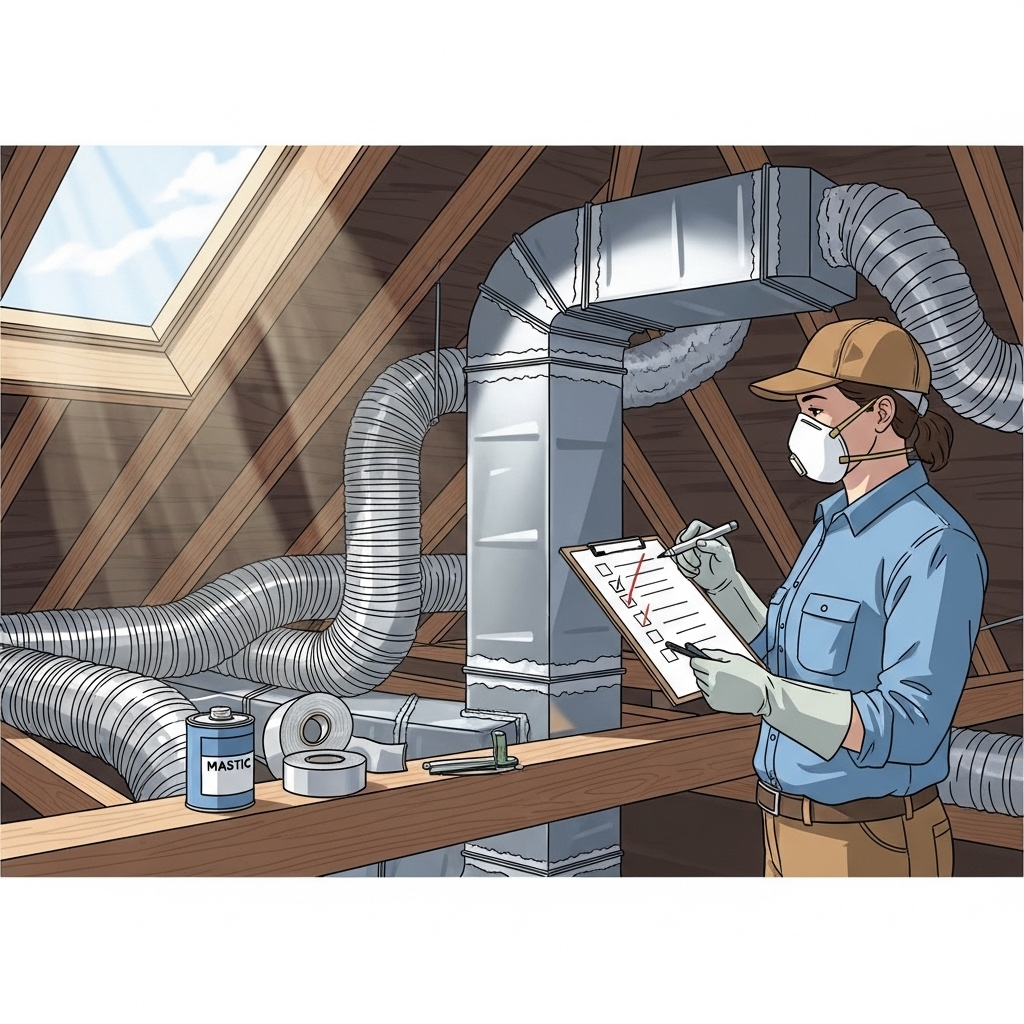
Walk through your home from the air handler to the farthest registers. For each item, mark “OK,” “Needs Attention,” or “Not Applicable.” Take photos and notes, especially before and after any repair. The goal is to eliminate leaks, ensure proper support, restore airflow, and keep ducts clean and insulated.
Pre-Inspection Preparation
- Turn off the HVAC system at the thermostat and, if necessary, at the breaker.
- Gather tools: flashlight, mirror, marker, UL 181 foil tape, mastic, screws, snips, clamps, straps, insulation, camera, and a smoke pencil.
- Clear access to attics, basements, and crawl spaces. Move stored items that block view of ducts.
- Put on gloves, eye protection, and a dust mask or respirator.
Air Handler and Plenum
- Filter Fit: The filter slot should be tight with no gaps. Seal any bypass with proper gaskets or tape designed for ductwork.
- Plenum Seams: Inspect for cracks or gaps. Seal with mastic and reinforce with foil tape as needed.
- Vibration Noise: Confirm that the plenum and ducts are supported to minimize rattling or drumming.
- Condensate Management: Ensure drain lines are clear and not leaking onto or near ducts in cooling season.
Main Trunks and Branch Takeoffs
- Seam Integrity: Brush mastic over long seams and tape edges for a durable seal.
- Takeoff Connections: Verify each takeoff is screwed and sealed to the trunk. Tighten or add screws and seal.
- Transitions and Elbows: Check for gaps at slip joints. Seal and support to maintain shape and reduce turbulence.
- Return Trunks: Pay equal attention to returns. Look for unsealed seams and penetrations that could draw in dusty or unconditioned air.
Flex Duct Condition
- Inner Core: Inspect for tears, holes, or crushing. Replace damaged sections rather than trying to stretch them back into shape.
- Bends and Kinks: Straighten tight bends and reduce unnecessary length. Avoid tying flex tightly over joists or nails that pinch the core.
- Outer Jacket and Insulation: Repair vapor barrier tears and re-tape insulation seams to prevent moisture issues.
- Connections: The inner core should be over the collar bead, clamped, taped, and then re-insulated and taped at the outer jacket.
Register Boots and Grilles
- Boot-to-Structure Seal: Caulk or tape the gap around the boot to stop leakage into walls or ceilings.
- Fastening: Ensure boots are firmly attached and not loose or rattling.
- Cleanliness: Vacuum dust and debris at registers regularly to reduce buildup that can migrate into ducts.
- Damper Operation: Verify that built-in dampers or external balancing dampers move freely.
Support and Hangers
- Spacing: Support flex runs every 4 to 6 feet and near fittings. Avoid long unsupported spans.
- Strap Width: Use wide straps or saddle supports to prevent compression of insulation and inner cores.
- Alignment: Keep ducts level or with a slight pitch where needed to avoid low spots that sag.
Insulation and Condensation Control
- Exposed Metal: Wrap and seal metal ducts in unconditioned spaces to prevent heat loss and sweating.
- Jacket Integrity: Repair rips or missing sections of insulation jacket promptly.
- Moisture Signs: Look for staining or rust that suggest condensation or roof leaks affecting ducts.
Airflow and Balance
- Room-to-Room Consistency: Note rooms with weak airflow or uncomfortable temperatures.
- Noise: Identify whistling or humming that indicates leaks or high velocity at undersized sections.
- Return Path: Confirm that doors do not starve rooms of return air. Transfer grilles or undercut doors may be needed.
Leak Testing and Sealing
- Smoke Pencil: With the blower running, pass smoke near seams and joints. Seal where smoke moves erratically.
- Mastic Application: Apply a continuous, even layer. Allow proper cure time before insulating over it.
- Foil Tape: Use UL 181-rated tape. Burnish firmly for long-lasting adhesion.
As you work through these items, you may find issues that call for diagnostic tools, ladder work in tight spaces, or specialized skills. Bringing in a trusted Somerville team for thorough air duct repair ensures that sealing, support, and balancing align with best practices and local conditions.
Documentation and After-Action Review
- Photos: Capture before-and-after images of each repair for reference.
- Notes: Record materials used and locations of dampers or access panels.
- System Run Test: After repairs, run heating or cooling and verify comfort and quiet operation across rooms.
- Maintenance Plan: Set reminders for filter changes and seasonal inspections.
Seasonal Considerations in Somerville
- Winter: Cold snaps can shrink materials and reveal small gaps; re-check seams and boots.
- Spring: Pollen and dust can accumulate; replace filters and vacuum registers.
- Summer: Humidity raises condensation risks; confirm insulation and vapor barriers are intact.
- Fall: Prepare for heating season with a comprehensive visual check and test run.
Common Pitfalls to Avoid
- Using generic cloth tape instead of UL 181 tape or mastic.
- Over-compressing flex with narrow straps that cause restrictions.
- Leaving boot-to-drywall gaps unsealed.
- Repairing supply ducts but ignoring return leaks.
- Skipping insulation on metal in unconditioned spaces.
FAQ
How often should I run this checklist? A quick pass each season plus a deeper annual review is ideal. Add an extra check after renovations or major storms.
What if my ducts are hard to reach? Safety comes first. If access is difficult or hazardous, hire trained professionals with the right equipment and fall protection.
Do I need to seal every joint I can see? Focus on all visible seams and joints, especially in unconditioned spaces. Consistency matters; a few unsealed joints can undermine overall improvements.
Will balancing dampers solve hot and cold spots? Dampers help, but they work best after leaks are sealed and restrictions are removed. Use dampers for fine-tuning rather than masking bigger problems.
How do I know when to replace flex instead of repairing it? Replace when the inner liner is torn, brittle, or crushed, or when kinks cannot be straightened without shortening the run excessively.
Can sealing affect equipment safety? Good sealing improves performance. Still, if you have combustion appliances nearby, ensure proper ventilation and consider professional testing to verify safe operation.
What should I document? Record the location of dampers, the materials applied, and any areas that need future attention. Photos are invaluable for tracking changes over time.
For a complete, confidence-boosting finish to your project, schedule professional air duct repair to validate your checklist, refine airflow, and deliver durable improvements throughout your home.
