
Introduction
Dryer vent installation may seem like a small detail, but it influences safety, efficiency, and everyday convenience. In Somerville, New Jersey, the mix of historic homes and modern townhouses means there is no one-size-fits-all approach. Success depends on smart routing, the right materials, and clean, weatherproof terminations. Whether you are upgrading an outdated vent or setting one up for a new laundry space, these practical tips will help you achieve a durable result. If at any point you want expert help, you can partner with local specialists in dryer vent installation who understand the area’s building styles and seasonal conditions.
What follows is a deep dive into layout choices, materials, airflow considerations, and maintenance habits that keep your system performing at a high level. You will learn how to avoid common pitfalls, how to test performance at the end of the job, and how to keep the vent in great shape for years.
Tip 1: Prioritize a Short, Straight Route
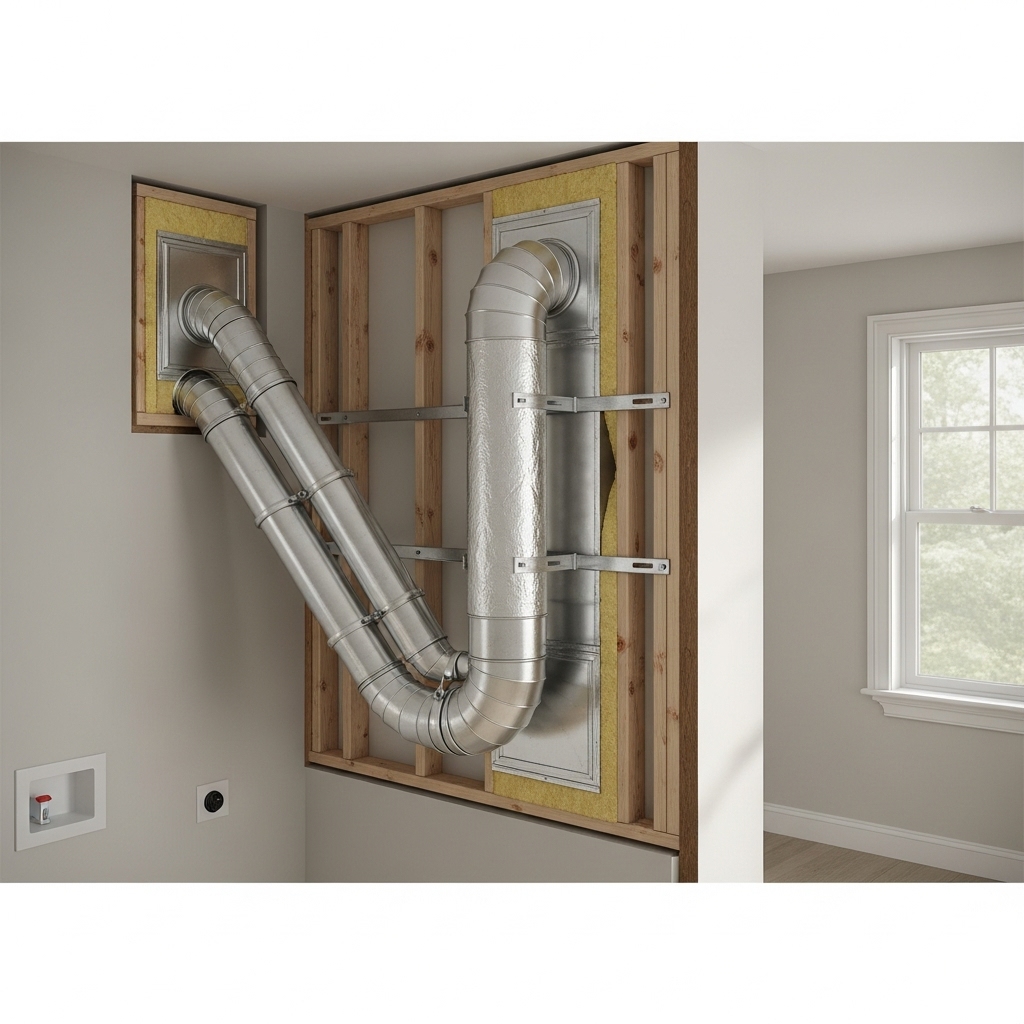
The path to the exterior determines most of your system’s performance. Each elbow adds resistance and effective length, making the dryer work harder. Sketch the shortest possible route and verify that you can maintain a consistent duct diameter along the way. If the dryer sits in a basement, consider how to rise vertically to clear obstacles, then exit through the nearest practical wall. In upper-floor laundries, evaluate whether a wall termination is feasible before defaulting to the roof; wall terminations are generally easier to access and maintain.
Tip 2: Use Rigid Metal Duct for the Main Run
Rigid aluminum or galvanized steel duct resists crushing and provides a smooth interior that discourages lint buildup. Reserve semi-rigid aluminum for the short connection behind the dryer when movement is required for service. Avoid plastic or thin vinyl options; they are prone to damage and can trap lint. Inside joints should not use interior screws that protrude into the airflow. Instead, assemble sections with the male ends facing airflow and seal seams with UL-listed foil tape.
Tip 3: Choose a Quality Exterior Termination
The hood at the outside wall or roof is more than a cap; it is a performance component. Select a termination with a low-resistance damper that opens smoothly. Avoid screens that collect lint. Place the hood where it is easy to inspect and keep clear of landscaping or architectural obstacles. A well-integrated termination protects the building envelope with proper flashing and sealant while allowing free exhaust flow.
Tip 4: Support and Pitch the Duct Correctly
Long horizontal runs should be supported at regular intervals to prevent sagging. Even slight sags create pockets where lint collects. Maintain a subtle pitch toward the exterior termination to discourage condensation from draining back to the dryer. Use long-radius elbows to make turns, and keep transitions smooth. Behind the dryer, a recessed vent box can preserve clearance and prevent kinking without sacrificing diameter.
Tip 5: Plan for Maintenance Access
Every dryer vent requires periodic cleaning. Build access into your design. Use removable clamps at the transition behind the dryer rather than permanent tape, and locate any mid-run cleanout points where they are actually reachable. Keep a simple diagram of the route and note the number of elbows. This makes future cleanings faster and helps you detect changes if drying times lengthen.
Tip 6: Respect Local Building Nuances
Somerville’s housing has quirks. Older brick homes often require core drilling for a neat, durable opening; ensure edges are protected with a sleeve and that the hood is carefully flashed. In newer townhomes with tight mechanical chases, elbows may be necessary to navigate framing—opt for long-radius fittings to keep resistance low. If your home has undergone renovations, be prepared for surprises behind walls. A careful scan for utilities prevents delays and protects safety.
Tip 7: Test Airflow Before Calling the Job Done
Run the dryer on an air-only or timed cycle and check the exterior damper. It should open fully and consistently, and you should feel a strong, steady exhaust. Inside, listen for rattles that might indicate a loose support or poorly seated joint. If the damper flutters weakly, reexamine elbows near the dryer, shorten the run where possible, or replace a tight turn with a long-radius elbow. Proper testing ensures you are not guessing about performance.
Tip 8: Keep the Laundry Area Clear
A clutter-free space behind and around the dryer promotes airflow and reduces the chance of kinking the transition connector when you push the appliance back into place. Avoid storing items that can shed fibers near the dryer; they can be pulled into the system during service. Vacuum around the base and behind the unit periodically to keep dust at bay.
Tip 9: Watch for Early Warning Signs
Longer drying times, a laundry room that feels unusually warm or humid, or a damper that barely moves when the dryer runs all suggest restriction. Address these signs quickly. Inspect the termination for lint mats, confirm that the duct has not been crushed, and schedule a cleaning if needed. Quick action preserves performance and prevents wear on the dryer.
Tip 10: Avoid Common Mistakes
Do not vent into enclosed spaces like attics, crawlspaces, or garages. Do not use interior screws that project into the duct. Do not rely on screens at the termination. Do not reduce duct diameter mid-run or use sharp, tight elbows that create turbulence. Do not push the dryer so close to the wall that the duct collapses behind it. Each of these errors increases lint buildup and reduces safety.
Local Weather and Seasonal Considerations
Somerville experiences humidity in summer and cold snaps in winter, both of which affect dryer vent performance. In warm, damp months, the risk of condensation increases in cool, unconditioned spaces; a slight pitch toward the exterior helps moisture leave the system. In winter, temperature differences can lead to condensation near the termination, making seasonal inspections important to keep the damper moving freely. Wind patterns around corners or in alleyways can influence damper behavior; choose terminations designed for stable operation in variable conditions.
Materials Checklist for a Reliable Install
Plan ahead so you are not improvising mid-project. Typical items include rigid metal duct in the specified diameter, long-radius elbows, UL-listed foil tape for seams, heavy-duty clamps for service connections, a quality exterior hood with a low-resistance damper, and appropriate tools for framed or masonry penetrations. Add supports or hangers to prevent sagging, and consider a recessed dryer box to preserve clearance behind the unit. Personal protective equipment—gloves, eyewear, and a dust mask—keeps the work safer and cleaner.
How to Evaluate Your Existing Vent
If you already have a vent, inspect it before deciding whether to repair or replace. Look for crushed sections, multiple tight turns, or long stretches of flexible material. Check the exterior hood while the dryer runs; if the damper rarely opens fully, airflow is compromised. Inspect for lint accumulation at joints, which suggests leaks. In many cases, replacing older, roughened duct with smooth rigid metal, simplifying the route, and sealing seams yields a dramatic improvement.
When to Bring in a Professional
Some projects are better handled by experts: penetrating thick masonry, routing through multiple finished levels, or working in tight closets where space is at a premium. Professionals bring the right drilling equipment, quality components, and the experience to maintain airflow despite obstacles. They also validate performance with testing and can document the route for future maintenance. If you began a DIY attempt and encountered hidden utilities or tough materials, pausing and calling for help can save time and preserve safety.
Middle-of-the-Project Guidance
If your planned route is blocked, reassess before making sharp, restrictive turns. A small shift in the termination location may shorten the run and improve airflow significantly. Replace short, tight elbows with long-radius versions and recheck the pitch. If your exterior material is challenging, like dense brick, consider professional assistance to ensure a clean, weatherproof opening. For a clear path forward and reliable results, consult a local crew that installs and services dryer vent installation routinely across Somerville’s varied housing.
Frequently Asked Questions
Question: What duct diameter should I use? Answer: Follow the dryer manufacturer’s specifications—many residential dryers require a 4-inch duct. Avoid reducing diameter mid-run; transitions create turbulence and lint collection points.
Question: Is semi-rigid acceptable anywhere? Answer: It is commonly used for the short transition behind the dryer where flexibility aids service, but the main run should be rigid metal for safety and performance.
Question: Why avoid screens at the termination? Answer: Screens trap lint rapidly, restricting airflow and increasing fire risk. A low-resistance damper designed for dryer exhaust is the better choice.
Question: How often should the vent be cleaned? Answer: Annually for most homes, but heavy laundry use, pet hair, and long routes may require more frequent cleaning. Watch for early warning signs like longer cycles and weak damper movement.
Question: Can I vent straight up through the roof? Answer: Yes, when designed for dryer exhaust and installed correctly, but a nearby wall termination is often simpler to maintain. Choose the route with the best airflow and access.
Take the Next Step with Confidence
If you are ready to upgrade or install a new system and want results that balance performance, durability, and safety, collaborate with Somerville professionals who focus on dryer vent installation. With a smart plan, proper materials, and careful testing, your laundry will run efficiently season after season.
