
Introduction
Planning a dryer vent cleaning inspection near Somerville, New Jersey ensures your laundry system is safe, efficient, and ready for year-round use. An inspection verifies the full path from the lint screen housing to the exterior hood and identifies issues that ordinary housekeeping can overlook, such as hidden elbows, crushed transition ducts, or a damper that barely opens. This guide explains what a thorough inspection includes, how to assess performance, and when it makes sense to follow up with detailed cleaning or routing improvements. If you prefer turnkey service, you can always book comprehensive dryer vent cleaning to establish a clear baseline and documentation of airflow restoration.
Somerville’s housing mix ranges from historic homes to newer developments, which means vent lengths, materials, and termination styles vary widely. Because airflow depends on the weakest point in the system, a reliable inspection looks at every component rather than focusing only on the visible section behind the dryer. The result is a clear plan for targeted cleaning, repairs, or upgrades that support safety and everyday convenience.
What an Inspection Covers
A proper dryer vent inspection begins with a discussion of symptoms: long dry times, a hot dryer cabinet, or a humid laundry room. The inspector then maps the entire route, identifying the lint screen type and housing, the transition duct, wall or floor collar, main duct material, elbows, and the exterior termination. Photographs or notes document conditions for comparison after cleaning or repairs. By understanding the system end-to-end, you avoid treating only the symptom while missing the main cause.
Next comes a visual and tactile check of vulnerable points. The transition duct is examined for kinks and crushing. The wall collar is checked for lint accumulation. The main duct is probed with a brush or inspection tool to gauge resistance and to estimate the length and number of elbows. At the exterior, the hood is tested for free damper movement and checked for signs of nesting or damage. Where safe, airflow at the termination is evaluated during a test cycle.
Airflow and Performance Indicators
Shorter dry times, steady exhaust at the exterior hood, and a dryer cabinet that stays comfortably warm rather than hot are strong indicators of good airflow. During an inspection, a simple qualitative test—placing a hand near the exterior termination without covering it—should reveal a robust, consistent exhaust stream. Visible damper movement is another quick confirmation. If the damper barely opens, additional resistance likely exists somewhere in the run.
Some dryers include built-in diagnostics that display lint or vent warnings when high backpressure is detected. Treat those alerts as actionable data. If your dryer repeatedly pauses or ends cycles early due to overheating, airflow is likely restricted and warrants immediate attention.
Common Issues Found in Somerville Homes
Long horizontal runs through basements are frequent in the area, often with elbows at joist spaces that trap lint. In older homes, legacy materials like foil or plastic may still be present, which crush easily and increase friction. Roof terminations present another challenge: elbows just below the roofline can harbor compacted lint that is difficult to reach without the right tools, and the roof hood itself may be weathered and sticking.
Inspectors also find screws penetrating duct interiors at old joints. These screws catch lint and create debris dams. Replacing these joints with smooth, taped connections makes a major difference in performance and reduces the chance of future blockages.
Inspection Steps You Can Follow
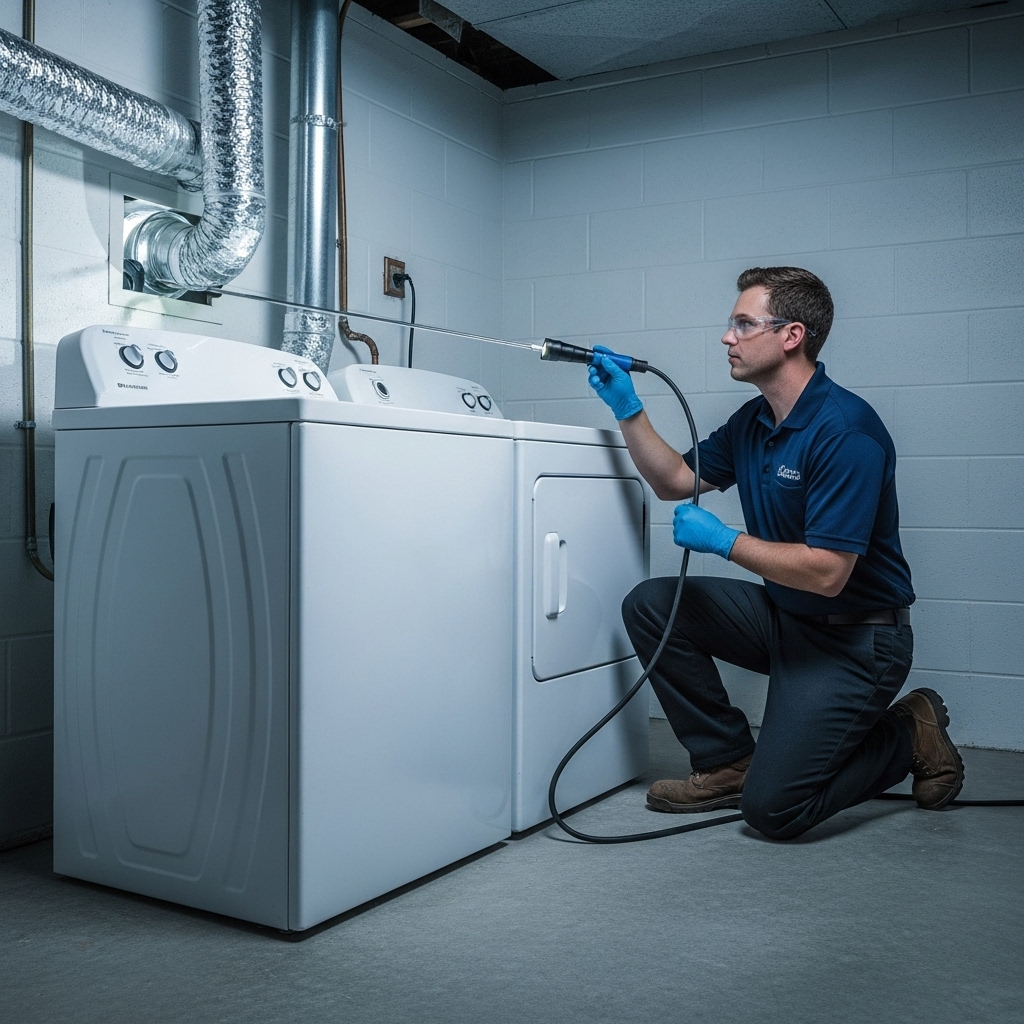
Begin by unplugging the dryer and shutting off the gas supply if you have a gas appliance. Pull the dryer out carefully and photograph the existing transition duct routing. Remove the lint screen and wash it with warm, soapy water to dissolve films that reduce airflow through the mesh. Vacuum the lint screen housing with a narrow attachment to capture debris near the blower inlet.
Disconnect the transition duct at both ends and inspect for crushing, tears, or heat damage. If the duct is flimsy foil or plastic, plan to replace it with semi-rigid metal. Check the wall collar for lint, and vacuum it thoroughly. With the transition duct removed, use a flashlight and a vent brush to probe the main duct and estimate resistance; heavy resistance, or a brush that returns laden with lint, confirms the need for a full cleaning.
Exterior Hood and Termination Check
Move outside and locate the termination. Confirm that the damper opens fully and closes when not in use. Remove the hood if practical, clean the cavity, and inspect for nesting or damage. Evaluate the hood’s height relative to grade to ensure snow or drifting leaves will not block it seasonally. During a test cycle, observe damper movement and feel for strong exhaust. A weak stream or a fluttering damper suggests restriction.
Note any staining on the siding near the hood. Moisture and lint marks indicate prolonged leakage or a sticking damper. Replacing a worn hood or upgrading to a model with smoother hinge action often improves performance significantly.
When an Inspection Should Lead to Cleaning
If the transition duct shows any damage, if the brush encounters heavy resistance in the main duct, or if the exterior damper does not open widely during a test, proceed to a full cleaning. Long dry times, hot cabinets, and musty odors from the laundry area are practical signs that cleaning is overdue. Plan to brush the main duct from the interior and exterior ends to ensure comprehensive coverage, followed by a retest at the termination.
After cleaning, reassemble with high-quality materials: rigid metal for the main run and semi-rigid metal for the transition, secured with appropriate clamps and foil HVAC tape on exterior joints. This combination reduces friction and makes future maintenance easier.
Routing Improvements Discovered During Inspection
It is common to discover routing opportunities while inspecting. Replacing two sharp elbows with a single long-turn elbow reduces resistance. Removing unnecessary length or a redundant loop behind the dryer prevents kinks when the appliance is pushed back. Eliminating screws that protrude into the airstream and sealing joints from the outside with tape create a smoother interior surface that resists lint accumulation.
If your laundry space is shallow, a recessed dryer box can provide room for the transition duct to curve gently. This small change can eliminate chronic kinking and immediately improve airflow.
Seasonal Considerations for Somerville
Winter conditions can freeze dampers or surround low terminations with snow, while summer humidity encourages lint to adhere more readily inside the duct. Incorporate quick exterior checks into your seasonal routine: after snowfalls, confirm the termination remains clear; in summer, keep vegetation trimmed. These small habits preserve the gains from your cleaning efforts and prevent sudden airflow drops.
Home renovation periods are another trigger for inspection. Drywall dust mixes with lint to form stubborn deposits. A post-renovation inspection and cleaning reset your system to a clean baseline so you do not struggle with mysterious longer dry times afterward.
Signs the Inspection Was Successful
After inspection and any recommended cleaning, expect shorter dry times, stronger exhaust, and a dryer cabinet that feels warm but not overly hot. The exterior damper should open readily during operation and close when the dryer stops. The laundry room should feel less humid. Keep brief notes about dry time improvements and retest monthly; a gradual increase is your cue to schedule the next cleaning sooner.
Listen for new rattles or vibrations after reassembly. These noises can indicate a loose clamp or misaligned section. Address them quickly so movement does not create gaps that leak lint or moisture into surrounding spaces.
When to Bring in Professionals
Some inspection findings point directly to the need for specialized tools and experience: long vertical runs terminating on a roof, multiple concealed elbows behind finished walls, severe compaction that a standard brush cannot penetrate, or repeated dryer shutdowns from overheat protection. In these cases, professional crews can clear obstructions completely and verify airflow restoration with diagnostic tools. When your inspection reveals these conditions, booking expert dryer vent cleaning is the most efficient path to a safe, reliable system.
Another common scenario is a property sale or rental turnover. An inspection with documentation gives buyers and tenants confidence and helps prevent avoidable service calls after move-in.
FAQ
How often should I schedule a dryer vent inspection near Somerville? For most homes, annually is appropriate. Heavy-use households, large families, or homes with pets benefit from twice-yearly checks.
What tools do I need for a homeowner inspection? A flashlight, a dryer vent brush kit with flexible rods, a vacuum with a hose attachment, and basic hand tools for clamps. A dust mask and safety glasses are helpful if you are sensitive to dust.
Can the dryer itself be the problem if airflow is low? It can be, but vents are more commonly at fault. After verifying a clean, unobstructed vent, consider a service check on the dryer if airflow or heat issues persist.
Is a roof termination harder to inspect? Typically yes. Safe access can be challenging, and elbows near the roofline collect lint. Many homeowners opt for professional inspection and cleaning when roof work is involved.
Why does the damper stick even after cleaning? Weathering, warping, or broken hinges can keep a damper from opening freely. Replacement is often the simplest solution and delivers immediate airflow gains.
Can pests block the termination? Yes. Nests and debris at the hood are common. Regular exterior checks prevent blockages and reduce fire risk.
What indicates a successful result after cleaning? Strong, steady exhaust at the termination, shorter drying cycles, and a dryer cabinet that remains comfortably warm during operation.
Streamline Your Next Inspection and Cleaning
If you want documented results, thorough cleaning, and a smooth maintenance plan tailored to your home’s layout, arrange professional dryer vent cleaning and enjoy reliable performance throughout the seasons in Somerville.
