
Introduction
A complete dryer vent cleaning checklist helps Somerville, New Jersey households protect their homes, lower energy waste, and keep laundry days running smoothly. Whether your dryer sits in a basement, closet, or second-floor laundry, the key is to restore an open, unobstructed pathway from the lint screen housing to the exterior termination. This checklist turns a complex task into a sequence of manageable steps you can follow with confidence. If you decide you’d rather have a specialist handle the work end-to-end, dependable dryer vent cleaning is available to deliver a thorough result and verify performance.
Every vent is unique. Some runs are only a few feet long; others weave through multiple elbows before reaching a side wall or roof hood. The more elbows and the longer the run, the more attention each stage deserves. As you proceed, remember that lint is both a by-product of drying and a potential hazard. Eliminating buildup improves airflow, reduces wear on your dryer, and adds a meaningful layer of safety for your home.
Checklist: Preparation
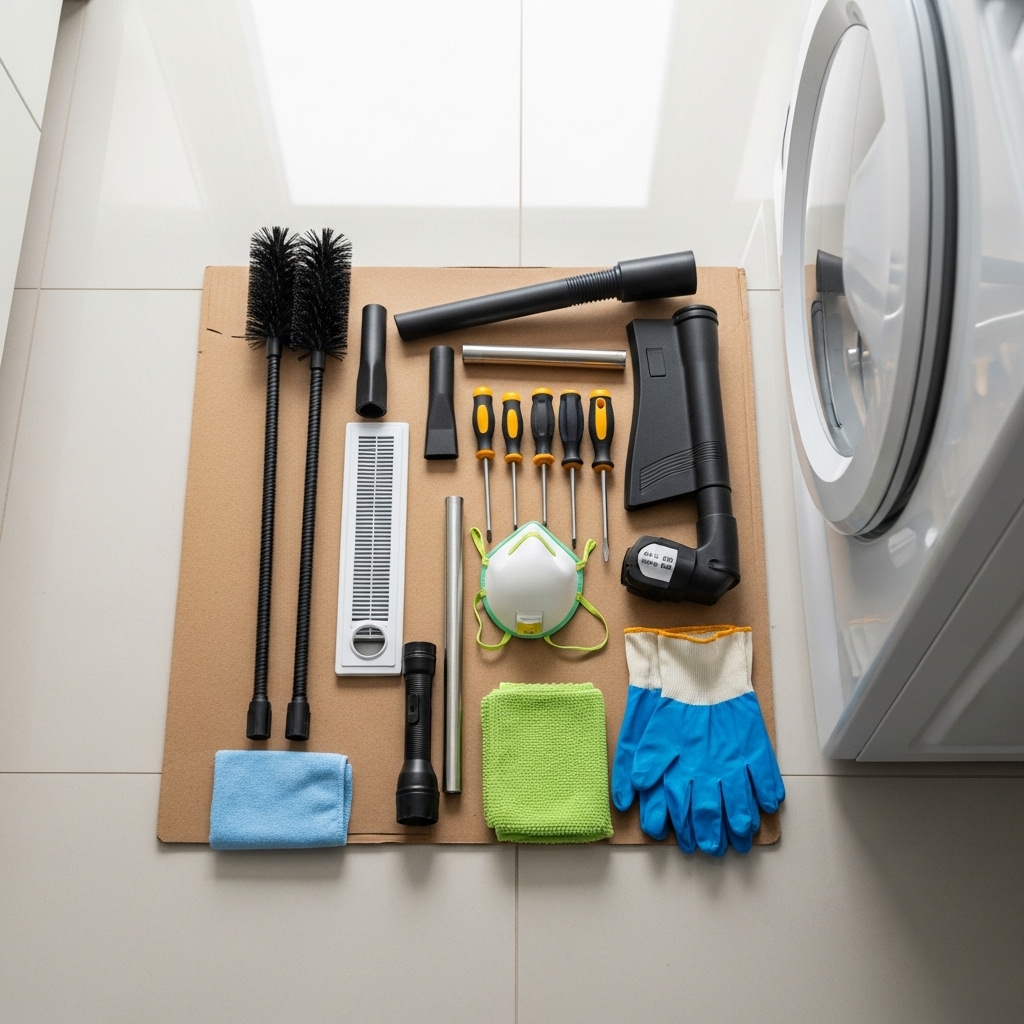
Confirm the dryer is unplugged. If your dryer is gas-fueled, shut off the gas supply valve before moving the appliance. Clear the surrounding area and protect the floor to avoid scratches. Locate the lint screen, transition duct, wall or floor collar, and exterior hood. Gather a vent brush kit with flexible rods, a vacuum with a hose attachment, a flashlight, microfiber cloths, and the appropriate screwdriver or nut driver for clamps.
Take photos of the existing setup behind the dryer so you can replicate secure connections during reassembly. This simple step prevents guesswork and helps you maintain the same gentle curve in the transition duct after cleaning.
Checklist: Lint Screen and Housing
Remove the lint screen and wash it with warm, soapy water to dissolve invisible residues that restrict airflow. Let it dry fully. Vacuum the lint screen housing carefully, using a narrow attachment to reach the bottom of the chute. This first pass captures lint that would otherwise fall back into the duct when brushing begins. Wipe any dust from the top of the dryer and around the door opening so loose fibers do not reenter the system.
If the lint screen is top-mounted, be patient and work methodically. Tools can slip down the chute if you rush. For interior lint screens, the opening is often wider and easier to access; still, move slowly to avoid damaging the mesh or housing.
Checklist: Transition Duct
Loosen clamps at both ends of the transition duct and remove it from the dryer and the wall collar. Inspect closely for kinks, crushing, or tears. Replace thin foil or plastic with semi-rigid metal cut to the correct length. Clean the interior of the transition duct with the brush, then vacuum out loosened lint. Clean the wall collar and surrounding area as well; this junction is a common collection point.
Ensure you have the correct clamps for reassembly. Worm-gear clamps are common and provide even compression around the duct. Have them ready so that once the main vent is clean, reconnecting is quick and secure.
Checklist: Main Vent Duct
Assemble the brush rods to match the length of the vent. Feed the brush into the duct, rotating as you advance, then retract periodically to vacuum debris. Continue until you reach the exterior termination. If you feel resistance, you likely hit an elbow; ease through with controlled rotation rather than forcing the rod, which could separate a joint. When possible, remove the exterior hood and brush from both ends so you meet in the middle, ensuring no section remains unaddressed.
As you work, keep the area tidy by capturing lint in a trash bag. Lint is lightweight and easily airborne; controlling it during the process makes final cleanup easier and keeps fibers from settling on nearby surfaces.
Checklist: Exterior Hood
Inspect the exterior hood for free damper movement. Clean out lint and any debris from insects or birds. Replace damaged or sticking covers. Ensure the termination sits high enough above grade to avoid snow blockage in winter and that landscaping does not obstruct it during summer. A properly functioning hood is essential because even a small restriction here can undermine your entire cleaning effort.
After cleaning, operate the dryer briefly and confirm that the damper opens widely and closes properly when the cycle ends. If it barely moves, recheck for restrictions or consider a new hood with a smoother hinge mechanism.
Checklist: Reassembly and Testing
Reconnect the transition duct to both the dryer and wall collar, seating it fully and tightening clamps snugly without deforming the duct. Slide the dryer back carefully to maintain a smooth curve with no kinks. Plug in the dryer and, if applicable, reopen the gas valve. Run a short cycle and feel the exhaust at the exterior hood; it should be strong and steady. Back inside, listen for rattling that could indicate a loose connection.
Verify that the lint screen is completely dry and properly inserted. Some airflow issues after cleaning come from a damp or misaligned screen, which acts like a partial blockage.
Checklist: Routing Improvements
If your cleaning reveals multiple sharp elbows, long runs, or screws protruding into the airstream, consider improvements. Long-turn elbows reduce resistance, and rigid metal duct with taped external joints minimizes lint snags. Removing unnecessary length or straightening a path can dramatically improve performance and reduce future maintenance.
If your dryer sits close to a wall, a recessed dryer box can provide the needed space for a gentle transition curve, preventing compression each time the appliance is moved for cleaning.
Post-Cleaning Benefits
After a thorough cleaning, you should notice shorter dry times, more consistent heat, and a laundry room that does not feel excessively humid. These gains reflect restored airflow and less strain on the dryer’s motor and heating system. Over time, that translates into fewer repairs and longer appliance life. Many homeowners also report fewer wrinkles and less static in clothes, which can occur when dryers run too long on restricted vents.
From a safety perspective, removing lint from the vent and the lint screen housing reduces a potential ignition source. While no maintenance eliminates all risk, regular attention to the vent is one of the most effective preventive steps you can take in a home.
When to Call Professionals
Not every vent is DIY-friendly. Long, complex runs with concealed elbows, vertical roof terminations, or signs of severe compaction call for specialized tools and experience. Professional teams can apply high-powered vacuums and rotary brushes to clear stubborn deposits and verify results with airflow measurements. If you hit a wall—literally or figuratively—scheduling skilled dryer vent cleaning ensures the job is completed thoroughly and safely.
It can also be wise to bring in specialists after renovations. Drywall dust and construction debris can mix with lint to form tough, paste-like deposits that a standard brush smears rather than removes. A professional cleaning reestablishes a clean starting point.
Maintenance Cadence for Somerville Homes
For many households, annual cleaning is sufficient. Busy homes, large families, and pet owners benefit from a six-month cadence. Supplement deep cleanings with routine habits: empty the lint screen before every load, wash the screen periodically, and keep the area behind and under the dryer clean so loose fibers do not reenter the system. Seasonal checks of the exterior hood—watching for snow, ice, or vegetation—help preserve the airflow you have restored.
Track dry times after each cleaning. If cycles begin creeping longer again, move up your next cleaning or investigate for routing issues that a modest reconfiguration could solve.
FAQ
How long does a thorough cleaning take? For a straightforward vent with minimal elbows, expect about one to two hours. Complex runs or roof terminations take longer, especially if access requires extra care.
Is it safe to use screws on duct joints? Screws that penetrate the duct interior can catch lint. Prefer foil HVAC tape on external joints for a smooth interior surface.
Can I reuse my old transition duct? If it is semi-rigid metal in good condition, yes. If it is crushed, kinked, or made from thin foil or plastic, replace it with a better option.
What if the damper barely opens after cleaning? The hood may be damaged, or lint may remain at a nearby elbow. Reinspect and consider replacing the hood with a model that opens easily.
Why does the laundry room feel humid? Restricted exhaust traps moisture. Verify the vent path is clear, the lint screen is clean and dry, and the hood opens fully during operation.
How often should Somerville households clean the vent? Light-use homes often do well with annual cleaning; heavy-use homes benefit from semiannual service.
Can pests block the vent? Yes. Nests and debris are common at neglected terminations. Inspect and clean the hood regularly and replace broken covers promptly.
Make Your Next Laundry Cycle Safer and Faster
If you want a thorough, no-hassle result and validated airflow improvements, schedule professional dryer vent cleaning and enjoy dependable performance in your Somerville home.
